Official Luthiers Forum!

Owned and operated by Lance Kragenbrink
It is currently Mon Jul 28, 2025 10:19 am


All times are UTC - 5 hours


Forum rules


Be nice, no cussin and enjoy!


Post new topic Reply to topic  [ 47 posts ]  Go to page Previous  1, 2
Author Message
PostPosted: Tue Mar 29, 2011 9:20 am 
Offline
Koa
Koa
User avatar

Joined: Sat Aug 19, 2006 1:29 am
Posts: 1384
Location: United States
Stephen, I am doing them separately also. I have been using Olson's method of using a fake binding of teflon to install the purflings which has been working beautifully. I did add these steps to my build thread if anyone is interested in seeing it. Certainly not the only way to do it but it has been working well for me.

_________________
Burton
http://www.legeytinstruments.com
Brookline, MA.


Top
 Profile  
 
PostPosted: Tue Mar 29, 2011 9:37 am 
Offline
Mahogany
Mahogany
User avatar

Joined: Mon Feb 11, 2008 10:15 pm
Posts: 94
Location: Washington State
First name: Mark
Last Name: Schrier
State: Washington
Focus: Build
Status: Amateur
I don't see any mention of it yet, but I use TB-III. The one time I forgot and used TB-I for the first in a set, it was the only one that had any separation issues from the heat of the bender. The other three pieces came through just Jim Dandy.

I also glue the bindings on the body with TB-I and the LMI binding tape.

I just got done flooding a rosette with CA and am so glad the acetone was close by, or I would have glued my hands together! :o

Mark

_________________
A world without music would Bb.


Top
 Profile  
 
PostPosted: Tue Mar 29, 2011 10:06 am 
Offline
Contributing Member
Contributing Member
User avatar

Joined: Mon Mar 19, 2007 7:05 am
Posts: 9191
Location: United States
First name: Waddy
Last Name: Thomson
City: Charlotte
State: NC
Focus: Build
Status: Semi-pro
I have allergy issues with CA too, so I use as little as possible, though I do use it in some instances, in very small amounts and very carefully. My allergy started after gluing nails on for playing for a couple of years. Eventually, my fingers started to itch, terribly. Now, if I get it on my hands and touch my neck or a tender part of my face, I'll break out there. I am also, now, terribly allergic to the fumes as well, and will have sever asthma symptoms for several days if exposed to too much of it, particularly if I use an accelerator. My Asthma Specialist told me it's the Toluene in the products that are the kicker.

_________________
Waddy

Photobucket Build Album Library

Sound Clips of most of my guitars


Top
 Profile  
 
PostPosted: Tue Mar 29, 2011 10:25 am 
Offline
Koa
Koa
User avatar

Joined: Thu Jan 01, 2009 9:43 am
Posts: 601
Location: Bozeman, Montana
Focus: Build
Laurent,

Thank you for the info about maple and CA leaving a dark line. I did not think about the CA being the problem. I figured I just needed to do better work. ( I still can do better work for sure.) No more CA and maple!

_________________
http://www.booneguitars.com
https://www.facebook.com/pages/Stephen-Boone-guitar-builder/488208541257210


Top
 Profile  
 
PostPosted: Tue Mar 29, 2011 10:31 am 
Offline
Koa
Koa
User avatar

Joined: Thu Aug 25, 2005 4:49 pm
Posts: 1209
Location: Ukiah, CA
There is a lot of good advice here already but I'll add my 2 cents.

Gluing purfling lines on individual binding strips is a slow and sometimes messy process. I think Laurent's suggestions are the best if you wish to continue to do that. But I think that gluing up sheets and ripping your own bindings with the purfling on is the best way to go as Burton suggests. Maybe you could sell your bindings in the classifieds and move on.

I was having some issues with white residue in the pores with LMI white so I switched back to CA. It isn't good for light colored wood that's glued to light colored wood, as Laurent states, but it works fine for dark to light. I think the problems you are having with excessive cleanup have to do with too much glue and the wrong tape as has been suggested.

Also, I have come up with a method which eliminates most of the mess and time consuming clean up. I use green 3M tape to tightly fit the binding and purfling in place and get my miters fit. Then I take out a three inch section of tape and wick in the CA with a pipette from the top. I wipe any excess CA and retape the three inch section with strapping tape and then green tape. This keeps almost all of the CA from wicking along the tape. The strapping tape doesn't wick the CA much but it doesn't hold well so the green tape keeps things tight. After I take the tape off I CA the top and side of the binding carefully in case the CA did not wick in everywhere. I get a tighter fit and cleaner results with this method than I did with the method where I taped, tacked in CA, untaped and wicked in CA.

For scraping, I sand lightly first to keep from snagging on any glue bumps. I use a ground single edge razor blade instead of a scraper. When it dulls a quick trip to the grinder and I'm ready to go. I sand with a small ebony block when I'm pretty close to level.

The fish glue idea might be a good way to go for light to light wood.

_________________
Ken Franklin
clumsy yet persistent
https://www.kenfranklinukulele.com


Top
 Profile  
 
PostPosted: Tue Mar 29, 2011 11:41 am 
Offline
Contributing Member
Contributing Member
User avatar

Joined: Wed Aug 31, 2005 7:30 am
Posts: 1792
Location: United States
Filippo Morelli wrote:
Laurent, thanks for the lengthy and detailed reply. I am sorry to hear about the CA issues - may I ask what are the symptoms?
Essentially asthma symptoms (I do not have asthma). Last fall I had an episode after mildly using CA (gluing/joining a back and flooding the centre strip I think) where afterward I had intense running nose and eyes, tightness in the chest and difficulty breathing. It lasted all day, I had to leave the shop and rest. Awful. That's where I discovered that allergies can be cumulative, and in a nasty way. Of course one can use the more expensive odourless CA, however I am sure that it still has a somewhat negative effect for somebody already sensitised. I phased out using CA almost entirely.
I would advise those who already find the smell of CA objectionable to diminish its use to the bare minimum and find alternatives. Forget about pore-filling with CA…

Stephen Boone wrote:
Thank you for the info about maple and CA leaving a dark line. I did not think about the CA being the problem. I figured I just needed to do better work. ( I still can do better work for sure.) No more CA and maple!
It drove me crazy for a long time as I use a lot of thick curly maple lines. I had "almost" perfect joints on most guitars, but always that very faint darker line. Sometimes it would only appears while spraying the seal coat. I didn't see how I could do better: razor sharp chisels, magnifier, perfect before wicking the CA. When I switched back to TB1 I had perfect joints, all the time… Life is so simple.

_________________
Laurent Brondel
West Paris, Maine - USA
http://www.laurentbrondel.com/


Top
 Profile  
 
PostPosted: Tue Mar 29, 2011 8:42 pm 
Offline
Brazilian Rosewood
Brazilian Rosewood
User avatar

Joined: Sat May 22, 2010 10:32 am
Posts: 2616
First name: alan
Last Name: stassforth
City: Santa Rosa
State: ca
Zip/Postal Code: 95404
Country: usa
Focus: Build
Status: Amateur
Somebody told me that when you use kicker with CA, you create cyanide vapor.
I got a hit of that once and it didn't feel good.
Use a mask, or don't breath while using it.
I got a pretty good job with a maple on maple binding job with the tb1.
Blond on blond is hard.


Top
 Profile  
 
PostPosted: Tue Mar 29, 2011 10:46 pm 
Offline
Koa
Koa

Joined: Fri Mar 31, 2006 4:54 pm
Posts: 713
Location: United States
First name: nick
Last Name: fullerton
City: Vallejo
State: ca
Zip/Postal Code: 94590
Country: usa
Focus: Build
Status: Amateur
thanks for all the info y'all. I think you were reading my mind as to what stage I'm on with this latest build. How does that happen? I just spent the day re doing my binder routing setup, and then ripping small strips and bending them. Haven't even done any body purflings yet and this is my first try at "staircase" routing :shock:

_________________
"Preoccupation with an effect gives it power and enhances the error"
from "Your Owner's Manual" by Burt Hotchkiss.


Top
 Profile  
 
PostPosted: Wed Mar 30, 2011 12:34 pm 
Offline
Contributing Member
Contributing Member

Joined: Fri Jan 25, 2008 9:51 pm
Posts: 1134
Location: Albany NY
First name: David
Last Name: LaPlante
Status: Professional
Filippo, I would echo much of what has been said here, glue up veneers and strip your bindings out from stock, stop using CA, I think it's far too aggressive for this particular job as well as horrible clean up against spruce etc.
I use fish glue and only use as much tape (common garden variety masking) as is needed to hold the bindings until I can "Bind" with cloth tape, which is really what provides the pressure to hold them. I always remove the tape immediatly once the cloth tape is on to facilitate the drying of the glue.
I use swedish style knives:
http://www.traditionalwoodworker.com/Mo ... 5Qoda16mcw
for scraping the bindings flush with the sides and a file to level them with the top and back before sanding. The curvature of the blade allows you to precisely remove wood only where you want and the handle allows better control of the blade angle and well as comfort.
Attachment:
binding-003.jpg


You do not have the required permissions to view the files attached to this post.


Last edited by David LaPlante on Wed Mar 30, 2011 2:02 pm, edited 1 time in total.

Top
 Profile  
 
PostPosted: Thu Mar 31, 2011 1:12 am 
Offline
Koa
Koa
User avatar

Joined: Tue Jan 20, 2009 12:41 am
Posts: 606
Location: LaCrosse WI
First name: Jason
Last Name: Moe
City: LaCrosse
State: WI
Zip/Postal Code: 54601
Country: USA
Focus: Build
Status: Semi-pro
green tape rules...thats it...Jason

_________________
Jason Moe
LaCrosse WI 54601


Top
 Profile  
 
PostPosted: Thu Mar 31, 2011 8:04 am 
Offline
Brazilian Rosewood
Brazilian Rosewood

Joined: Fri Dec 14, 2007 3:21 pm
Posts: 3445
Location: Alexandria MN
This has been one of the best threads we've had in a while.

_________________
It's not what you don't know that hurts you, it's what you do know that's wrong.


Top
 Profile  
 
PostPosted: Thu Mar 31, 2011 8:34 am 
Offline
Koa
Koa
User avatar

Joined: Mon Feb 18, 2008 10:01 pm
Posts: 1655
Location: Jacksonville Florida
First name: Chris
City: Jacksonville
State: Florida
Focus: Build
Status: Amateur
Terence Kennedy wrote:
This has been one of the best threads we've had in a while.


+1

_________________
There is no difference between the man that thinks he can....and the man that thinks he cannot.


Top
 Profile  
 
PostPosted: Thu Mar 31, 2011 9:46 am 
Offline
Contributing Member
Contributing Member
User avatar

Joined: Fri Feb 01, 2008 8:47 am
Posts: 1244
Location: Montreal, Canada
Focus: Build
Status: Amateur
I'm also in the camp of:

- Make your bindings from stock
- Don't use CA (I use titebond)
- Only three pieces of green tape to hold things in place until I wrap with rubber band.

_________________
Alain Moisan
Former full time builder of Acoustics, Classicals and Flamencos.
(Now building just for fun!)


Top
 Profile  
 
PostPosted: Thu Mar 31, 2011 11:42 am 
Offline
Cocobolo
Cocobolo

Joined: Thu Mar 19, 2009 10:52 am
Posts: 133
State: PA
Country: USA
Focus: Build
Status: Amateur
+1 on strapping tape. I cut about 50 pieces before I start & stick them around the edges of a 2'x2' piece of Masonite for easy access in the heat of battle.


Top
 Profile  
 
PostPosted: Thu Mar 31, 2011 12:34 pm 
Offline
Contributing Member
Contributing Member

Joined: Wed Apr 23, 2008 7:16 pm
Posts: 146
I like strapping tape also. I think I'm using LMI's white glue here:

Image

Image

Setting up the tape beforehand made the process a lot smoother for me.


Joe


Top
 Profile  
 
PostPosted: Fri Apr 01, 2011 2:26 am 
Offline
Koa
Koa

Joined: Fri Mar 31, 2006 4:54 pm
Posts: 713
Location: United States
First name: nick
Last Name: fullerton
City: Vallejo
State: ca
Zip/Postal Code: 94590
Country: usa
Focus: Build
Status: Amateur
just tried doing it the wrong way but it's interesting. Don't have any CA glue left so I used titebond 1. What the heck I'll share a pic:

I found that with titebond I can wait for it to dry and then use an iron to heat up and clamp flush any gaps. The result is far from perfect in some areas, but not bad for my first try at purflings.


You do not have the required permissions to view the files attached to this post.

_________________
"Preoccupation with an effect gives it power and enhances the error"
from "Your Owner's Manual" by Burt Hotchkiss.


Top
 Profile  
 
PostPosted: Fri Apr 01, 2011 8:15 pm 
Offline
Contributing Member
Contributing Member

Joined: Wed Jul 02, 2008 11:44 am
Posts: 1005
Location: SE Michigan
First name: Kenneth
Last Name: Casper
City: Northville
State: MI
Country: U.S.A
Focus: Build
Good thread! I use either Titebond or CA. I like a lot of things about CA, but there is one thing I have to really watch out for. Light sawdust that gets into a seam appears much more visible when using CA than Titebond. Thin CA has no gap filling ability, so even with fairly tight joints, I will occasionally get a hairline gap. When using Titebond, the glue fills these narrow voids. However, with CA, sawdust from sanding and leveling can get in there. These sawdust specks breakup an otherwise invisible joint. I have yet to figure out this aspect of CA.

Ken

_________________
http://www.casperguitar.com


Top
 Profile  
 
PostPosted: Mon Apr 04, 2011 8:12 pm 
Offline
Cocobolo
Cocobolo

Joined: Tue Nov 27, 2007 2:36 am
Posts: 241
Location: Magnolia, Texas
First name: Chuck
Last Name: Gilbert
Focus: Build
Status: Semi-pro
Very timely thread as I just finished the binding chore on a new build. I use the CA method with the brown binding tape from LMI and and make at least 3 passes around the binding wicking extremely small amounts of CA (less than you think would work) in on each pass and waiting about 5 minutes (or 2 songs on the shop guitar, whichever is longer) between passes. When I first started, I had the common problem of too much glue under the tape. Now that problem is much less. It's amazing just how far thin CA will wick and how little you really need to use.

After removing the tape, I make initial passes around the binding with P220 grit disks on a random orbit sander, moving the sander pretty quickly and being careful not to tip it in towards the top or back (ask me how I know this [headinwall] ). This gives be an initial flat (sort of) surface on all of the glue spots and bumps and a well sharpened scraper makes short work of the rest. The most important part of this is the "well sharpened" part. If it does not easily produce long, fine curls of material, it isn't sharp enough.

As for the side purflings, I usually use WBW and a method similar to Laurent (I use original Titebond for this) except that I squeze the entire length in the vice (a parrot vice) one 2 inch segment at a time and hold each section for a count of 5. Those take a couple of minutes each and I do something else while they dry, maybe for a few hours.

There is a lot of great information in this thread. Best read in a while....

Chuck

_________________
"To live a creative life, we must lose our fear of being wrong"
- Joseph Chilton Pearce


Top
 Profile  
 
PostPosted: Tue Apr 05, 2011 12:59 am 
Offline
Brazilian Rosewood
Brazilian Rosewood
User avatar

Joined: Tue Jan 25, 2005 6:16 am
Posts: 2692
Your work looks good, Filippo.

_________________
Howard Klepper
http://www.klepperguitars.com

When all else fails, clean the shop.


Top
 Profile  
 
PostPosted: Wed Apr 06, 2011 2:36 pm 
Offline
Cocobolo
Cocobolo

Joined: Sun Feb 13, 2005 2:47 am
Posts: 306
Location: Seattle
First name: Rick
Last Name: Davis
City: Seattle
State: WA
Country: United States
Focus: Build
Status: Professional
Not so many pics, but here's my procedure.

For side purflings, I use sheets of veneer and CA, which is more heat-resistant than Titebond etc. If I have a stick of binding wood, I'll glue it to the sheet with clamps and medium CA. If I have individual binding strips (hopefully a bit thick), I use thin CA and glue them on with a little space between each, then rip on the bandsaw and sand to thickness. Tape the binding/purflings together to support the glue joints and bend to shape. I have very few delaminate using this process.

Bevel the edges that join the guitar sides. Not much, just a few passes with 80 or 120 grit on a hard block. This allows for a less-than-perfect rabbet and almost guarantees a tight joint on the sides if you press the binding down. Also clean up the inside of the binding since bending usually raises fibers.

I glue up with Titebond or LMI and bind with heavy brown tape (similar to the Stew-Mac stuff), then if necessary wrap with rubber bands or, better, surgical tubing (mine is 7/16" with a 3/32" wall). I wouldn't consider hide glue (too finicky) or CA (too much chance of it wicking into the top and doesn't work with the next step).

My goal is have a perfect joint along the sides, even at the expense of some gaps on the back (or, less commonly, the top). I level enough to find problem areas and get out the heat gun.

Where there are gaps between body and binding, warm the area with the gun, work a little more glue into the gap, heat until the glue boils out. At that point, you probably can easily close the gap with tape or other binding material. The glue cools and you're done. Note that you cannot stretch the wood to close up areas where you bridge a curve, such as the waist or inside of cutaways. But it will compress around outside bends and in places where it tends to twist -- like the upper bouts on the back. If you're really sloppy, you may have to chase gaps around a bit but you should be able to close them eventually. The heat gun trick is great.

Clean-up is basically by scraper but don't forget about De-Glue-Goo. For those vulnerable areas of the top where the scraper pulls up fibers if you're not careful, D-D-G will save you a lot of grief.


Top
 Profile  
 
PostPosted: Thu Apr 14, 2011 9:53 am 
Offline
Cocobolo
Cocobolo
User avatar

Joined: Tue Oct 14, 2008 11:06 am
Posts: 372
one more way to attach a side purfling
monofilament line and CA works well even on a bent binding
Attachment:
P1030027 (640x480).jpg


You do not have the required permissions to view the files attached to this post.


Top
 Profile  
 
PostPosted: Thu Apr 14, 2011 1:49 pm 
Offline
Koa
Koa

Joined: Sat Nov 08, 2008 3:57 pm
Posts: 775
Location: Powell River BC Canada
First name: Daniel
Last Name: Minard
City: Powell River
State: BC
Country: Canada
I like working with CA on bindings/purflings. I can get a "perfect" fit before adding any glue, which takes a lot of the stress away. There's plenty of time to inspect the fit before you commit.
I like using the clear, re-enforced strapping tape, Todd mentions. You can see, immediately, if the CA is wicking under the tape.
Filippo, It sounds like you've figured out how to avoid CA wicking along the tape already...
After making a huge mess on the first one, I now tack glue the bindings in place between the tapes. Once the glue is dry, I remove all the tape & wick glue into the seams. Along the sides as well as around the top & back.
If you do get a big glue buildup, try using your scraper "on the flat". I wrap two layers of masking tape around one end of the scraper (to prevent scratches), then lay the scraper flat on the top or back with an inch or more hanging over the side. Holding the scraper down on the taped end, I grab the other end and swing it back & forth over the edge, varying the downward pressure. Since the scraper is registered on the top or back, it can't dig in or chatter & it won't round over the corner.
I use this method a lot, when working on an edge or a corner that needs truing up.
Works for me...
Great thread, by the way. Lots of good ideas here. Thanks Guys.


Top
 Profile  
 
Display posts from previous:  Sort by  
Post new topic Reply to topic  [ 47 posts ]  Go to page Previous  1, 2

All times are UTC - 5 hours


Who is online

Users browsing this forum: No registered users and 14 guests


You cannot post new topics in this forum
You cannot reply to topics in this forum
You cannot edit your posts in this forum
You cannot delete your posts in this forum
You cannot post attachments in this forum
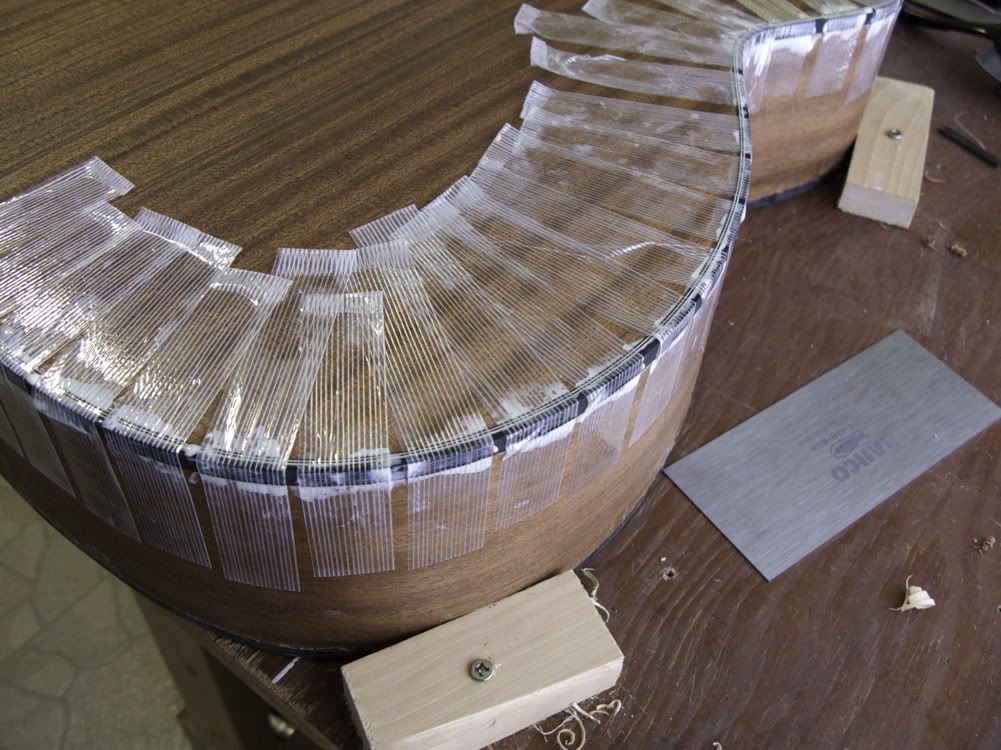
Jump to:  
Powered by phpBB® Forum Software © phpBB Group
phpBB customization services by 2by2host.com