Official Luthiers Forum!

Owned and operated by Lance Kragenbrink
It is currently Mon Jul 21, 2025 3:41 pm


All times are UTC - 5 hours


Forum rules


Be nice, no cussin and enjoy!


Post new topic Reply to topic  [ 16 posts ] 
Author Message
PostPosted: Mon Feb 14, 2011 9:10 am 
Offline
Contributing Member
Contributing Member
User avatar

Joined: Tue Aug 17, 2010 3:31 pm
Posts: 1682
First name: Kevin
Last Name: Looker
City: Worthington
State: OH
Zip/Postal Code: 43085
Country: USA
Focus: Build
Status: Amateur
I just started on my first heel & neck carving attempt. I only have straight chisels & pattern maker's rasps. I made some headway but I feel the right carving tools would help.

What do you use? Draw knives, spoke shaves? How big, what shape?

Thanks,
Kevin Looker

_________________
I'm not a luthier.
I'm just a guy who builds guitars in his basement.
It's better than playing golf.


Top
 Profile  
 
PostPosted: Mon Feb 14, 2011 9:23 am 
Offline
Brazilian Rosewood
Brazilian Rosewood
User avatar

Joined: Thu Jan 06, 2011 6:08 pm
Posts: 2712
First name: ernest
Last Name: kleinman
City: lee's summit
State: mo
Zip/Postal Code: 64081
Country: usa
Focus: Build
Status: Professional
Hi kevin there are many ways to do it.I use big belt sander, spokeshaves, small drwknife, sandpaper, rasps and files for the heels and three double bevel flat gouges 1.5 in 3/4 in and 1 in plus assorted carving knives, for neck/heel transitions , and 3 or 4 skew chisels around neck/headstock and tadpole rubber sanders. I also have a router jig that does a 3/4 in roundover on a classical guitar neck. regards ernie


Top
 Profile  
 
PostPosted: Mon Feb 14, 2011 9:35 am 
Offline
Contributing Member
Contributing Member
User avatar

Joined: Wed Aug 31, 2005 7:30 am
Posts: 1792
Location: United States
In no particular order:
- 1" chisel and mallet to knock out waste in a hurry
- large Dragon coarse rasp and cabinet file
- antique Stanley 151 spokeshave
- 2 custom knives (L & R, made with a #5 plane blade)
- a couple of cabinet scrapers
- 3' long 80 grit 3" belt
- small 1" engineer square
- flat and curved sanding blocks with assorted PSA sandpaper (120 and 220)
- good light and North window to check flatness, curves and profile


You do not have the required permissions to view the files attached to this post.

_________________
Laurent Brondel
West Paris, Maine - USA
http://www.laurentbrondel.com/


Top
 Profile  
 
PostPosted: Mon Feb 14, 2011 10:22 am 
Offline
Contributing Member
Contributing Member
User avatar

Joined: Fri Sep 09, 2005 7:51 am
Posts: 3786
Location: Canada
I rough the neck and heel in with a Kutzall 4 inch grinding disk on an angle grinder wow7-eyes 
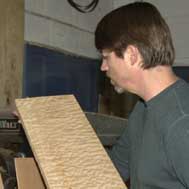
.... manual CNC !!! Then use a couple rasps and sometimes a block plane to even the neck shaft.

_________________
Tony Karol
www.karol-guitars.com
"let my passion .. fulfill yours"


Top
 Profile  
 
PostPosted: Mon Feb 14, 2011 11:42 am 
Offline
Contributing Member
Contributing Member
User avatar

Joined: Tue Aug 17, 2010 3:31 pm
Posts: 1682
First name: Kevin
Last Name: Looker
City: Worthington
State: OH
Zip/Postal Code: 43085
Country: USA
Focus: Build
Status: Amateur
Thanks for the replies.

I have a Nicholson 49 & 50 pattern maker's rasps. It looks like the Dragon has a lot more taper and is more convex which would work into the tight spots better.

Kevin Looker

_________________
I'm not a luthier.
I'm just a guy who builds guitars in his basement.
It's better than playing golf.


Top
 Profile  
 
PostPosted: Mon Feb 14, 2011 2:36 pm 
Offline
Brazilian Rosewood
Brazilian Rosewood

Joined: Thu Feb 12, 2009 10:27 pm
Posts: 2109
Location: South Carolina
First name: John
Last Name: Cox
Focus: Build
Status: Amateur
You would be surprised how well those Nicholsen rasps work out....
Just make sure you get a good quality unvarnished wood file handle.... There's nothing like shanking your wrist with a rasp handle..... The real advantage is that you can work the rasp about 20x harder with a proper handle.... The Unvarnished part also helps prevent blisters....

I do like my lee valley low angle spoke shave - but more for the shaft than the heel.....

I would also add some sanding sticks (Dowels and square wooden rods covered with sticky back sandpaper) and some cloth back 1" or 1.5" wide sandpaper in 80 grit, 120 grit, 150 grit, and 220 grit. You work the cloth back sandpaper back and forth over the neck like the old shoeshine motion... Really helps to smooth out those curves....

Thanks


Top
 Profile  
 
PostPosted: Mon Feb 14, 2011 7:08 pm 
Offline
Brazilian Rosewood
Brazilian Rosewood
User avatar

Joined: Mon Dec 27, 2004 9:42 pm
Posts: 4217
Location: Buffalo, NY
First name: Robert
Last Name: Cefalu
City: Buffalo
State: NY
Zip/Postal Code: 14217
Country: US
a few years back some one on the forum suggested using one of these for the heel with along with a rubber drum sander in the chuck. Works quite well. Good control and removes material pretty fast.
http://www.amazon.com/Eazypower-30167-40-Inch-Flexible-Extension/dp/B0009XAFXU

_________________
Beautiful and unusual tone woods at a reasonable price.
http://www.rctonewoods.com/RCT_Store
The Zootman
1109 Military Rd.
Kenmore, NY 14217
(716) 874-1498


Top
 Profile  
 
PostPosted: Mon Feb 14, 2011 7:24 pm 
Offline
Contributing Member
Contributing Member
User avatar

Joined: Fri Aug 26, 2005 5:49 pm
Posts: 2915
Location: Norway
I've gotten so sensitized to wood dust, that I like to use edge tools as much as possible for this. Draw knife, violin knife, rasps and files, before strips of 80 grit sanding belts for the final shaping. Final sanding 150-220 grit. I quite enjoy the draw knife though, makes me feel like a real woodworker, for once!

Image

_________________
Rian Gitar og Mandolin


Top
 Profile  
 
PostPosted: Mon Feb 14, 2011 9:14 pm 
Offline
Contributing Member
Contributing Member

Joined: Wed Mar 19, 2008 11:49 am
Posts: 897
Location: Northen Cal.
Arnt, you are one person that I have NO doubt is a "real" woodworker.


On the cloth backed shoe shine sandpaper trick you can use regular sandpaper and stick duct tape to the back.

L.

_________________
Cut to size.....Beat to fit.....Paint to match.


Top
 Profile  
 
PostPosted: Mon Feb 14, 2011 10:43 pm 
Offline
Contributing Member
Contributing Member
User avatar

Joined: Wed Oct 22, 2008 9:31 pm
Posts: 1877
First name: Darryl
Last Name: Young
State: AR
Country: USA
Focus: Build
Status: Amateur
Arnt, that sure looks scary! I know you know what you are doing........but I could see me burying that draw knife too deep and ruining the neck. I've not yet made a neck myself but want to one day. Likely will do at least a couple more builds before I tackle making a neck.

Arnt Rian wrote:
I've gotten so sensitized to wood dust, that I like to use edge tools as much as possible for this. Draw knife, violin knife, rasps and files, before strips of 80 grit sanding belts for the final shaping. Final sanding 150-220 grit. I quite enjoy the draw knife though, makes me feel like a real woodworker, for once!

Image

_________________
Formerly known as Adaboy.......


Top
 Profile  
 
PostPosted: Tue Feb 15, 2011 12:45 am 
Offline
Brazilian Rosewood
Brazilian Rosewood

Joined: Fri Dec 14, 2007 3:21 pm
Posts: 3444
Location: Alexandria MN
I found this picture I took a couple of years ago and it pretty much shows most my tools for a neck. I do the preliminary shaft and heel taper with drill press RoboSander jigs. I use the Nicholson 49 and 50 rasps and sanding sticks to shape the profile at the 1st and 10th frets (for a 14 fret neck) and blend in the headstock with the rasps, and a smaller Grobet rasp (http://www.toolsforworkingwood.com/inde ... ST-GROBDET). I use the Grizzly pneumatic sanding drums and the rasps to shape the heel and blend it into the shaft. Finally I hog off the excess between the profiled areas at 1 and 10 with a Dynabrade and use a flat wood sanding block to true up the shaft and transitions but quite honestly with a stiff pad the Dynabrade gets it pretty close. Final touch up with scrapers, and the usual assortment of sanding blocks. The PC 330 Speed-Bloc sander is really nice to follow the curves of the heel and headstock transitions to get rid of rasp scratches.

Image

One thing for sure, when you think you're done, set it aside and comeback in the morning and look at it. There's always something. It's amazing how sensitive your fingers are a finding little bumps and hollows or an uneven transition.

_________________
It's not what you don't know that hurts you, it's what you do know that's wrong.


Top
 Profile  
 
PostPosted: Tue Feb 15, 2011 3:23 am 
Offline
Koa
Koa

Joined: Fri Mar 31, 2006 4:54 pm
Posts: 713
Location: United States
First name: nick
Last Name: fullerton
City: Vallejo
State: ca
Zip/Postal Code: 94590
Country: usa
Focus: Build
Status: Amateur
Now that's a cool set up! Let us not forget the importance of that bandsaw. I discovered on my second neck that cutting off as much as I could before shaping was especially helpful. Initially I was a bit fearful of this and made too much work for myself. My neck holding jig is primitive, but I don't really use it much anyways, finding I do most shaping with the neck either in my hand or clamped in a vice. Spokeshave, rasp, cabinet scraper, and sanding block get alternately used. It's nice to have all the options to switch between.


You do not have the required permissions to view the files attached to this post.

_________________
"Preoccupation with an effect gives it power and enhances the error"
from "Your Owner's Manual" by Burt Hotchkiss.


Top
 Profile  
 
PostPosted: Tue Feb 15, 2011 6:54 am 
Offline
Brazilian Rosewood
Brazilian Rosewood

Joined: Wed Apr 08, 2009 9:34 am
Posts: 3081
Just about exactly the same as Terry does. I also use my 6 X 89 belt to start.


Top
 Profile  
 
PostPosted: Tue Feb 15, 2011 9:09 am 
Offline
Contributing Member
Contributing Member
User avatar

Joined: Tue Aug 17, 2010 3:31 pm
Posts: 1682
First name: Kevin
Last Name: Looker
City: Worthington
State: OH
Zip/Postal Code: 43085
Country: USA
Focus: Build
Status: Amateur
Wow, this clearly looks like a case of "Different Strokes".

I've been working at it with a 1" chisel, #49 rasp & some 80 grit.

At first I was dreading it but it's turning out to be fun & very rewarding.

I want to end up with a Martin look but right now it's more like a clunky interpretation of a Gibson.

Thanks again for the replies.

Kevin Looker


You do not have the required permissions to view the files attached to this post.

_________________
I'm not a luthier.
I'm just a guy who builds guitars in his basement.
It's better than playing golf.


Top
 Profile  
 
Display posts from previous:  Sort by  
Post new topic Reply to topic  [ 16 posts ] 

All times are UTC - 5 hours


Who is online

Users browsing this forum: rbuddy, Treenewt and 32 guests


You cannot post new topics in this forum
You cannot reply to topics in this forum
You cannot edit your posts in this forum
You cannot delete your posts in this forum
You cannot post attachments in this forum

Jump to:  
Powered by phpBB® Forum Software © phpBB Group
phpBB customization services by 2by2host.com