Well, I sort of don’t know where to start with this one. It’s been a very long time in the making for me. This is a long story and worth writing if you don’t mind reading about it. If you do, scroll down to the pictures, hope those will be of interest.
OK, Back in December 2005, Bob “The Zootman” Cefalu posts pictures of some incredible Imbuia, asking if anyone saw a face in the wood. Lots of comments come on what people saw but I jumped on the email and told Bob I wanted that wood.
It sat in my shop for 5 months when a friend of mine asked me if I would make a guitar for her. This was late spring 2006. I said I’d be happy to and that I had a rather special set of wood that she might like. So I showed her the Imbuia and she really liked it. Now, she’s of Scottish heritage and she wanted a Celtic sounding guitar. So I thought that we would couple the Imbuia with Cedar, a nice warm sounding guitar I though. She also wanted lots of Celtic inlays on the guitar.
So I started planning the guitar out. I drew up plans of the guitar with the inlays and sent them over to her. She just said they looked cool and for me to enjoy the journey and make her what my heart wanted to, based on the Celtic theme.
So, I got to work on the guitar, started it in June 2006. I was in for a journey. Here’s the way this guitar went before I finished it this past week.
Started by wanting to make the rims. I was using a light bulb bender at the time and it worked great for EIR but that’s all I’d ever worked with before. Well, the Imbuia was totally different. I broke the first set of sides while trying to bend. I called up Bob and he sent me out another set of wood and I started to sand them. Ya, when sanding, one of the pieces hopped up from my push board and shot back at the handle of m push board and broke into 50 pieces or so.....”Bob, do you have another set of Imbuia sides, I broke another piece...” Yes, Bob had another set of sides and sent them to me.
This is when I built my new side bender, got a heating blanket and spring steel slats. The sides bent wonderfully. I go the cutaway bent and assembled the rims. This was now sometime in the Summer of 2006.
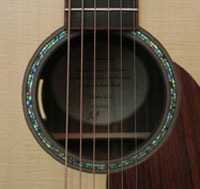
I got the back thicknessed and braced up with no issues and it was ready to attach to the rims, I wanted to get the top ready to attach to the rims too, so I started working on the rosette. Well, that was a nightmare for me. First I inlayed the Gold MOP Celtic rosette (which you can get from Andy DePaul) upside down. I didn’t know that the Gold doesn’t go through the shell all the way, and when I had finished, I had a nice white MOP Celtic rosette instead of a gold one. Well, you know what I did? I pulled all the pieces out and started to inlay them by hand, piece by piece into the top. It turned out ok till I tried and filling it with blackened epoxy. It was a nightmare again, smearing black epoxy over the top and everywhere, honestly. AGHHHHH!!!!!! I started to sand down the rosette and well, of course I sanded through much of the gold shell to the while pearl and the top was getting thin with still a bunch of black epoxy on the Cedar and the rosette looks like crap. That top hit the floor and I ordered another rosette.
This time, I pulled the rosette off the backing board right and inlayed it into a new top. I scrapped the epoxy this time and decided that I would try ebony dust and CA. Well that was a total nightmare. In order to fill all those cavities....well let me just say that I didn’t do it right and I used way to much Ca and it started to get the top really hot and it actually warped the top. When the CA cured I started sanding down the dust/CA filler and due to the warping of the top, I sanded the upper bout way to thin (like down to 0.060”) and I was getting really frustrated thinking I’d never get this thing right. That top hit the floor and I ordered another rosette.
I now put this guitar aside, feeling like I was biting off way more than I could chew (this happens to big mouths like me sometimes).
Came back to the guitar in early 2007. Well now that the back had gone through a few seasons with some humidity changes, it was pretty flattened out so I pulled the braces off it and waited till I was ready to brace up the top.
Take 3 on the rosette went great. I got some advice from Ron Wisdom, who had inlayed the same type of rosette on one of his guitars. It all worked out fine and I could finally brace up the top and get it on the rims. I think we are just into 2007 at this point.
So, I had this idea in my mind for a bracing pattern. So I set to work getting this done. Voiced and ready to attach to the rims, I braced up the back and got it all glued to the rims. It was a box finally.
Well, I took a rather long break from the shop in late spring of 2007, actually it was a nine month break due a very difficult pregnancy my wife (and I and our other kids) went through. Shop time came to a full stop. I didn’t get back at this guitar till spring of 2008.
I started to work on the bindings, bending Ebony is not very fun I found out. I broke a few sets but the really hard part was the cutaway. I must have broken 5-6 pieces just tring to get it bent. Finally I decided to use black fibre 0.020” thick, stacked up on the cutaway. It worked pretty good to my surprise.
OK, so now I got the body all done, onto the neck. A few other life moments keep me out of the shop again and I found myself putting this guitar on hold, again!
I think I got back to it in late 2008 or early 2009. I got the headstock inlay done and then the neck sat again. I finished off a guitar for a friend of mine while I pondered how I was going to inlay the “Trinity” knots on the fret board. This took me to spring of 2009, when I lost my job and ventured out on starting my own company.....well, there goes the motivation to get into the shop. I was so exhausted with my day job that I had no motivation to go out to the shop.
Finally, winter of 2009/2010 I got motivated enough to get the fret board inlayed and then the neck come together rather quickly. I found myself ready to finish the guitar in mid February 2010. As I was spraying shellac seal coat on the body, I dropped it and it hit the floor and fractured the top and binding very badly at the lower bout. I cut out the fractured portion of the top, it was about 1/2-5/8” wide and I inlayed another piece of cedar from the off cut of the board. It was a pretty seamless repair but I could still see a slight difference in the wood color.
This guitar was killing me. I just had to get it done. So I sprayed it and waited to buff it out (by hand), than attach the neck. This was April 2010.
So, I attached the neck, got the bridge located and attached it, I installed the frets, levelled and polished and it was ready for a saddle and nut. I had a friend over the night I was stringing it up for the first time.
Now remember, I had tried a new bracing layout. It was braced really lightly and I found out very quickly after the strings went on that it was just way to lightly braced. With the strings on, up to concert pitch, the top rose, and rose and the bridge rolled forward and forward and even separated from the top just a the back of the belly.
This was total top failure, right before my eyes. It happened over a period of about 1 hour, but let me tell you, for that 1 hour I was hearing something that I had never heard before. What an amazing sounding guitar.....
Too bad it was a total failure of a bracing pattern.
So, instead of smashing the guitar into 100 pieces right then and there, I set it aside for a month. Then I removed the top (#3) and cut the rosette out, which I needed to salvage for the next new top.
I got to work on top #4, getting down in my stash of cedar now. I got the rosette inlayed and it turned out. I braced the top as I had done on my other guitars, with only slight difference in that I tapered the braces from near the X intersection out to nothing at the edge of the liners. This instead of scalloped braces.
I got the top glued back on the rims, bindings bent, dang, I had another piece of ebony to try for the cutaway. I actually tried again but to no avail, I couldn’t bend that ebony for the cutaway. I broke3 more pieces. So, I bent a piece of EIR and after installing it and levelling it, I died it black with Indian ink.
OK, so now I’m back to the finishing stage, this is now October 2010. I sanded all the previous finish off the back and sides and the neck too as I cooked the finish when taking the neck off.
Into the booth, spray spray spray.... then the wait. Level sanded (you saw some pictures of that) and used my buffer for the first time.
Got the neck and bridge glued on just a couple weeks ago and I let it sit for 3 days before I could get strings on it.
I was now at the home stretch, rounding third, I could see the summit.......I put the nut and saddle in place, put the tuners back in place and got out a set of strings.....
HOLY CRAP was I ever nervous. After all this, I was again putting strings on this guitar. Would it survive? Would it sound ok? I was pretty confident in the bracing that I did as I have several other guitars with the same bracing and they are all holding up just fine. But I was still nervous.
Moment of truth. Stings went on, pulled up to concert pitch and beyond the normal popping and creaking, everything was fine. The top hardly moved. So, I let it sit with high action, a flat saddle etc for 3 days. Of course I played it and the sound started to open up (gotta love Cedar for this) and I was thinking it might be my best sounding guitar yet.
So, this past Tuesday, November 23, I did the final set up on it. Got the action nice and low as I my customer wanted, got the intonation all dialled in (Love the Petterson strobe tuner for iPhone) and did a final polish.
My wife took pictures of the guitar this morning and at 8pm tonight, I delivered the guitar to my friend Donelda.
What an amazing journey of trial, stupidity (on my part) and perseverance. I totally love this guitar and want to build another one right away. But I hope I never go through these types of challenges again.
Thanks for sticking with me on this. Now onto the pictures, there aren’t many but they are good


And finally a sound file for this guitar. This is not my playing as I'm pretty much a hack. This is the guitar with a flat EQ and slight compression to remove background noise. This is my friend who is quite a good player. I'm very happy with the recording. Enjoy.
https://app.box.com/s/iol8g5o5dkhhsyf3oxm4


![[clap]](./images/smilies/smiley32.gif "adulations")


![[:Y:]](./images/smilies/smiley20.gif "Thumbs Up") to the Mrs. and her photography skills.
to the Mrs. and her photography skills.