Official Luthiers Forum!Owned and operated by Lance Kragenbrink |
| It is currently Mon Aug 11, 2025 4:28 am |
|
All times are UTC - 5 hours |
 
|
Page 1 of 1 |
[ 22 posts ] |
|
| Author | Message | ||||||
|---|---|---|---|---|---|---|---|
| WaddyThomson |
|
||||||
Joined: Mon Mar 19, 2007 7:05 am Posts: 9191 Location: United States First name: Waddy Last Name: Thomson City: Charlotte State: NC Focus: Build Status: Semi-pro |
|
||||||
| Top | |||||||
| WaddyThomson |
|
||||||
Joined: Mon Mar 19, 2007 7:05 am Posts: 9191 Location: United States First name: Waddy Last Name: Thomson City: Charlotte State: NC Focus: Build Status: Semi-pro |
|
||||||
| Top | |||||||
| WaddyThomson |
|
||||||
Joined: Mon Mar 19, 2007 7:05 am Posts: 9191 Location: United States First name: Waddy Last Name: Thomson City: Charlotte State: NC Focus: Build Status: Semi-pro |
|
||||||
| Top | |||||||
| WaddyThomson |
|
||||||
Joined: Mon Mar 19, 2007 7:05 am Posts: 9191 Location: United States First name: Waddy Last Name: Thomson City: Charlotte State: NC Focus: Build Status: Semi-pro |
|
||||||
| Top | |||||||
| WaddyThomson |
|
||||||
Joined: Mon Mar 19, 2007 7:05 am Posts: 9191 Location: United States First name: Waddy Last Name: Thomson City: Charlotte State: NC Focus: Build Status: Semi-pro |
|
||||||
| Top | |||||||
| WaddyThomson |
|
||||||
Joined: Mon Mar 19, 2007 7:05 am Posts: 9191 Location: United States First name: Waddy Last Name: Thomson City: Charlotte State: NC Focus: Build Status: Semi-pro |
|
||||||
| Top | |||||||
| Stephen Boone |
|
||||||
Joined: Thu Jan 01, 2009 9:43 am Posts: 601 Location: Bozeman, Montana Focus: Build |
|
||||||
| Top | |||||||
| SteveSmith |
|
||||||
Joined: Wed Oct 08, 2008 11:36 am Posts: 7473 Location: Southeast US City: Lenoir City State: TN Zip/Postal Code: 37772 Country: US Focus: Repair |
|
||||||
| Top | |||||||
| WaddyThomson |
|
||||||
Joined: Mon Mar 19, 2007 7:05 am Posts: 9191 Location: United States First name: Waddy Last Name: Thomson City: Charlotte State: NC Focus: Build Status: Semi-pro |
|
||||||
| Top | |||||||
| Shane Neifer |
|
||||||
Joined: Thu Aug 04, 2005 7:50 am Posts: 3152 Location: Canada |
|
||||||
| Top | |||||||
| WaddyThomson |
|
||||||
Joined: Mon Mar 19, 2007 7:05 am Posts: 9191 Location: United States First name: Waddy Last Name: Thomson City: Charlotte State: NC Focus: Build Status: Semi-pro |
|
||||||
| Top | |||||||
| Miketobey |
|
||||||
Joined: Thu Dec 01, 2005 11:38 am Posts: 639 Location: United States |
|
||||||
| Top | |||||||
| WaddyThomson |
|
||||||
Joined: Mon Mar 19, 2007 7:05 am Posts: 9191 Location: United States First name: Waddy Last Name: Thomson City: Charlotte State: NC Focus: Build Status: Semi-pro |
|
||||||
| Top | |||||||
| douglas ingram |
|
||||||
Joined: Wed Sep 26, 2007 12:55 am Posts: 1505 Location: Lorette, Manitoba, Canada First name: Douglas Last Name: Ingram City: Lorette State: Manitoba Country: Canada Focus: Build |
|
||||||
| Top | |||||||
| Jim Watts |
|
||||||
Joined: Thu May 12, 2005 5:46 am Posts: 2997 Location: United States |
|
||||||
| Top | |||||||
| Jim Kirby |
|
|||||
Joined: Tue Nov 29, 2005 11:44 am Posts: 2186 Location: Newark, DE First name: Jim Last Name: Kirby Focus: Build Status: Amateur |
|
|||||
| Top | ||||||
| WaddyThomson |
|
||||||
Joined: Mon Mar 19, 2007 7:05 am Posts: 9191 Location: United States First name: Waddy Last Name: Thomson City: Charlotte State: NC Focus: Build Status: Semi-pro |
|
||||||
| Top | |||||||
| Darrel Friesen |
|
||||||
Joined: Wed Jan 24, 2007 2:45 pm Posts: 1372 Location: Calgary, Canada Status: Amateur |
|
||||||
| Top | |||||||
| alan stassforth |
|
||||||
Joined: Sat May 22, 2010 10:32 am Posts: 2616 First name: alan Last Name: stassforth City: Santa Rosa State: ca Zip/Postal Code: 95404 Country: usa Focus: Build Status: Amateur |
|
||||||
| Top | |||||||
| John A |
|
||||||
Joined: Thu Sep 24, 2009 9:50 am Posts: 942 Location: Ellicott City, Md - USA First name: John Last Name: A Focus: Build Status: Amateur |
|
||||||
| Top | |||||||
| fric |
|
|||||
Joined: Fri Sep 18, 2009 3:11 am Posts: 140 State: Serbia Status: Semi-pro |
|
|||||
| Top | ||||||
| WaddyThomson |
|
||||||
Joined: Mon Mar 19, 2007 7:05 am Posts: 9191 Location: United States First name: Waddy Last Name: Thomson City: Charlotte State: NC Focus: Build Status: Semi-pro |
|
||||||
| Top | |||||||
|
|
Page 1 of 1 |
[ 22 posts ] |
|
All times are UTC - 5 hours |
Who is online |
Users browsing this forum: No registered users and 12 guests |
| You cannot post new topics in this forum You cannot reply to topics in this forum You cannot edit your posts in this forum You cannot delete your posts in this forum You cannot post attachments in this forum |


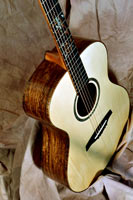
![[headinwall]](./images/smilies/headbangwalluf8.gif "Mad") Here is the open body awaiting the top, while I carve braces.
Here is the open body awaiting the top, while I carve braces.

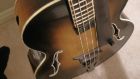
![[:Y:]](./images/smilies/smiley20.gif "Thumbs Up") And makes a great tutorial for anybody trying to remove a top for the first time.
And makes a great tutorial for anybody trying to remove a top for the first time.