Official Luthiers Forum!

Owned and operated by Lance Kragenbrink
It is currently Sun Aug 10, 2025 10:18 pm


All times are UTC - 5 hours


Forum rules


Be nice, no cussin and enjoy!


Post new topic Reply to topic  [ 32 posts ]  Go to page 1, 2  Next
Author Message
PostPosted: Wed Aug 04, 2010 9:54 am 
Offline
Contributing Member
Contributing Member
User avatar

Joined: Mon Mar 19, 2007 7:05 am
Posts: 9191
Location: United States
First name: Waddy
Last Name: Thomson
City: Charlotte
State: NC
Focus: Build
Status: Semi-pro
Well, I trashed the top on #5 last night, trying to fix a little problem... gaah 
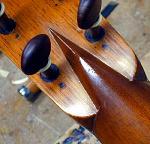
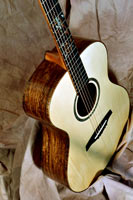
Multiple reasons, but in reality, it was my carelessness that caused it. This guitar has been a troublesome stack of errors and negligence! Anyway, some purfling lines, somehow, popped out when I was leveling them. It was pretty thin, and certainly may have been a bad glue job. In trying to repair that, I let my purfling cutter (the one I made) slip, and carved a nice cut across about 3" of the lower bout near the tail (very visible place). I was going to try to fix that, but realized that that cut would show, no matter what I did. Decided to add another purfling pair around the perimeter. It was really getting wider than I wanted, but I started by cutting a groove around the inside of the already wide purfling. Well, there is a degree of unevenness that limits my capabilities, and in removing sections, popped some Spruce. The whole thing was going to look like a mess, even if I got it done. Decided that replacing the top may be about as easy. Or, maybe not. I'm hoping i can salvage the rosette, and the TB's. If I can get the top off the TB's it would make re-topping a lot easier. I'll have to be careful removing though. Any Suggestions?

This was where it started. Looked minor. Tried to patch in a piece. Looked terrible. Decided to replace from the break point to the tail, and that's when things got out of hand. All my fault for not using a wrench to tighten my purfling cutter. It slipped when I was trying to slit along the purfling to keep it from chipping. Live and learn! [headinwall]
Attachment:
P1030941 (Large).JPG


You do not have the required permissions to view the files attached to this post.

_________________
Waddy

Photobucket Build Album Library

Sound Clips of most of my guitars


Top
 Profile  
 
PostPosted: Wed Aug 04, 2010 10:06 am 
Offline
Cocobolo
Cocobolo
User avatar

Joined: Mon Jan 03, 2005 7:06 am
Posts: 460
Location: United States
Waddy,

Here are a couple of tutuorials you might find useful.

http://www.grevenguitars.com/GrevenGuitars.html

http://www.guitar-repair.com/article_apr_09_retop.htm

_________________
Jimmy Caldwell
http://www.caldwellguitars.com


Top
 Profile  
 
PostPosted: Wed Aug 04, 2010 10:06 am 
Offline
Contributing Member
Contributing Member
User avatar

Joined: Thu Jun 12, 2008 6:59 am
Posts: 1964
Location: Rochester Michigan
Two words: inlaid ornament :D

I had a router slipup when routing the back binding channels on my first so I did this. Non-luthier friends say "cool man". Luthiers say, "cool coverup man, whadga screw up?"

You can put a corresponding inlay on the opposite side in the upper bout to make it look intentional.


You do not have the required permissions to view the files attached to this post.

_________________
http://www.birkonium.com CNC Products for Luthiers
http://banduramaker.blogspot.com


Top
 Profile  
 
PostPosted: Wed Aug 04, 2010 10:20 am 
Offline
Contributing Member
Contributing Member
User avatar

Joined: Mon Mar 19, 2007 7:05 am
Posts: 9191
Location: United States
First name: Waddy
Last Name: Thomson
City: Charlotte
State: NC
Focus: Build
Status: Semi-pro
Too late for creative ornamentation. It's much worse now, as I was trying to cut a new purfling groove, and it wasn't going well at all. It's a mess. Re-topping is the only solution. I'll check out those links. I'm familiar with the one where you rout the top out, but, alas, I don't think it's going to work for me. Bending by hand, and such, creates a bit of unevenness that precludes and exact route out of the top. Also, because it's a classical guitar, the top in the lower bout is only about 1.8 mm at the edges, while in the upper bout it's 2.5 at the edges. I guess I could just adjust as I go. Do the lower bout in one pass, then adjust for the upper bout. Might be worth a try. Don't know about the evenness of the thickness of the binding though.

_________________
Waddy

Photobucket Build Album Library

Sound Clips of most of my guitars


Top
 Profile  
 
PostPosted: Wed Aug 04, 2010 10:39 am 
Offline
Koa
Koa

Joined: Thu Sep 10, 2009 4:01 pm
Posts: 1887
Location: UK
Been there, done it . . . on more than one occasion. The good news is that it can all be fixed, it just depends if you want to spend the time on all the remedial work. I think I'd be tempted to remove the bindings and redo all the purfling, making sure the ledge is nice and flat and with clean edges. Sandpaper glued to small curved blocks help clean up the ledge. Chip outs in Spruce can be made virtually invisible if you have soundboard off cuts but it really is advisable to practice inlaying patches on off cuts first. In the process you learn some of the skills of the repairer/restorer.


Top
 Profile  
 
PostPosted: Wed Aug 04, 2010 11:13 am 
Offline
Contributing Member
Contributing Member
User avatar

Joined: Mon Mar 19, 2007 7:05 am
Posts: 9191
Location: United States
First name: Waddy
Last Name: Thomson
City: Charlotte
State: NC
Focus: Build
Status: Semi-pro
Thanks, Michael. I figured, it would happen one of these days. Just a matter of time. I have patched a couple of little chips on other guitars without issue, but this thing is beyond patching now. I'm committed to the salvaging of the guitar, though. I may replace the binding and purfling, but I think I'd like to re-top it first then take off the binding and side purflings. That would help keep it together, since my side bindings and purflings are so deep, due to the slipping of my router depth collar,when I was cutting them. If I can get a top in place, it'll reinforce the dentellones when I take off the binding and purfling. I don't know! I'll just have to see when I get there.

_________________
Waddy

Photobucket Build Album Library

Sound Clips of most of my guitars


Top
 Profile  
 
PostPosted: Wed Aug 04, 2010 11:15 am 
Offline
Koa
Koa
User avatar

Joined: Thu Feb 21, 2008 8:57 pm
Posts: 1982
Location: 8.33±0.35 kpc from Galactic center, 20 light-years above the equatorial in the Sol System
First name: duh
Last Name: Padma
City: Professional Sawdust Maker
Focus: Build
Mac Tack Waddy, mack tack , comes in assorted wood grains and in different colours too.
Peal the back off, slap it down, run some black duck tape around the edge, tuner her up and send on down the line.


blessings
the
Padma

_________________
.

Audiences and dispensations on Thursdays ~ by appointment only.


.


Top
 Profile  
 
PostPosted: Wed Aug 04, 2010 12:20 pm 
Offline
Contributing Member
Contributing Member

Joined: Fri Jan 25, 2008 9:51 pm
Posts: 1134
Location: Albany NY
First name: David
Last Name: LaPlante
Status: Professional
Hi Waddy, Sorry to hear.........Steve Kovacik's article on www.guitar-repair.com shows how you can trim the new top to the precise outline of the inside of the binding or purfling.
This is done with a router and the actual top removal can be done with hand tools.
Seems to me that this would enable you to preserve the glue blocks as they are as well as the geometry of the guitar. I would use the original binding edge to "trap" the top to glue it, then rout out the binding and redo to either match the back or redo both top and back binding/purflings.
The point of this on a restoration is to keep the original binding/purfling intact which can be impossible to match with modern materials.

In this case though since you can replace the bindng etc. the technique provides a way to preserve the most in terms of internal structure and geometry that you've created thus far.


Top
 Profile  
 
PostPosted: Wed Aug 04, 2010 12:34 pm 
Online
Contributing Member
Contributing Member
User avatar

Joined: Thu May 12, 2005 5:46 am
Posts: 2997
Location: United States
Ouch!
Waddy if you've already decided to trash the top you can easily remove it cleanly by routing it off with a rabbet cutter that cuts just a little wider than the width of you sides+linings, set at the depth of cut at the top thickness and go for it. I do this on experimental guitars steel strings though with the neck off. I think you'll have to get creative when dealing with a classical in the fingerboard area, it may need to be removed.
jim

_________________
Jim Watts
http://jameswattsguitars.com


Top
 Profile  
 
PostPosted: Wed Aug 04, 2010 12:39 pm 
Offline
Contributing Member
Contributing Member
User avatar

Joined: Mon Mar 19, 2007 7:05 am
Posts: 9191
Location: United States
First name: Waddy
Last Name: Thomson
City: Charlotte
State: NC
Focus: Build
Status: Semi-pro
Thanks, David. That is exactly what I would like to do. Preserve the innards, that is. I just need to "gut up" and do it! eek Thanks for the link.

Fortunately, Jim, I have not put on the fingerboard yet. Glad I didn't go ahead. I was getting ready to, then I thought, "Waddy, you'd better see what you can do with that repair before gluing more stuff on." One of the few smart things I have done on this one!

_________________
Waddy

Photobucket Build Album Library

Sound Clips of most of my guitars


Top
 Profile  
 
PostPosted: Wed Aug 04, 2010 12:46 pm 
Offline
Contributing Member
Contributing Member
User avatar

Joined: Mon Mar 19, 2007 7:05 am
Posts: 9191
Location: United States
First name: Waddy
Last Name: Thomson
City: Charlotte
State: NC
Focus: Build
Status: Semi-pro
Oh, no, Filippo! I made it much worse. Cut a 3" stripe about 2mm from the purfling across the tail. Then tried to add more purfling and made a mess when grooving for some additional lines. It ain't pretty! I didn't take a picture, but will before I start removing. That picture was just what started it.

_________________
Waddy

Photobucket Build Album Library

Sound Clips of most of my guitars


Top
 Profile  
 
PostPosted: Wed Aug 04, 2010 1:33 pm 
Offline
Contributing Member
Contributing Member
User avatar

Joined: Mon Mar 19, 2007 7:05 am
Posts: 9191
Location: United States
First name: Waddy
Last Name: Thomson
City: Charlotte
State: NC
Focus: Build
Status: Semi-pro
I'm learning that fast. I had to re-back #2 when I was doing it. I've trashed a few bridge blanks too. This'll be my first top. Unfortunately, it was a good one. Great tap when braced.

_________________
Waddy

Photobucket Build Album Library

Sound Clips of most of my guitars


Top
 Profile  
 
PostPosted: Wed Aug 04, 2010 2:36 pm 
Offline
Koa
Koa
User avatar

Joined: Sat May 02, 2009 2:59 pm
Posts: 593
First name: Marcus
Last Name: Bailie
City: Kirkland
State: WA
Focus: Build
I understand your frustration, Waddy. As I'm sure all of us do. I'm on my second binding install, myself. I almost reduced my current build to a pile of ashes in frustration over the weekend. In retrospect, I am glad I didn't, but I still hold to my guns thinking it would have been very therapeutic.

_________________
-Marcus
http://www.bailieguitars.com
Instagram | YouTube


Top
 Profile  
 
PostPosted: Wed Aug 04, 2010 3:16 pm 
Offline
Contributing Member
Contributing Member

Joined: Fri Jan 25, 2008 9:51 pm
Posts: 1134
Location: Albany NY
First name: David
Last Name: LaPlante
Status: Professional
Some additional thoughts Waddy,
If you keep your present binding for the time being (i.e. flush with the top). You can "drop in" the new one ever so slightly thicker then sand down to the level of the old binding to replicate your present top thicknesses.
Since the guitar is kept intact while the new top is "blocked up" above the old in order to precisely trim it to size and shaped with the router (using the sides of the guitar below as a guide) there is not much risk (beyond the new top blank) in givng this a try. Once the new top is trimmed so that it will "drop in" once the old one is removed, it's just a straightforward process of transferring or (maybe you should think about keeping the old one intact to make a smaller guitar with?) installing the rosette and bracing it up.


Top
 Profile  
 
PostPosted: Wed Aug 04, 2010 3:39 pm 
Offline
Contributing Member
Contributing Member
User avatar

Joined: Mon Mar 19, 2007 7:05 am
Posts: 9191
Location: United States
First name: Waddy
Last Name: Thomson
City: Charlotte
State: NC
Focus: Build
Status: Semi-pro
Thanks, David! Excellent points to keep in mind as I go forward.

_________________
Waddy

Photobucket Build Album Library

Sound Clips of most of my guitars


Top
 Profile  
 
PostPosted: Wed Aug 04, 2010 5:32 pm 
Offline
Brazilian Rosewood
Brazilian Rosewood

Joined: Tue Nov 29, 2005 11:44 am
Posts: 2186
Location: Newark, DE
First name: Jim
Last Name: Kirby
Focus: Build
Status: Amateur
Good luck with it, Waddy. I've had to take a back off myself, after realizing that the neck was set at entirely the wrong angle. Luckily, I've never trashed a top.

_________________
Jim Kirby
kirby@udel.edu


Top
 Profile  
 
PostPosted: Wed Aug 04, 2010 6:30 pm 
Offline
Brazilian Rosewood
Brazilian Rosewood

Joined: Tue Nov 29, 2005 11:44 am
Posts: 2186
Location: Newark, DE
First name: Jim
Last Name: Kirby
Focus: Build
Status: Amateur
Filippo,

I hear you. I think that's what people refer to as "slipping the heel" and I guess it's the standard way of doing a neck reset on a Spanish heel guitar. I think I was just in eek wow7-eyes [headinwall] gaah mode, and got a little over-active.

Think before you leap!

_________________
Jim Kirby
kirby@udel.edu


Top
 Profile  
 
PostPosted: Thu Aug 05, 2010 10:53 am 
Offline
Contributing Member
Contributing Member
User avatar

Joined: Mon Mar 19, 2007 7:05 am
Posts: 9191
Location: United States
First name: Waddy
Last Name: Thomson
City: Charlotte
State: NC
Focus: Build
Status: Semi-pro
NO one to run to around here! Well, no one I know well enough to run to, anyway. There are a couple of other classical builders in the area, but not in convenient locations. However, advice received here has been good in most every case. Can't say I've ever been steered wrong. Sometimes I had to choose my medicine, but none was wrong. It's nice to be able to choose the way you are most comfortable with. I planed and joined a new top (Shane's Lutz - man that's pretty stuff) last night. Shot a good joint with a plane for the first time, without the help of sandpaper! bliss Thanks, Todd, for the instructions at John's place, and for the "door prize" slanted shooting board. Worked great.
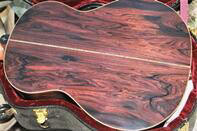
_________________
Waddy

Photobucket Build Album Library

Sound Clips of most of my guitars


Top
 Profile  
 
PostPosted: Thu Aug 05, 2010 12:54 pm 
Offline
Brazilian Rosewood
Brazilian Rosewood
User avatar

Joined: Mon Mar 06, 2006 10:10 pm
Posts: 2485
Location: Argyle New York
First name: Mike/Mikey/Michael/hey you!
Last Name: Collins
City: Argyle
State: New York
Zip/Postal Code: 12809
Country: U.S.A. /America-yea!!
Focus: Build
Status: Professional
Waddy if you put a piece of tape on the f.b. and mark the center line
and do the same at the butt(where the sides meet ) it will
help you allot in lining up a new top.
Mike ;)

_________________
Mike Collins


Top
 Profile  
 
PostPosted: Thu Aug 05, 2010 1:01 pm 
Offline
Contributing Member
Contributing Member
User avatar

Joined: Mon Mar 19, 2007 7:05 am
Posts: 9191
Location: United States
First name: Waddy
Last Name: Thomson
City: Charlotte
State: NC
Focus: Build
Status: Semi-pro
Thanks, Mike. Good pointers. This is a 5 piece neck, so center is easy to see, plus I have a notch in the sides at the neck that needs to fit. there.
Attachment:
P1030914 (Large).JPG


The tail needs to be centered. I'm hoping I can leave the bindings at full height and drop the top in place, then route the bindings off as David recommended, which leaves me with a top in the right place, as it will have a boarder to force it in place.


You do not have the required permissions to view the files attached to this post.

_________________
Waddy

Photobucket Build Album Library

Sound Clips of most of my guitars


Top
 Profile  
 
PostPosted: Thu Aug 05, 2010 1:34 pm 
Offline
Brazilian Rosewood
Brazilian Rosewood
User avatar

Joined: Mon Mar 06, 2006 10:10 pm
Posts: 2485
Location: Argyle New York
First name: Mike/Mikey/Michael/hey you!
Last Name: Collins
City: Argyle
State: New York
Zip/Postal Code: 12809
Country: U.S.A. /America-yea!!
Focus: Build
Status: Professional
Waddy ;
is it not the purfling mistake that makes you want to change the top?
Mc

_________________
Mike Collins


Top
 Profile  
 
PostPosted: Thu Aug 05, 2010 1:38 pm 
Offline
Contributing Member
Contributing Member
User avatar

Joined: Mon Mar 19, 2007 7:05 am
Posts: 9191
Location: United States
First name: Waddy
Last Name: Thomson
City: Charlotte
State: NC
Focus: Build
Status: Semi-pro
Yes, why?

_________________
Waddy

Photobucket Build Album Library

Sound Clips of most of my guitars


Top
 Profile  
 
PostPosted: Thu Aug 05, 2010 1:43 pm 
Offline
Brazilian Rosewood
Brazilian Rosewood
User avatar

Joined: Mon Mar 06, 2006 10:10 pm
Posts: 2485
Location: Argyle New York
First name: Mike/Mikey/Michael/hey you!
Last Name: Collins
City: Argyle
State: New York
Zip/Postal Code: 12809
Country: U.S.A. /America-yea!!
Focus: Build
Status: Professional
Is the top so dinged up that adding new binding & purfs.
would make it to thin or unstable ?

I must be missing something !
I'll read your posts over again!

Mike

_________________
Mike Collins


Top
 Profile  
 
PostPosted: Thu Aug 05, 2010 1:59 pm 
Offline
Contributing Member
Contributing Member
User avatar

Joined: Mon Mar 19, 2007 7:05 am
Posts: 9191
Location: United States
First name: Waddy
Last Name: Thomson
City: Charlotte
State: NC
Focus: Build
Status: Semi-pro
Here's the rub, Mike. I already have nearly 5 mm of purfling on a top with 8 mm dentellones. Plus, as I was trying to cut a slot, as I was going to add two more lines, that would account for my screw-up, I did some more damage. I was doing it with a chisel, and I got a bunch of chip out around the edges. Too close a job for the tools I had, I guess. I made a little chisel out of a jigsaw blade, but it's not very efficient. I can't take it any farther or there won't be any support under the purfs. Not sure I want to trust the top to hold up to that. There is some variability in thickness of the bindings, which makes it nearly impossible to get a clean cut with a purfling cutter to make a groove that is even enough to create the purfling channel. Anyway, that's my read of the situation. Believe me, I wasn't planning to re-top this sucker! I was ready to glue on the fingerboard and bridge and string it up.

_________________
Waddy

Photobucket Build Album Library

Sound Clips of most of my guitars


Top
 Profile  
 
PostPosted: Thu Aug 05, 2010 2:37 pm 
Offline
Brazilian Rosewood
Brazilian Rosewood
User avatar

Joined: Thu Mar 22, 2007 10:59 pm
Posts: 2103
Location: Bucharest, Romania
Country: Romania
Focus: Build
Status: Professional
My extra wide purfling scheme is nearly 5mm too but I use regular 5.5 linings....talk about building on the edge! I plan to switch to 6 maybe 6.5mm linings in the future but anyway you get the idea. As for extra thin chisels, i made a nice one from a 0.5mm sewing needle. Worked wonders for making room for a damaged veneer bit in a rosette.

Anyway if you actually have to retop... [xx(] you have my full sympathy.

_________________
Build log


Top
 Profile  
 
Display posts from previous:  Sort by  
Post new topic Reply to topic  [ 32 posts ]  Go to page 1, 2  Next

All times are UTC - 5 hours


Who is online

Users browsing this forum: No registered users and 15 guests


You cannot post new topics in this forum
You cannot reply to topics in this forum
You cannot edit your posts in this forum
You cannot delete your posts in this forum
You cannot post attachments in this forum

Jump to:  
Powered by phpBB® Forum Software © phpBB Group
phpBB customization services by 2by2host.com