Official Luthiers Forum!

Owned and operated by Lance Kragenbrink
It is currently Mon Jul 28, 2025 8:51 am


All times are UTC - 5 hours


Forum rules


Be nice, no cussin and enjoy!


Post new topic Reply to topic  [ 18 posts ] 
Author Message
PostPosted: Thu Apr 23, 2009 12:02 am 
Offline
Contributing Member
Contributing Member
User avatar

Joined: Tue Jan 04, 2005 10:03 am
Posts: 6680
Location: Abbotsford, BC Canada
Well, this might very well be the longest it's ever taken anyone to successfully install a rosette.

I started this guitar 3 years ago and I screwed up two separate tops and rosettes (all of the same design). I gave up on it for well over a year and I finally got the courage up to give it one last try.

The guitar that this is part of has a lot of Celtic inlays on it and the rosette for some reason really gave me grief. First time out, I sanded it down to far and most of it was not Gold MOP anymore :x strike 1. Second time I tried filling the gaps with ebony dust and CA. Well, that was a disaster and that was the first time I threw a piece at the wall (it didn't make it).

I finally asked someone who has done this rosette before how he did it. Now that I know, I'm sort of [headinwall] but it was a good lesson for me and in the end, it turned out great. It's not totally finished, I still have a few pin holes to fill (I better not screw that up :shock: )

A huge thank you to Ron Wisdom (AKA: Old Man) for helping me out with this rosette. I really appreciate it.

Oh, and if anyone is wondering, this rosette has about (guessing here) 250 pieces and they are all hand cut. It is supplied by Andy DePaule at DePaule Supply.

Thanks for looking.

Attachment:
Celtic Rosette.JPG


You do not have the required permissions to view the files attached to this post.

_________________
My Facebook Guitar Page

"There's really no wrong way, as long as the results are what's desired." Charles Fox

"We have to constantly remind ourselves what we're doing....No Luthier is putting a man on the moon!" Harry Fleishman

"Generosity is always different in the eye of the person who didn't receive anything, but who wanted some." Waddy Thomson


Top
 Profile  
 
PostPosted: Thu Apr 23, 2009 12:07 am 
Offline
Cocobolo
Cocobolo
User avatar

Joined: Fri Apr 13, 2007 12:52 am
Posts: 296
Location: Canada
First name: Cal
Last Name: Maier
City: Crossfield
State: AB
Country: Canada
Focus: Build
WOW! That looks great Rod. Well worth the wait, I'm sure.

Cal

_________________
Remember, there are no stupid questions, only stupid answers!


Top
 Profile  
 
PostPosted: Thu Apr 23, 2009 12:08 am 
Offline
Koa
Koa
User avatar

Joined: Tue Mar 14, 2006 4:08 pm
Posts: 1018
Location: Denver, Colorado
Rod, that is super cool. I'm glad you stuck with it. [clap] [clap] [clap]

_________________
Mike

"The Dude abides. I don't know about you but I take comfort in that. It's good knowin' he's out there. The Dude. Takin' 'er easy for all us sinners. Shoosh." The Stranger


Top
 Profile  
 
PostPosted: Thu Apr 23, 2009 1:29 am 
Offline
Contributing Member
Contributing Member
User avatar

Joined: Wed Feb 15, 2006 7:37 am
Posts: 4820
Wow! Good perseverance!


Top
 Profile  
 
PostPosted: Thu Apr 23, 2009 7:30 am 
Offline
Koa
Koa
User avatar

Joined: Sat Jan 03, 2009 7:08 pm
Posts: 524
Hey, i am building a guitar with that same DePaule rosette right now, what are the odds. I also had trouble with sanding through the golden topping in a few spots, its right on the surface in some places, and others it is a little bit thicker, dang. I am counting on coloring it during the finish process. Yours looks super good.

I really like all the stuff i have gotten from DePaule, i could cut all those little pieces myself, but then i would go insane and have to finish the guitar from inside the crazy house, and they don't let you have pointy tools there.

_________________
Jordan Aceto
Ithaca, NY


Top
 Profile  
 
PostPosted: Thu Apr 23, 2009 7:37 am 
Offline
Contributing Member
Contributing Member

Joined: Wed Jul 02, 2008 11:44 am
Posts: 1005
Location: SE Michigan
First name: Kenneth
Last Name: Casper
City: Northville
State: MI
Country: U.S.A
Focus: Build
Looks terrific Rod. So did you use tinted epoxy? What did you final settle on for gluing it in?

Ken

_________________
http://www.casperguitar.com


Top
 Profile  
 
PostPosted: Thu Apr 23, 2009 8:16 am 
Offline
Cocobolo
Cocobolo

Joined: Thu Feb 21, 2008 2:37 pm
Posts: 118
Location: Louisville, KY USA
I love it!!!

What was the wisdom imparted by the Old Man?
Walter

_________________
Walter Lay
"It's taken me so long, but now that I know
I can see. All that I do or say, is all I ever will be"
- Billy Joe Shaver


Top
 Profile  
 
PostPosted: Thu Apr 23, 2009 8:22 am 
Offline
Contributing Member
Contributing Member
User avatar

Joined: Wed Oct 08, 2008 11:36 am
Posts: 7473
Location: Southeast US
City: Lenoir City
State: TN
Zip/Postal Code: 37772
Country: US
Focus: Repair
Hey Rod, it looks great. So, what are the steps you went through to install it? For similar inlays, but on a much smaller scale, I place the inlay in place then use thin CA to lock it in. Next I use tinted epoxy to fill. I've never tried something with that many pieces before.

_________________
Steve Smith
"Music is what feelings sound like"


Top
 Profile  
 
PostPosted: Thu Apr 23, 2009 11:37 am 
Offline
Cocobolo
Cocobolo

Joined: Sat Mar 29, 2008 9:45 am
Posts: 430
I bought a DePaule rosette a while back, but haven't used it yet. I asked about using black epoxy and he said that would work fine. I think he was also the person that gave me a tip on using a light to provide a little heat on the epoxy to help prevent bubbles from creating holes in the epoxy.


Top
 Profile  
 
PostPosted: Thu Apr 23, 2009 11:45 am 
Offline
Contributing Member
Contributing Member
User avatar

Joined: Fri Nov 09, 2007 12:28 pm
Posts: 252
Location: Oakville, Ontario, Canada
Fantastic job Rod! I really like the look of Celtic knots but couldn't muster up the courage to try one of these on my first build. I would like to add a Celtic knot as a 12th fret marker though. Can you share with us what the secret to pulling this off is (i.e. what wisdom did your tutor share)? Any other pearls of wisdom relating to intricate inlay work this this?

TX!
Rick


Top
 Profile  
 
PostPosted: Thu Apr 23, 2009 12:05 pm 
Offline
Koa
Koa
User avatar

Joined: Wed Mar 18, 2009 6:27 pm
Posts: 1246
Location: Arkansas, USA
First name: Bill
Last Name: Hodge
Country: USA
Focus: Build
Status: Professional
Good job Rod. Perseverance produces victory, way to go. :) I've been contemplating one of these rosettes as well.
Good to know of their problematic tendencies.

_________________
Bill Hodge


One does not simply, own enough guitars!


Top
 Profile  
 
PostPosted: Thu Apr 23, 2009 12:16 pm 
Offline
Contributing Member
Contributing Member
User avatar

Joined: Tue Jan 04, 2005 10:03 am
Posts: 6680
Location: Abbotsford, BC Canada
Thanks folks. I'm really pleased with how its turned out.

Here's the way to install it.

First to remove the inlay from the backing board, put clear packing tape over top of the inlay and push it on as hard as possible. Than, cut the tape out so that only the inlay is covered. Even the gap at the top of the rosette. This of course helps to ensure it stays together right.

Next, take a pie plate or similar container (a deep plate would work fine) and put the inlay on the backing board in it. Pour hot water over top and let the white glue soften and the inlay will all lift right off the backing board, yet the packing tape will stay put.

Now the rosette is free to inlay.

Leave the top plate thicker than need be by 0.010-0.020". When cutting the channel, cut it deeper than the shell by 0.005-0.010", this way the shell will sit down in the channel and you can than level the top plate without sanding through the color of the inlay (that was my problem on the first try).

The first channel I cut was for the inner and outer purflings. I than installed the purfling lines, B/W/B. This inside black purfling line helps to make the black matrix around the shell 'even'. That's the best I can describe it.

After the purfling line is set, cut the rest of the channel, up to the inside black purfling line. Again, cut the channel for the shell deeper than the thickest piece of shell by 0.005-0.010". Now dry fit the shell.

Once happy with the fit, I filled the channel with black epoxy. I used ebony dust and a few drops of ink to make the epoxy black. Don't put to much epoxy in the channel, it's easier to fill the voids versus cleaning up a lot of dried epoxy.

Place the shell into the channel and press it down. I put a piece of wax paper over the shell, than a piece of plywood over top of that and clamped it in the go-bar deck.

When the epoxy is cured, scrape or sand to make it flat, but don't take to much of the top plate off. You don't want to sand down to the shell yet.

Than I masked around the entire purfling lines, both inside and outside and extending about 2" radius outside of the purfling line. This ensures I don't get epoxy all over the top.

Blow out the shell and fill the voids with more black epoxy. I used a piece of spruce cut to an edge as a trowel to spread the epoxy. Try not to leave much if any on the top of the shell. This will make clean up and leveling easier.

When the epoxy is set and hard, pull the tape off and level down to the shell.

That's it (sounds way more complicated than it is really).

Rick Cowan wrote:
Fantastic job Rod! I really like the look of Celtic knots but couldn't muster up the courage to try one of these on my first build. I would like to add a Celtic knot as a 12th fret marker though. Can you share with us what the secret to pulling this off is (i.e. what wisdom did your tutor share)? Any other pearls of wisdom relating to intricate inlay work this this?

TX!
Rick


Rick, I can hardly even be considered a rookie at inlay work. The biggest factor for any inlay work though is take your time, practice practice, practice and if it doesn't work out, set it aside and try again. Don't let it win :)

Bill Hodge wrote:
Good job Rod. Perseverance produces victory, way to go. :) I've been contemplating one of these rosettes as well.
Good to know of their problematic tendencies.


Bill, the problem was with the installer, not necessarily the material :D

_________________
My Facebook Guitar Page

"There's really no wrong way, as long as the results are what's desired." Charles Fox

"We have to constantly remind ourselves what we're doing....No Luthier is putting a man on the moon!" Harry Fleishman

"Generosity is always different in the eye of the person who didn't receive anything, but who wanted some." Waddy Thomson


Top
 Profile  
 
PostPosted: Thu Apr 23, 2009 12:23 pm 
Offline
Brazilian Rosewood
Brazilian Rosewood
User avatar

Joined: Mon Jul 04, 2005 7:13 am
Posts: 3270
Location: United States
Wow, Rod, I blew that pic up as big as it would go and I don't see anything wrong with it. You nailed it. bliss

Ron

_________________
OLD MAN formerly (and formally) known as:

Ron Wisdom

Somewhere in the middle of Arkansas......


Top
 Profile  
 
PostPosted: Thu Apr 23, 2009 12:24 pm 
Offline
Koa
Koa
User avatar

Joined: Wed Mar 18, 2009 6:27 pm
Posts: 1246
Location: Arkansas, USA
First name: Bill
Last Name: Hodge
Country: USA
Focus: Build
Status: Professional
Thanks for the tips Rod. I'll try to remember it while I'm keeping one eye on the forest. ;)

_________________
Bill Hodge


One does not simply, own enough guitars!


Top
 Profile  
 
PostPosted: Thu Apr 23, 2009 1:54 pm 
Offline
Contributing Member
Contributing Member
User avatar

Joined: Wed Jul 23, 2008 1:34 pm
Posts: 639
Location: Santa Cruz, CA
First name: Randolph
Last Name: Morris
Focus: Build
Status: Amateur
WOW! way worth it Rod. It looks killer. This guitar is going to be a show stopper!! Way to hang in there. [:Y:] [:Y:]


Top
 Profile  
 
PostPosted: Fri Apr 24, 2009 10:17 am 
Offline
Brazilian Rosewood
Brazilian Rosewood
User avatar

Joined: Tue Dec 20, 2005 7:46 am
Posts: 2227
Location: Canada
That does look fantastic bro! Your perseverance was well rewarded in the end!

_________________
I'd like to be able to prove, just for once, that money wouldn't make me happy...


Top
 Profile  
 
PostPosted: Fri Apr 24, 2009 10:30 am 
Offline
Contributing Member
Contributing Member
User avatar

Joined: Sat Dec 30, 2006 3:20 am
Posts: 2593
Location: Powell River BC Canada
First name: Danny
Last Name: Vincent
Hey Rod,
Beautiful looking! Pretty nice to see something a little different. Looking forward to seeing the rest.

All The Best,
Danny


Top
 Profile  
 
PostPosted: Sat Apr 25, 2009 10:46 am 
Offline
Cocobolo
Cocobolo
User avatar

Joined: Mon Nov 10, 2008 10:20 am
Posts: 107
Location: Colorado, USA
Focus: Build
Status: Amateur
WOW. That is truly amazing. I can't wait to see the finish guitar. I have a lot to aspire to - Thank You.


Top
 Profile  
 
Display posts from previous:  Sort by  
Post new topic Reply to topic  [ 18 posts ] 

All times are UTC - 5 hours


Who is online

Users browsing this forum: No registered users and 7 guests


You cannot post new topics in this forum
You cannot reply to topics in this forum
You cannot edit your posts in this forum
You cannot delete your posts in this forum
You cannot post attachments in this forum
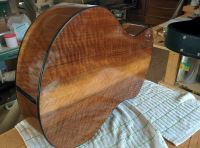
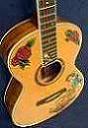
Jump to:  
Powered by phpBB® Forum Software © phpBB Group
phpBB customization services by 2by2host.com