Official Luthiers Forum!

Owned and operated by Lance Kragenbrink
It is currently Sat Jun 07, 2025 4:29 pm


All times are UTC - 5 hours


Forum rules


Be nice, no cussin and enjoy!


Post new topic Reply to topic  [ 49 posts ]  Go to page 1, 2  Next
Author Message
PostPosted: Sun Nov 09, 2008 5:08 pm 
Offline
Koa
Koa
User avatar

Joined: Tue Mar 18, 2008 8:43 am
Posts: 776
Location: Florida
First name: John
Last Name: Killin
Focus: Build
Status: Amateur
I have decided I am going to try and use the long compass method to make a radius dish.

I started by making the box similar to the on Chris Paulick uses in his YouTube video. I made the box with the rails Fixed rail distance of 30 inches.

I then went to cut my first set of rails. That went well until I tested them on the box. I used a 48” rail and it looks like it is way to short to make a 48” dish. So my big error here is that I didn’t accurately calculate just how long the rails need to be.

So I am going to attempt to recover it. Here is my thought:

When I made the rails, instead of cutting the rail into a V, I doubled the V rise and cut that as the angle on one side leaving the other side square. I am thinking that I can just add some to the square end so that the carriage has longer to travel. Will that work?

The next step will be to scrap these two rails and try and work with a smaller box. I have two blanks ready for another set, but they are cut to 48” as well.

I hope this makes sense to somone who has done this before.
Thanks,
John


Top
 Profile  
 
PostPosted: Sun Nov 09, 2008 9:28 pm 
Offline
Brazilian Rosewood
Brazilian Rosewood
User avatar

Joined: Sat Jun 21, 2008 10:58 am
Posts: 2774
Location: Tampa, Florida USA
John, You are making a 48" dish??? Is that right? What radius are you looking to make?


Top
 Profile  
 
PostPosted: Sun Nov 09, 2008 9:40 pm 
Offline
Koa
Koa
User avatar

Joined: Tue Mar 18, 2008 8:43 am
Posts: 776
Location: Florida
First name: John
Last Name: Killin
Focus: Build
Status: Amateur
Chris,

Sorry about that I am making a 24" dish. I just have the number 48 on the brain. gaah 
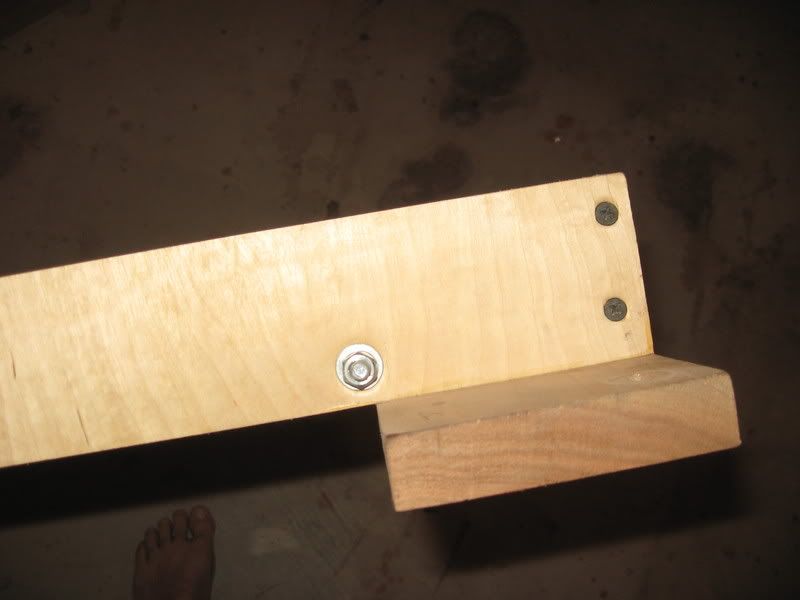
The total rail\carriage length is 48". I started cutting the angle to get the rise in the center at 24".

I plan to make a 15' and a 25' dish. I have the 15' rails cut. I think I would be fine if I were making something like a 9" dish. [headinwall]

My thought is since I added all of the rise to one side of the carriage that I could just extend the square side of my carriage to compensate without changing the final radius. But that would be way too simple to actually work.

John


Top
 Profile  
 
PostPosted: Sun Nov 09, 2008 10:10 pm 
Offline
Brazilian Rosewood
Brazilian Rosewood
User avatar

Joined: Sat Jun 21, 2008 10:58 am
Posts: 2774
Location: Tampa, Florida USA
That would work or you could turn the rail upside down and cut it. You don't need to work from the center but can offset the center. If your box sides are 30" or a span of 30" then put your center at greater then 1/2 the span or 15". That is all one side of the sled rails need to be. You get what I'm saying. At the start the center point of the sled is at the edge of the dish or 12" from center. So there's 3" from the point to the box edge and then 12" of over hang. You can make the the center point 16" from one end to give you 1" left to ride the box rail when you are routed to the center of the dish. The total sled rail length needs to be span + 1/2 dish diameter + 2" for safty. Your span would be better at 36" or even 40" for reasons I can't easily explain. Or even better yet you could come down and use my setup. It's for 15' and 25'.


Top
 Profile  
 
PostPosted: Sun Nov 09, 2008 11:25 pm 
Offline
Koa
Koa
User avatar

Joined: Tue Mar 18, 2008 8:43 am
Posts: 776
Location: Florida
First name: John
Last Name: Killin
Focus: Build
Status: Amateur
OK. I think I might try and flip the rail and re-cut it with the offset at 16”. If I do this, how do I calculate the rise at 16”? I don’t think I have the formula totally figured out. I am using the spreadsheet that was posted on MIMF.

If I bungle this one, I may just take you up on your offer to use your jig. It would be well worth the trip.

Hopefully once I get the 15’ one done the 25’ will be a breeze.

John


Top
 Profile  
 
PostPosted: Sun Nov 09, 2008 11:34 pm 
Offline
Brazilian Rosewood
Brazilian Rosewood
User avatar

Joined: Sat Jun 21, 2008 10:58 am
Posts: 2774
Location: Tampa, Florida USA
What did you figure for your rise at the 30" span? That number will stay the same. and if I take it right you doubled it and made one cut.


Top
 Profile  
 
PostPosted: Mon Nov 10, 2008 12:28 am 
Offline
Brazilian Rosewood
Brazilian Rosewood
User avatar

Joined: Sat Jun 21, 2008 10:58 am
Posts: 2774
Location: Tampa, Florida USA
I like this calculator.
http://www.liutaiomottola.com/formulae/sag.htm

Okay for a 25" radius with a 30" span( the inside demention of your box) the sag or rise is .375" or 3/8".
Go in 1" from the end and mark a line parallel with the end. Go 16" from the same end and mark the center point at the bottom of the rail board. Now go back to the line 1" from the end or 15" from the center point. Mark the line 3/4" up from the bottom or twice the sag/rise of .375 or 3/8". Now draw a line from the center point through the 3/4" point and off the board. That's your angle cut. By doubling the sag you only make that one cut and leave the other side of the board uncut. You have to do some figuring about how high the box rails need to be also. The box rails need to be 3/8" higher then the top of the dish for a 25' radius. And higher for the 15'. But you can double the difference between the 15' and 25' and add a strip of wood to the one box rail to adjust for that or take a little deeper cut for the 15' radius. It won't matter enough to be of any concern. I didn't figure that out untill I cut my dishes. What would also be good to do would be to make the sled rails distance between them 25". Then you won't have to worry about the sled rails bottoming out on the dish. You would need to mount you're dust collection hose close to the bit or it will get dusty I would think.


Top
 Profile  
 
PostPosted: Mon Nov 10, 2008 3:10 pm 
Offline
Koa
Koa
User avatar

Joined: Tue Mar 18, 2008 8:43 am
Posts: 776
Location: Florida
First name: John
Last Name: Killin
Focus: Build
Status: Amateur
I think I may have cut the original 15’ angle wrong. Every time I think about this I find some flaw in my logic. I think I’m going to have to break down and actually try and understand the concept before I get accurate results.

On my 15’ rail I had the sag/rise at 1.002. I doubled it to come up with 2.004. Of course I’m fairly sure when I did this that I’m off by at least 0.004. I made the center mark on my 48” rail at 24” and put a mark at 2.004 at the end of the rail and drew the line between the points. So the 2.004 should have been placed at 15” from the center point? I’m glad I had the issue with the rail not fitting the box. I would have a set of dishes that didn’t come close to what I want.

Following the measurements you gave for the 25’ dish the 3/8” rise is for if you are cutting both ends. If I double that and only cut one end I should make the mark at ¾”?

For the box rail height if I cut my rails to be 3/8” higher than the dish for the 25’ dish, how much of a shim do I need to add to the rail for the 15’ dish? Also, I made my box 26” wide so I’m probably not going to successfully be able to do the 25” wide carriage. Plus storage would be a pain. Although, I may be able to find something in my scrap pile that will work. How much did you cut off the rail to keep them from bottoming out?

John


Top
 Profile  
 
PostPosted: Mon Nov 10, 2008 3:44 pm 
Offline
Koa
Koa
User avatar

Joined: Tue Mar 18, 2008 8:43 am
Posts: 776
Location: Florida
First name: John
Last Name: Killin
Focus: Build
Status: Amateur
I keep smacking myself on this. [headinwall] I think I may have been right on the numbers I used to cut my original rail, but more importantly this is what I'm going to use to cut the new rails.

25' dish 3/4" rise @ 15" from center point.
15' Dish 1 1/4" rise @ 15" from center point. This has a slight bit of rounding.

Eventually I will cut a dish and use it.

John


Top
 Profile  
 
PostPosted: Mon Nov 10, 2008 4:22 pm 
Offline
Brazilian Rosewood
Brazilian Rosewood
User avatar

Joined: Sat Jun 21, 2008 10:58 am
Posts: 2774
Location: Tampa, Florida USA
By Joe I think you have it John. Do you get what I'm saying about spacing the rails wider then 24"? If you don't the edge of the rails will bottom out on the dish as you route. That's why I had to remove the part of the rail that wasn't needed from the center point to the box rail. In your case that's only 3" on the short side. I don't know if that will work. That's why I suggest 36" or even better 40" for the span if you want to keep the sled rails close together and remove that not needed section. Some have just lowered the bit below the point and routed it like that. They said it doesn't change the radius enough to matter. I don't really know how the math would work out on that. I bet you could make a long compass and draw a arch and then move the pencil an inch from the point and draw another arch and see what happens if you are so inclined.


Top
 Profile  
 
PostPosted: Mon Nov 10, 2008 5:24 pm 
Offline
Koa
Koa
User avatar

Joined: Tue Mar 18, 2008 8:43 am
Posts: 776
Location: Florida
First name: John
Last Name: Killin
Focus: Build
Status: Amateur
I get what you are saying about spacing the rails more than the diameter of the disk. In order to do that I'm going to have to find some other material to pull it off. I'm close to doing this whole thing with scrap. I just need to come up with my method of attaching the router to the sled now. And successfully cut the sled rails.

How must higher than the dish do the rails for he box need to be for he 15' radius need to be to be accurate?


Top
 Profile  
 
PostPosted: Mon Nov 10, 2008 5:53 pm 
Offline
Brazilian Rosewood
Brazilian Rosewood
User avatar

Joined: Sat Jun 21, 2008 10:58 am
Posts: 2774
Location: Tampa, Florida USA
It would be 1 1/4" - 3/4"= 1/2"
You could just put 1/2" shims under the sled rails on the start side of the box or 1/4" shims all around. Acouple of 2 X 4 s might work. I don't know what that might look like when done but make sure you keep your hand away from that bit when routing begins. The dish will start to turn on it's own. In the video it looks like I'm spinning it but there are times when I'm trying to stop it .


Top
 Profile  
 
PostPosted: Mon Nov 10, 2008 9:11 pm 
Offline
Koa
Koa
User avatar

Joined: Tue Mar 18, 2008 8:43 am
Posts: 776
Location: Florida
First name: John
Last Name: Killin
Focus: Build
Status: Amateur
So for the box rails they should sit

15' = 1/2 inch taller than the dish
25' = 3/8 inch taller than the dish

So if I am using two pieces of 3/4 MDF for my dish I'll have a dish height of 1 1/2"

I should make my box rails 1 7/8" high. Then I can do the 25' dish. Then shim the front and back box rail by 1/8".

Thanks for checking my math (and providing all the numbers) on this. On the up side I just cut my 25' rails. bliss
I need to cut the 15' rails and then come up with a way to put them together and mount the router.

What size bit did you use?


Top
 Profile  
 
PostPosted: Mon Nov 10, 2008 10:34 pm 
Offline
Brazilian Rosewood
Brazilian Rosewood
User avatar

Joined: Sat Jun 21, 2008 10:58 am
Posts: 2774
Location: Tampa, Florida USA
Yeah that's right . Are you just using a center pin on the bottom of the box or a lazy susan? I use a 1/2" or 3/8" carbide mortising or straight bit. Make sure it's in the collet tight. I had the first try come loose near the center of the dish and it pulled out and down making grove in the center. I had to bondo it and re cut it . I used it for the sanding dish. You might be able to run the 2 X 4s parallel with the sled rails keeping the bottom of the 2 x 4s even with the bottom of the end of the sled rails. They should clear the the dish. It might throw the router a little of square since the long end is a little higher then the short half but I should matter in the real world. Or you could put another board from sled rail to rail at 16" from the point if you are really concerned about it. Or you could could just run the 2 X 4s perpendicular keeping them about 1 1/2"- 2" above the point. Mount your router to a piece of 1/4" or 1/2" stuff and screw it to the bottoms of the 2 X 4s. Just keep in mind you need the clearence and also the higher you go the longer bit you might need. It's a litle bit of a balancing act.


Top
 Profile  
 
PostPosted: Wed Nov 12, 2008 5:06 pm 
Offline
Koa
Koa
User avatar

Joined: Tue Mar 18, 2008 8:43 am
Posts: 776
Location: Florida
First name: John
Last Name: Killin
Focus: Build
Status: Amateur
I am using a pin and not a lazy susan.

I think I have a plan for what to do with the sled. I was able to get the sled rails cut for the 15' and 25' dish. I made the blanks for the dish using a router and a circle cutting jig I made. The first is a bit rough looking, but he second one came out pretty good. Both are workable.

All and all I think I am making progress.


Top
 Profile  
 
PostPosted: Fri Nov 14, 2008 3:11 pm 
Offline
Cocobolo
Cocobolo

Joined: Mon Jan 28, 2008 3:29 pm
Posts: 213
Location: Meredosia, IL 62665
John & Chris:

After having some dialog with Chris and then tuning into this thread, this jig is finally getting through my thick skull.

Thanks for sharing!! Chris, thanks for going well beyond for us beginning luthiers.


Top
 Profile  
 
PostPosted: Thu Nov 20, 2008 11:50 am 
Offline
Koa
Koa
User avatar

Joined: Tue Mar 18, 2008 8:43 am
Posts: 776
Location: Florida
First name: John
Last Name: Killin
Focus: Build
Status: Amateur
Well last night I finally cut the first radius into my 15’ dish using my long compass jig. I have to say it worked great.

I pretty much followed the design Chris used as can be seen in his YouTube video.

http://youtube.com/watch?v=tvGemvizrz4

The main change I made was to make the sled 24 1/2” wide instead of just wide enough to hold the router. I did this so that I didn’t have to cut out portion of the rail to keep it from hitting the dish as the radius got deeper. It worked as I had planned, but compromised the process in a couple of ways (none which actually impacted the cutting of the dish).

Attachment:
Sled 1.jpg

Attachment:
Sled 2.jpg


1. It is big. So storage will be more of an issue. I think this jig will find a home in the attic.

2. Clearance. In the Chris video he is using his hand to slow the spin of the dish. With my sled as the sled gets closer to center my support raids block access. A couple of times the dish started going and when I grabbed it I could sense that if I didn’t stop the spin right away my hand would be pulled into the support rail on the sled. I just didn’t have the control over the dish that it appears Chris has in the video and if I seriously lost control, I’m not sure how quickly I could get it back. Next time I’m going to wear a glove on that hand so I can grab the dish by the edge without the friction causing damage to may hand. Really this wasn’t a big deal, but something I was thinking about while I was cutting the dish.

3. Structural access to the sled. Piecing things together and keeping the geometry correct is important. The sled must travel in a straight line. By making the sled as wide as I did I was able to mount the router lower. I had to change my design when I realized that the router did not clear the bar I had placed across the front to keep the sled traveling in a straight line. I didn’t have enough room on the outside of the box the dish sits in to put anything permanent there so I ended up just screwing some screws in to the box rails. This worked great and was actually simpler than what I was originally planning (except that I had already done what I originally planned and had to rework it).

4. Advancing the sled. One thing that appealed to me as just being cool with Chris’s sled was the use of the clamp to move it. Again I had clearance access issues here. Moving the rails to the outer edge sort of eliminates access to the center part of the jig. You can’t just stick the clamp there without causing clearance issues when cutting the dish. I’m sure I could come up with something, but I didn’t have the clamp yet and had already spent too much time putting this together. The real advancing problem was that I couldn’t tell when I was at the center. For the next dish I will mark on the inside of the sled rail where it meets the support rail when the sled is at the center of the dish.

I were to make this jig again, I would probably follow closer to Chris’s style. I would move my shop vac. If you are standing at the center point of the sled and the sled is moving from right to left, the vac needs to be in the upper right. And it can be low. I’m also not sure how long the shop vac would be effective even if it was in a better position. The filer was seriously clogged. I would wear hearing protection and will probably do it outside.

So would I do this again? Before Chris’s video I had talked myself out of making and into buying. Now that I have the jig I would definitely do it myself. And if I didn’t have the jig and had the time I would do it again. But if I could borrow a jig and didn’t have to go through the trouble, I probably would go that route. Since I am starting out everything is a learning experience. I learned a lot from this project. I made most of this out of scrap and other than the router bit I spent about $30 on materials for the dishes and have half a sheet of MDF left over. In the big picture I can now move the money I would have spent on dishes to something else.

So now I just need to cut the back side of my 15’ dish, cut the front and back to my 25’ dish, seal it and add some sand paper to one side of each dish.

John


You do not have the required permissions to view the files attached to this post.


Top
 Profile  
 
PostPosted: Thu Nov 20, 2008 1:48 pm 
Offline
Brazilian Rosewood
Brazilian Rosewood
User avatar

Joined: Sat Jun 21, 2008 10:58 am
Posts: 2774
Location: Tampa, Florida USA
You could probably refine it the second time some but as long as it works what the heck? I did offer to let you use mine. :)
Yeah that MDF will clog the filters. Looks good though.


Top
 Profile  
 
PostPosted: Thu Nov 20, 2008 3:12 pm 
Offline
Cocobolo
Cocobolo

Joined: Mon Jan 28, 2008 3:29 pm
Posts: 213
Location: Meredosia, IL 62665
John and Chris:

I haven't had the time to complete my jig, but have a good start. I just have to finish the router mounting and dust collection hook-up. I took Chris's advice and taped a pencil horizontally at the apex of the sled angle for a dry run. I held a scrap piece of plywood to register the arc scribed by the pencil. It turned out very close to my homemade (read: questionalbe accuracy) acrylic 15' arc guide.

I will have 8" between the rails of the sled for the router mounting and have not yet removed any material for the bottoming out of the sled on the dish, which I'm not sure I will experience. Hopefully, I'll post with positive results this weekend.

Thanks to you both for the inspiration/perspiration.


Top
 Profile  
 
PostPosted: Thu Nov 20, 2008 5:09 pm 
Offline
Koa
Koa
User avatar

Joined: Tue Mar 18, 2008 8:43 am
Posts: 776
Location: Florida
First name: John
Last Name: Killin
Focus: Build
Status: Amateur
Danny,

Good luck. On mine I came up with sort of a terraced effect. As I am sanding I am finding the smaller rings are sanding easier. Not a big deal, but when you are cutting, limit how far in you go with the bit for each circle. Of course there is the trade off of a shallower cut requires more passes and will take longer. I'm going to do another tonight and see how it goes. You may be OK on the clearance. Just be sure that your bit has enough depth with the cutting surface to get as deep as you need.

Chris,

I' sure I could refine it, but since its build.... I'll just live with it. It works so I'm a happy guy. And don't think there weren't many times that I thought about just making another trip to Tampa to use your setup. Thanks for the offer and thanks for all the tips.

John


Top
 Profile  
 
PostPosted: Thu Nov 20, 2008 5:20 pm 
Offline
Brazilian Rosewood
Brazilian Rosewood
User avatar

Joined: Sat Jun 21, 2008 10:58 am
Posts: 2774
Location: Tampa, Florida USA
I'm not sure what you are talking about all the rings. Unless you were taking to big of a bit with each pass.


Top
 Profile  
 
PostPosted: Thu Nov 20, 2008 7:53 pm 
Offline
Koa
Koa
User avatar

Joined: Tue Mar 18, 2008 8:43 am
Posts: 776
Location: Florida
First name: John
Last Name: Killin
Focus: Build
Status: Amateur
That is exactly what I am saying. I just cut the other side of the 15' dish and used the Irwin style clamp to advance the sled where I could and it made a huge difference. Very smooth. I need to make the trip to harbor freight to pick up a full size one.

The downside to this run was that I thought the bit slipped slightly. gaah What was actually happening was that the clamp that holds the router height adjustment was coming loose. [headinwall] This allowed the router to rotate in the base. I now need to figure out the cause of this. It is like the vibration causes it to pop loose. I may just strap some Velcro around it to hold it shut.


Top
 Profile  
 
PostPosted: Thu Nov 20, 2008 8:11 pm 
Offline
Brazilian Rosewood
Brazilian Rosewood
User avatar

Joined: Sat Jun 21, 2008 10:58 am
Posts: 2774
Location: Tampa, Florida USA
Duct tape! :shock:


Top
 Profile  
 
PostPosted: Thu Nov 20, 2008 8:16 pm 
Offline
Koa
Koa
User avatar

Joined: Tue Mar 18, 2008 8:43 am
Posts: 776
Location: Florida
First name: John
Last Name: Killin
Focus: Build
Status: Amateur
I'll probabaly just build some sort of a Jig for it. laughing6-hehe


Top
 Profile  
 
PostPosted: Fri Nov 21, 2008 6:58 am 
Offline
Cocobolo
Cocobolo

Joined: Fri Jan 12, 2007 11:47 pm
Posts: 153
Location: United States
First name: Vincent
Last Name: Simokovich
City: Parma
State: OH
Zip/Postal Code: 44134
Country: USA
Focus: Build
Status: Amateur
Hi John. Here are some pics of a jig that I built to make my own dishes. I built the base with a 3/8" dowel to center and hold my dish blank, and brass inserts to bolt my carriage to. The carriage is just a frame with base blocks that are thick enough to just clear the top of the MDF blank, and wide enough to accept my router with minimal side to side play. The rails are bolted on to the carriage frame and only have to be profiled to the point where the router can pass the center of the dish. Once the 24" dia. disc is cut and the pilot hole drilled, just bolt the carriage frame to the base and have at it. Be aware that you will have a mountain of MDF dust.

Image

Image

Image

Image

Image

Image

Image

Image

Image

Vince


Top
 Profile  
 
Display posts from previous:  Sort by  
Post new topic Reply to topic  [ 49 posts ]  Go to page 1, 2  Next

All times are UTC - 5 hours


Who is online

Users browsing this forum: No registered users and 43 guests


You cannot post new topics in this forum
You cannot reply to topics in this forum
You cannot edit your posts in this forum
You cannot delete your posts in this forum
You cannot post attachments in this forum

Jump to:  
Powered by phpBB® Forum Software © phpBB Group
phpBB customization services by 2by2host.com