Official Luthiers Forum!

Owned and operated by Lance Kragenbrink
It is currently Sun Jun 29, 2025 5:51 pm


All times are UTC - 5 hours


Forum rules


Be nice, no cussin and enjoy!


Post new topic Reply to topic  [ 20 posts ] 
Author Message
PostPosted: Wed Dec 17, 2014 11:59 am 
Offline
Koa
Koa
User avatar

Joined: Thu Nov 21, 2013 2:03 pm
Posts: 569
First name: Toonces
Last Name: the Cat
City: New Smyrna Beach
State: FL
Country: United States
Focus: Build
Status: Amateur
How to Detect Runout -- Practical Tips

There's no easy way to detect runout. Years ago there were some misinformed posts stating that you could tell runout from the sides -- you can't.

Here's what I do:

1) Hold the wood up to a light and splash mineral spirits across the center. Outside light works really well if you don't have good interior lighting. Look at the set from several different angles while sighting down the joint to detect a difference in color between the 2 plates.

2) The smoother the surface, the easier it is to see runout. 120 grit is usually perfect for detecting a color difference.

3) Sometimes a top will look better joined from the outside edge rather than the center edge. The outside edge actually comes from the center of the tree and there is less chance for twist at the center of a spruce billet than at the outside. If the grain lines are tight all the way across and the set is flawless, you can usually get some runout free sets this way. I've done this a lot with mastergrade Engelmann that has had runout. I've ended up with AAA Engelmann (because the grain lines aren't as tight in the center) but no runout.

4) Lastly, I hold the top underneath a very bright light in a dark room and check for voids and flaws. With careful planning, you can sometimes hide flaws underneath the fretboard, rosette, or bridge. Also, you won't be surprised by flaws that appear during sanding. So don't just receive the top the way you get it and think it's good to go -- take some time to optimize the aesthetics through careful joining and body placing.

Ultimately, it takes a bit of skill to detect these slight color differences. Also, some folks don't dislike runout and that makes things much easier because there are a lot of beautiful tops with slight runout. If you make an effort to only stock runout free tops, you will find that the material cost of obtaining inventory will likely double since it is extremely difficult to find runout free tops (the exception being Sitka and, of course, Redwood and Cedar).


These users thanked the author Toonces for the post (total 3): CharlieT (Wed Dec 17, 2014 9:36 pm) • GRS (Wed Dec 17, 2014 2:49 pm) • SteveSmith (Wed Dec 17, 2014 1:44 pm)
Top
 Profile  
 
PostPosted: Wed Dec 17, 2014 12:16 pm 
Offline
Contributing Member
Contributing Member
User avatar

Joined: Sat Jan 31, 2009 8:50 pm
Posts: 2260
Location: Seattle WA
Focus: Build
Status: Semi-pro
Are aesthetics your main reason for choosing tops with no run out?


Toonces wrote:
...Look at the set from several different angles while sighting down the joint to detect a difference in color between the 2 plates.


This is after you've joined and sanded and I've heard you say that you only keep about one in a dozen that you order and send the rest back. So, how do you look for it in raw sets? And do you still exclude some even after you've joined them?

_________________
Pat


Top
 Profile  
 
PostPosted: Wed Dec 17, 2014 1:12 pm 
Offline
Koa
Koa

Joined: Mon Dec 18, 2006 9:42 am
Posts: 1582
Location: United States
There is a fellow in Alaska who sells Sitka spruce. Sometimes he gets boards wide enough and even grain so you can have a top without a center seam. Then, you will not notice the run out.


Top
 Profile  
 
PostPosted: Wed Dec 17, 2014 1:18 pm 
Offline
Contributing Member
Contributing Member
User avatar

Joined: Fri Dec 17, 2010 6:22 pm
Posts: 1295
First name: Miguel
Last Name: Bernardo
Country: portugal
Focus: Build
Status: Semi-pro
This is a good topic. I usually hold a fluorescent light tube crosswise above the top plates, the plates being held together as they'll be in the joined top. If the reflection of the light in the top is about 90 degrees to the grain orientation that should mean low to no runout. If the light reflection is skewed at an angle, there's runout. The higher the angle the higher the runout. If I can't for some reason get a good reading I just cut a corner and split it.

_________________
member of the guild of professional dilettantes


These users thanked the author mqbernardo for the post: Tom West (Wed Dec 17, 2014 6:25 pm)
Top
 Profile  
 
PostPosted: Wed Dec 17, 2014 1:29 pm 
Offline
Contributing Member
Contributing Member
User avatar

Joined: Wed Sep 08, 2010 12:17 am
Posts: 1292
First name: John
Last Name: Arnold
City: Newport
State: TN
Zip/Postal Code: 37821
Country: USA
Focus: Repair
Status: Professional
In my experience, the best lighting for detecting runout in a rough sawn top is a long fluorescent tube, oriented perpendicular to the grain direction. Hold both halves of the top in the same plane, and view the reflection off the fluorescent light. You should see a narrow band across the wood. If the band is continuous across both halves, there is no runout at the joint. If the bands are offset, you will have visible runout.
Another thing to note is that if the bands are not straight across but angled, that indicates a tree with spiral growth. In that case, there will only be one line across the width of each half that has no runout. This line will always be at the point where the reflected band is at the same level in both halves of the top.

This photo illustrates the effect. The white lines are highlighting the reflected bands. The pink line is straight across, midway between the two bands. The blue lines are at the intersections, and show where the top has zero runout. Note that the runout is in opposite directions on either side of this blue line. The top on the left was from a tree with excessive spiral. If possible, it would be better to join the other edge, since it has less runout. The middle top has less spiral, and much less runout at the joint. The right-hand top was cut from a tree with minimal spiral, and that top has very little runout.

Image

The top on the left is an indication that the wood was cut from long logs, rather than from split billets. In that case, runout will be the worst along the bark edge, which is usually the most desirable to join. If that wood had been cut into short blocks and split, there is the opportunity to saw parallel to the split along the bark edge. That means there will be no visible runout at the joint. Not only is that better visually, but it makes the top stronger in the bridge area. IMHO, runout placed on the outer edges of a top has very little or no negative impact.

_________________
John


These users thanked the author John Arnold for the post (total 21): James Ringelspaugh (Tue Dec 23, 2014 12:56 pm) • ChrisC (Thu Dec 18, 2014 11:28 pm) • Jim Watts (Thu Dec 18, 2014 6:18 pm) • bftobin (Thu Dec 18, 2014 9:57 am) • Tim L (Wed Dec 17, 2014 8:53 pm) • Terence Kennedy (Wed Dec 17, 2014 7:17 pm) • Tom West (Wed Dec 17, 2014 6:25 pm) • jack (Wed Dec 17, 2014 3:19 pm) • GRS (Wed Dec 17, 2014 2:49 pm) • Dave Rickard (Wed Dec 17, 2014 1:37 pm) and 11 more users
Top
 Profile  
 
PostPosted: Wed Dec 17, 2014 3:40 pm 
Offline
Contributing Member
Contributing Member
User avatar

Joined: Thu May 12, 2005 5:46 am
Posts: 2994
Location: United States
John, That's an interesting technique i wasn't familiar with. Thanks for sharing it.

_________________
Jim Watts
http://jameswattsguitars.com


Top
 Profile  
 
PostPosted: Wed Dec 17, 2014 4:16 pm 
Offline
Koa
Koa
User avatar

Joined: Thu Nov 21, 2013 2:03 pm
Posts: 569
First name: Toonces
Last Name: the Cat
City: New Smyrna Beach
State: FL
Country: United States
Focus: Build
Status: Amateur
John's tip is very good.

The information in the original post can be applied before and after a top is joined. Sometimes you will find that even if a top doesn't seem to have any runout at all, once you join it and sand with fine grit, there will be slight runout.

Runout is purely a cosmetic topic -- the runout would have to be extreme for it to cause a structural issue.

And yes, I return over 90% of the high grade tops from LMI because of runout. Most of it is slight but it still personally bothers me. LMI charges a restocking fee for this and so I usually place an order for around 75 tops with a $500 restocking fee -- its worth it to me. I might find 5 to 10 tops that I think are suitable -- that's why I say it costs me about double to source runout free tops. Some vendors are very good about selecting tops for you if you have special requirements. Again, runout is not a flaw, it is just an aesthetic I don't like. The reason I posted this information is because a forum member asked how I detected runout. If you are building sub-$5k instruments then I wouldn't be too picky about it unless it just really bothers you -- many players absolutely don't care and some will hate runout.


These users thanked the author Toonces for the post (total 2): CharlieT (Wed Dec 17, 2014 9:36 pm) • Pmaj7 (Wed Dec 17, 2014 8:31 pm)
Top
 Profile  
 
PostPosted: Wed Dec 17, 2014 4:29 pm 
Offline
Koa
Koa

Joined: Sat Apr 19, 2008 10:08 pm
Posts: 1958
Location: Missouri
First name: Patrick
Last Name: Hanna
State: Missouri
Country: USA
Clearly and simply demonstrated, John. Very nice tip, too. Thank you.


Top
 Profile  
 
PostPosted: Wed Dec 17, 2014 5:54 pm 
Offline
Contributing Member
Contributing Member
User avatar

Joined: Fri Jul 10, 2009 4:44 am
Posts: 5573
First name: colin
Last Name: north
Country: Scotland.
Focus: Build
Status: Semi-pro
serendipity - I was just pondering about this recently.
Great info - thanks guys!

_________________
The name catgut is confusing. There are two explanations for the mix up.

Catgut is an abbreviation of the word cattle gut. Gut strings are made from sheep or goat intestines, in the past even from horse, mule or donkey intestines.

Otherwise it could be from the word kitgut or kitstring. Kit meant fiddle, not kitten.


Top
 Profile  
 
PostPosted: Wed Dec 17, 2014 6:04 pm 
Offline
Contributing Member
Contributing Member

Joined: Sun Feb 17, 2013 4:58 pm
Posts: 1449
First name: Ed
Last Name: Minch
City: Chestertown
State: MD
Zip/Postal Code: 21620
Country: United States
Focus: Build
Status: Amateur
John

Great tip

Ed


Top
 Profile  
 
PostPosted: Wed Dec 17, 2014 7:04 pm 
Offline
Contributing Member
Contributing Member

Joined: Sun Mar 14, 2010 12:00 pm
Posts: 2020
Location: Utah
Simon - thanks very much for starting this thread and sharing your methods. Thanks to the others who have chimed in as well. John - super helpful info and pictures. Thanks!


Top
 Profile  
 
PostPosted: Wed Dec 17, 2014 9:02 pm 
Offline
Koa
Koa
User avatar

Joined: Thu Nov 21, 2013 2:03 pm
Posts: 569
First name: Toonces
Last Name: the Cat
City: New Smyrna Beach
State: FL
Country: United States
Focus: Build
Status: Amateur
Charlie, who is this Simon person you are referring to ???

If I may add, John's method is excellent and will get you 95% of the way there but IMO, you will still miss subtle runout with that method. It's hard to tell from a photo (it may just be the light), but the 3rd photo in John's post seems to have some barely there runout about 2/3 from the top. In my experience, the only way to completely eliminate runout is to use mineral spirits under good lighting -- many times I've found that the runout is only visible with mineral spirits but looks fine otherwise. When I say no runout, I mean absolutely no color difference at all when moving across the center joint -- relatively few guitars seem to meet that criteria.

Here's a quick link to a soundboard gallery from this complete asshat of a builder named Fay -- shoddy work but no runout on his tops

http://fayguitars.com/Guitars/Gallery/soundboards.html


These users thanked the author Toonces for the post: CharlieT (Wed Dec 17, 2014 9:36 pm)
Top
 Profile  
 
PostPosted: Wed Dec 17, 2014 9:24 pm 
Offline
Contributing Member
Contributing Member
User avatar

Joined: Wed Sep 08, 2010 12:17 am
Posts: 1292
First name: John
Last Name: Arnold
City: Newport
State: TN
Zip/Postal Code: 37821
Country: USA
Focus: Repair
Status: Professional
This may be stating the obvious, but I'll do it anyway:
If you seek out suppliers who cut from split billets, you stand a much better chance of getting a top with no visible runout. While it is a common method on huge Sitka trees, it is much less common on the smaller spruces like Euro or red.
In the case of red spruce, there are only a few who do cut from split billets....and that does not include the most famous one located in Missouri.
In addition to the visual, you can also detect runout by feel. Rub the top with your fingers along the grain in both directions. If there is runout and you rub against the grain, it will feel grabby. It should feel smooth when you rub in the opposite direction.
It's like rubbing the fur on a short-haired dog or cat.

_________________
John


These users thanked the author John Arnold for the post: CharlieT (Wed Dec 17, 2014 9:36 pm)
Top
 Profile  
 
PostPosted: Wed Dec 17, 2014 9:42 pm 
Offline
Cocobolo
Cocobolo
User avatar

Joined: Wed Jul 04, 2007 5:07 pm
Posts: 206
Location: Singapore
First name: Sen
Last Name: Goh
Country: Singapore
Focus: Build
Status: Amateur
I was taught the the same lighting method by Alex (Alexandru Marian) .
It's very useful when purchasing wood (especially when I have to pay a hefty amount for shipping)
and I have a good idea how much runout top has before receiving it.
That is provided the supplier knows how take the top wood with the flash lightning.

Here's a previous thread that Alex elaborated.

http://luthiersforum.com/forum/viewtopic.php?f=10101&t=38227&p=501510&hilit=runout#p501510

_________________
-----
Sen CL Goh
http://senguitar.blogspot.com


Top
 Profile  
 
PostPosted: Wed Dec 17, 2014 9:56 pm 
Offline
Contributing Member
Contributing Member

Joined: Sun Jan 10, 2010 11:40 am
Posts: 764
First name: wes
Last Name: Lewis
City: Garland
State: Tx.
Zip/Postal Code: 75044
Focus: Build
bliss bliss bliss
Good stuff!!! thanks bliss bliss bliss

_________________
MK5acoustics.com


Top
 Profile  
 
PostPosted: Wed Dec 17, 2014 10:16 pm 
Offline
Contributing Member
Contributing Member

Joined: Fri May 09, 2008 2:25 pm
Posts: 1958
First name: George
City: Seattle
State: WA
Country: USA
Focus: Build
Status: Amateur
Most useful thread on this topic I've ever come across. Thanks all, for sharing your knowledge and tips.

I'm working a top right now that I thought was run out-free, but after getting the rosette in and taking it down to final thickness, I can see a little of that telltale offset sheen appearing. It will be interesting to go do some experimenting with the other tops that I have in my stash.

Thanks again!

_________________
George :-)


Top
 Profile  
 
PostPosted: Thu Dec 18, 2014 4:42 am 
Offline
Contributing Member
Contributing Member
User avatar

Joined: Fri Dec 17, 2010 6:22 pm
Posts: 1295
First name: Miguel
Last Name: Bernardo
Country: portugal
Focus: Build
Status: Semi-pro
Sen, seems we got the answer from the same source.

_________________
member of the guild of professional dilettantes


Top
 Profile  
 
PostPosted: Thu Dec 18, 2014 9:47 am 
Offline
Cocobolo
Cocobolo
User avatar

Joined: Wed Jul 04, 2007 5:07 pm
Posts: 206
Location: Singapore
First name: Sen
Last Name: Goh
Country: Singapore
Focus: Build
Status: Amateur
mqbernardo wrote:
Sen, seems we got the answer from the same source.

[:Y:] Yeah you are very right, Miguel.
Not only this though, I have learnt lots of other valuable knowledge from Alex too!
I'm pretty sure that you too!

_________________
-----
Sen CL Goh
http://senguitar.blogspot.com


Top
 Profile  
 
PostPosted: Thu Dec 18, 2014 6:39 pm 
Offline
Contributing Member
Contributing Member
User avatar

Joined: Fri Dec 17, 2010 6:22 pm
Posts: 1295
First name: Miguel
Last Name: Bernardo
Country: portugal
Focus: Build
Status: Semi-pro
Not to derail the thread, but you're right. Alex has been an invaluable help and a good friend.

_________________
member of the guild of professional dilettantes


Top
 Profile  
 
PostPosted: Thu Dec 18, 2014 9:15 pm 
Offline
Contributing Member
Contributing Member
User avatar

Joined: Tue Mar 19, 2013 3:34 pm
Posts: 1097
First name: Bob
Last Name: Russell
State: Michigan USA
Focus: Repair
Status: Semi-pro
Thanks Toonces for starting this thread and to John for the great explanation and pictures of how to detect runout.
This is something I have been struggling to figure out the best way to detect it on the sets I have been buying lately so this info is quite helpful.

Thanks again,
Bob


Top
 Profile  
 
Display posts from previous:  Sort by  
Post new topic Reply to topic  [ 20 posts ] 

All times are UTC - 5 hours


Who is online

Users browsing this forum: doncaparker and 9 guests


You cannot post new topics in this forum
You cannot reply to topics in this forum
You cannot edit your posts in this forum
You cannot delete your posts in this forum
You cannot post attachments in this forum
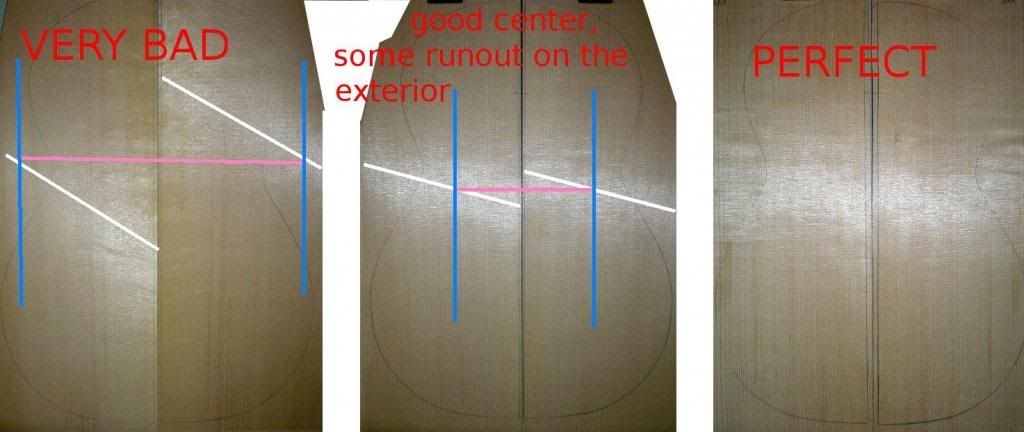
Jump to:  
Powered by phpBB® Forum Software © phpBB Group
phpBB customization services by 2by2host.com