I have been slowly getting back into building after recently finishing a guitar and thought that I would share my process for bracing a back. This is not a toot but simply a look over my shoulder as I brace the back of an OM.
As always there are a million ways to do most anything in guitar building and this is simply my process for now.
And as always be safe, wear a dust mask, ear protection and use any and all of the best practices for working in a shop with edge and power tools.
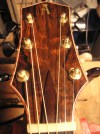
This guitar is named Charo since it sports some beautiful Cuban Mahogany from Uncle Bob at RC Tonewoods. It was name it Charo or Fidel and since the wood is so pretty I didn't want to imagine it wearing a jogging suit.......

In addition, I have so very many pictures to post here I am going to have to use a number of posts in this thread throughout the day today. So friends your patience is greatly appreciated and always your comments are whole heartedly solicited.
Let's get started.......
Once the back halves are joined and thicknessed (this one is currently .089) I install the back strip reinforcement. More on this in a minute.
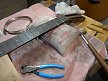
Then I make my braces in preparation of gluing them onto the back. The radius that I use for backs is 15' and I trace this radius on my bracing stock (this bracing stock is Adi) and then rough in the radius on a belt sander. The final radius is achieved by sanding in the proper radius dish, again 15'.
I have found that taping two braces together greatly reduces any errors in the final radius caused from the brace stock flexing while dish sanding. It also makes it much easier, for me at least, to hold onto while sanding in the dish.
Attachment:
DSC01149.jpg
When I am ready to sand the braces in the dish I make pencil marks that will be sanded away once the brace is hitting the dish in all areas.
Attachment:
DSC01151.jpg
Attachment:
DSC01152.jpg
I find that wearing a latex glove makes it much easier to hold onto braces while dish sanding.
Attachment:
DSC01155.jpg
Next I sand both sides of the taped together braces in the dish until the marks are gone.
Attachment:
DSC01154.jpg
And then the tape is removed and I have two radiused braces.
Attachment:
DSC01156.jpg
Attachment:
DSC01157.jpg
Attachment:
DSC01158.jpg
To be continued.........


![[headinwall]](./images/smilies/headbangwalluf8.gif "Mad")
![[xx(]](./images/smilies/smiley11.gif "Dead")


![[:Y:]](./images/smilies/smiley20.gif "Thumbs Up")