Official Luthiers Forum!

Owned and operated by Lance Kragenbrink
It is currently Wed Jul 30, 2025 6:52 am


All times are UTC - 5 hours


Forum rules


Be nice, no cussin and enjoy!


Post new topic Reply to topic  [ 75 posts ]  Go to page 1, 2, 3  Next
Author Message
PostPosted: Mon Feb 22, 2016 3:12 pm 
Offline
Contributing Member
Contributing Member
User avatar

Joined: Mon Mar 19, 2007 7:05 am
Posts: 9191
Location: United States
First name: Waddy
Last Name: Thomson
City: Charlotte
State: NC
Focus: Build
Status: Semi-pro
Any suggestions on how I might repair this so it won't be a ruined guitar. It is a promised build, but no up front money has changed hands. I first noticed the half moon in the purfling channel and thought I had a solution with wider purfling. Image
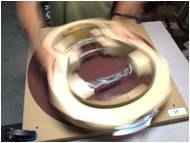
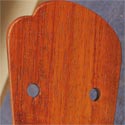
Then I saw the section removed from the side. ImageSo far I have not found the missing piece. I'll have to cut open the vacuum bag to see if it's there in a useable form. I'm not holding my breath. I do have some binding strips cut from the sides. Think I could fit a piece without it being an eyesore. How do you handle that with a customer?

_________________
Waddy

Photobucket Build Album Library

Sound Clips of most of my guitars


Top
 Profile  
 
PostPosted: Mon Feb 22, 2016 3:36 pm 
Offline
Cocobolo
Cocobolo

Joined: Thu Mar 17, 2011 1:39 pm
Posts: 124
Location: France
Wow, so sad for you!
I think you have to make a rosewood patch on the side, and make a thick purfking scheme on the top .
Patching a matchind rosewood piece of wood should not be very difficult and in the end it may be almost invisible.

Q.


Top
 Profile  
 
PostPosted: Mon Feb 22, 2016 3:39 pm 
Offline
Cocobolo
Cocobolo

Joined: Fri Jan 15, 2016 9:04 pm
Posts: 315
First name: Andy
Status: Professional
Bevel.

Andy


Top
 Profile  
 
PostPosted: Mon Feb 22, 2016 3:40 pm 
Offline
Contributing Member
Contributing Member
User avatar

Joined: Mon Mar 19, 2007 7:05 am
Posts: 9191
Location: United States
First name: Waddy
Last Name: Thomson
City: Charlotte
State: NC
Focus: Build
Status: Semi-pro
That's my hope. I can live with the wider purfling on the top.

_________________
Waddy

Photobucket Build Album Library

Sound Clips of most of my guitars


Top
 Profile  
 
PostPosted: Mon Feb 22, 2016 3:42 pm 
Offline
Contributing Member
Contributing Member
User avatar

Joined: Mon Mar 19, 2007 7:05 am
Posts: 9191
Location: United States
First name: Waddy
Last Name: Thomson
City: Charlotte
State: NC
Focus: Build
Status: Semi-pro
It's a classical. Not a bevel subject. In my opinion. It's also a nice set of Indonesian Rosewood I got from Lance a year or so ago.

_________________
Waddy

Photobucket Build Album Library

Sound Clips of most of my guitars


Top
 Profile  
 
PostPosted: Mon Feb 22, 2016 3:50 pm 
Offline
Contributing Member
Contributing Member
User avatar

Joined: Mon Aug 23, 2010 11:42 pm
Posts: 1714
First name: John
Last Name: Parchem
City: Seattle
State: Wa
Zip/Postal Code: 98177
Country: USA
Focus: Build
Status: Amateur
Yikes, It looks like the side piece tore out routing the purfling channel and the bearing dropped in? I think using the missing piece, it probable tore out in large chunks, would be best. If you can not find the missing piece I agree that an invisible repair can be made with an off cut. If it were me I would fix it up. As the patch would be a 100% glued to the linings there are no integrity issues.

I would probably point out the repair to a buyer, but I am not sure that it is really necessary.

_________________
http://www.Harvestmoonguitars.com


Top
 Profile  
 
PostPosted: Mon Feb 22, 2016 3:53 pm 
Offline
Contributing Member
Contributing Member
User avatar

Joined: Mon Apr 16, 2012 12:47 pm
Posts: 2575
First name: Jay
Last Name: De Rocher
City: Bothell
State: Washington
I can't quite tell from the photo, is the missing rosewood because of a tear out rather than a slip of the router? If so, I sure hope you can find the piece(s) because that would make for a relatively easy fix. Do you have any left over sides material in addition to the binding strips you cut from the sides?

_________________
Once in a while you get shown the light in the strangest of places if you look at it right - Robert Hunter


Top
 Profile  
 
PostPosted: Mon Feb 22, 2016 4:01 pm 
Offline
Contributing Member
Contributing Member
User avatar

Joined: Sat Dec 30, 2006 3:20 am
Posts: 2593
Location: Powell River BC Canada
First name: Danny
Last Name: Vincent
Only 2 choices I'd say. Re top or add more purling.

Sorry to see that. I KNOW how stuff like that can be very upsetting. Just have to chalk it up to "stuff happens" and hopefully learn something. Tough lesson eh.


Top
 Profile  
 
PostPosted: Mon Feb 22, 2016 4:21 pm 
Offline
Brazilian Rosewood
Brazilian Rosewood

Joined: Sun Mar 30, 2008 8:20 am
Posts: 5968
If your linings are tall enough you could cut through them to remove the top (in order to save it). You could then resand the linings/sides to bring them down to a normal binding scheme. In some places the linings might stay proud of the sides. Clean the linings and glue off the edge of the previously removed top (vinegar will loosen most "organic"glues) and reglue it to the remaining linings. Carefully rerout the binding ledge. The body will be slightly thinner (probably not much), but many makers have varied the body depths of their guitars.


Top
 Profile  
 
PostPosted: Mon Feb 22, 2016 5:18 pm 
Offline
Contributing Member
Contributing Member
User avatar

Joined: Fri Jul 10, 2009 4:44 am
Posts: 5584
First name: colin
Last Name: north
Country: Scotland.
Focus: Build
Status: Semi-pro
I feel for you Waddy.
Only thing is, it's just added to my pucker factor - I'm all set up to rout binding ledges tomorrow.........
(Update - "Chippy" Satinwood- Done, a la Gore Book, I can unpucker now.)

_________________
The name catgut is confusing. There are two explanations for the mix up.

Catgut is an abbreviation of the word cattle gut. Gut strings are made from sheep or goat intestines, in the past even from horse, mule or donkey intestines.

Otherwise it could be from the word kitgut or kitstring. Kit meant fiddle, not kitten.


Last edited by Colin North on Tue Feb 23, 2016 10:55 am, edited 1 time in total.

Top
 Profile  
 
PostPosted: Mon Feb 22, 2016 6:04 pm 
Offline
Contributing Member
Contributing Member
User avatar

Joined: Mon Mar 19, 2007 7:05 am
Posts: 9191
Location: United States
First name: Waddy
Last Name: Thomson
City: Charlotte
State: NC
Focus: Build
Status: Semi-pro
Well, the binding strips weren't going to be used on this guitar anyway, so I may be able to use one of the closest matching pieces to make a strip to fit. I'm thinking it would be best to just take it all the way to the center of the tail where the sides join, an where the tail graft will be.

I ordered a Luthier Tools self aligning binding jig today. Tired of these bearing cutters that whack the sides.

_________________
Waddy

Photobucket Build Album Library

Sound Clips of most of my guitars


Top
 Profile  
 
PostPosted: Mon Feb 22, 2016 6:17 pm 
Offline
Koa
Koa

Joined: Tue Jan 22, 2008 8:57 pm
Posts: 780
Location: Austin, Texas
ermmm...well, yeah, the bearing rode into the void created by the blowout of the side...I'm betting you weren't climb cutting...it's for things like that I pretty much completely stopped traditional routing and have gone to most always climb cutting (e.g. pulling the router towards you).

no, not trying to rub any salt in your wounds...typically I make a climb cut pass and if no problems are indicated I go forwards for a final clean up when routing stuff...in general, if there is a flaw in the wood such as appears to be in your case, climb cutting will not blow the piece away, rather one will notice the issue and have a chance to glue it back together


Top
 Profile  
 
PostPosted: Mon Feb 22, 2016 6:39 pm 
Offline
Brazilian Rosewood
Brazilian Rosewood

Joined: Mon Jan 28, 2008 5:21 am
Posts: 4915
Location: Central PA
First name: john
Last Name: hall
City: Hegins
State: pa
Zip/Postal Code: 17938
Country: usa
Focus: Build
Status: Professional
next time use a climb cut OUCH
I agree that taking it to the tail piece is the best option. You will be surprised how good this will hide for you.

_________________
John Hall
blues creek guitars
Authorized CF Martin Repair
Co President of ASIA
You Don't know what you don't know until you know it


Top
 Profile  
 
PostPosted: Mon Feb 22, 2016 6:57 pm 
Offline
Contributing Member
Contributing Member
User avatar

Joined: Mon Mar 19, 2007 7:05 am
Posts: 9191
Location: United States
First name: Waddy
Last Name: Thomson
City: Charlotte
State: NC
Focus: Build
Status: Semi-pro
Actually, I was climb cutting as I understand it. Maybe my understanding is flawed!

_________________
Waddy

Photobucket Build Album Library

Sound Clips of most of my guitars


Top
 Profile  
 
PostPosted: Mon Feb 22, 2016 7:31 pm 
Offline
Contributing Member
Contributing Member
User avatar

Joined: Mon Jan 08, 2007 3:47 pm
Posts: 1213
Location: Raleigh, NC
First name: Ringo
Long grain patch on the side should be easy and invisible, especially since it cleaved right down the grain line. Pain in the butt, but it's just cosmetic.

Only advice I'd give is to use hide glue... titebond or similar even with a pretty good fit can show a yellow line under finish. Ask me how I know that :(


Top
 Profile  
 
PostPosted: Mon Feb 22, 2016 7:38 pm 
Offline
Contributing Member
Contributing Member
User avatar

Joined: Fri Dec 17, 2010 6:22 pm
Posts: 1295
First name: Miguel
Last Name: Bernardo
Country: portugal
Focus: Build
Status: Semi-pro
nothing much to add except that i feel your pain... must be a terrible punch in your stomach. i had bits digging into the wood but not by that much.

hang in there Waddy!

_________________
member of the guild of professional dilettantes


Top
 Profile  
 
PostPosted: Mon Feb 22, 2016 7:51 pm 
Offline
Koa
Koa

Joined: Tue Jan 22, 2008 8:57 pm
Posts: 780
Location: Austin, Texas
climb cut: router is to right of wood...operator is behind router and router is being pulled towards him/her...this is non-traditional as with big bits and such the router can tend to want to fly towards you and go out of control.

anyway, if you were doing a climb cut and this incident happened, then there is not a darned thing you could have done better...if a weakness like that was present in the wood then that's that...

another 'solution' would be to make a decorative inlay type of thing on both ends of the guitar (e.g. symmetry)...said 'inlay' would be a patch for the blown out area, and could be mirror reflected on the other side of the end graft...I think some sort of curve could be incorporated and it would look really nice


Top
 Profile  
 
PostPosted: Mon Feb 22, 2016 8:12 pm 
Offline
Contributing Member
Contributing Member
User avatar

Joined: Sat Feb 02, 2008 4:01 pm
Posts: 1104
Location: Winfield, IL.
Personally, I would beat the living H.E. double hockey sticks out of it with a framing hammer and curse a lot. You seem quite a bit more reserved than that. Best of luck.

Steve


Top
 Profile  
 
PostPosted: Mon Feb 22, 2016 8:47 pm 
Offline
Contributing Member
Contributing Member
User avatar

Joined: Mon Apr 16, 2012 12:47 pm
Posts: 2575
First name: Jay
Last Name: De Rocher
City: Bothell
State: Washington
Mike_P wrote:
ermmm...well, yeah, the bearing rode into the void created by the blowout of the side...I'm betting you weren't climb cutting...it's for things like that I pretty much completely stopped traditional routing and have gone to most always climb cutting (e.g. pulling the router towards you).

no, not trying to rub any salt in your wounds...typically I make a climb cut pass and if no problems are indicated I go forwards for a final clean up when routing stuff...in general, if there is a flaw in the wood such as appears to be in your case, climb cutting will not blow the piece away, rather one will notice the issue and have a chance to glue it back together


Your post made me realize that I hadn't really given any thought before to what conventional versus climb cuts mean for the binding channels as opposed to the purfling channels in the top or back. I was taught to rout "downhill" in both directions from the widest points of the upper and lower bouts which results in climb cuts in four sections as in the diagram from the StewMac site below to avoid tear out because of routing across the end grain of the top and back. I just carried that same pattern over to routing the binding channels in the sides by default, but there you aren't routing across end grain (except possibly in some really wildly figured wood). It occurs to me that the only time I've experienced tear out was in highly figured bubinga in two sections where I was making a pass in the conventional cut direction. Have you found that using a climb cut for the sides eliminates blowouts?

Image

_________________
Once in a while you get shown the light in the strangest of places if you look at it right - Robert Hunter


Top
 Profile  
 
PostPosted: Mon Feb 22, 2016 9:12 pm 
Offline
Contributing Member
Contributing Member
User avatar

Joined: Sat Jan 31, 2009 8:50 pm
Posts: 2260
Location: Seattle WA
Focus: Build
Status: Semi-pro
WaddyThomson wrote:
Tired of these bearing cutters that whack the sides.
Has this happened b4?! Maybe cutter getting dull? I suspect maybe a little runout in just the wrong spot can be a factor. Using that downcut bit it sure attractive.

I did my first 2 all by hand with a gramil (for dayz), so I am really appreciating powering through, but I always get a little nervous on this part. I try to do it in a multi pass approach.

Purdy kerfing!

_________________
Pat


Top
 Profile  
 
PostPosted: Mon Feb 22, 2016 9:24 pm 
Offline
Contributing Member
Contributing Member

Joined: Sun Jan 27, 2008 4:10 pm
Posts: 2764
First name: Tom
Last Name: West
State: Nova Scotia
Country: Canada
Focus: Build
Status: Amateur
J De Rocher wrote:
Have you found that using a climb cut for the sides eliminates blowouts?


Climb milling is from the outside to the inside while conventional milling is from the inside to the outside. Climb milling pushes wood inward and together,conventional pushes out and apart. At one time I followed the traditional patterns until it was pointed out by Trevor Gore that climb milling did away with all that and was very effective. Thanks again Trevor.
Tom

_________________
A person who has never made a mistake has never made anything!!!


These users thanked the author Tom West for the post: Colin North (Tue Feb 23, 2016 9:55 am)
Top
 Profile  
 
PostPosted: Mon Feb 22, 2016 9:29 pm 
Offline
Contributing Member
Contributing Member

Joined: Sun Jan 27, 2008 4:10 pm
Posts: 2764
First name: Tom
Last Name: West
State: Nova Scotia
Country: Canada
Focus: Build
Status: Amateur
Waddy: So sorry to see these pictures. No help but I find routing channels turns up the pucker factor. I tend to agree with Andy about the bevel. I know it not traditional but maybe a talk with the customer and you both could try a bit of a new path. Hope you can work it out somehow. Good luck.
Tom

_________________
A person who has never made a mistake has never made anything!!!


Top
 Profile  
 
PostPosted: Mon Feb 22, 2016 10:11 pm 
Offline
Koa
Koa

Joined: Tue Jan 22, 2008 8:57 pm
Posts: 780
Location: Austin, Texas
Tom West wrote:
J De Rocher wrote:
Have you found that using a climb cut for the sides eliminates blowouts?


Climb milling is from the outside to the inside while conventional milling is from the inside to the outside. Climb milling pushes wood inward and together,conventional pushes out and apart. At one time I followed the traditional patterns until it was pointed out by Trevor Gore that climb milling did away with all that and was very effective. Thanks again Trevor.
Tom


exactly...so the cutter is essentially compressing the wood, which greatly mitigates the chance of the wood blowing into pieces...rather flaws in the wood will usually be exposed (come loose, split, whatever) but still stay intact leaving you with the chance to glue it back together in place as opposed to crawling around on the floor looking for the piece that flew God knows where in the work area (been there, done that, worn that nasty shirt)...

the typical diagrams as posted above for directions of routing are more pertained to worries about the top wood and it's grain structure...with a nice sharp bit I worry more about the undulations in the grain of the hardwoods...if one is really paranoid about the top then simply do your first pass of routing with a larger bearing and climb cut then switch out to the final bearing and follow the diagram for the final pass...a lot of this can be ameliorated by taking your time...this is a binding channel (rabbet) and any burns caused by being too slow will never be seen.


These users thanked the author Mike_P for the post: Colin North (Tue Feb 23, 2016 10:57 am)
Top
 Profile  
 
PostPosted: Mon Feb 22, 2016 10:19 pm 
Offline
Contributing Member
Contributing Member
User avatar

Joined: Thu May 12, 2005 5:46 am
Posts: 2997
Location: United States
Man, I feel for ya Waddy. I've had the same thing happen on a side, I was able to make an invisible fix for the side using some of the pieces that blew out and some off cuts from the same area, but I've never been able to make an acceptable fix on the top having to cross grain lines like that.
Keep us posted!
-JW

_________________
Jim Watts
http://jameswattsguitars.com


Top
 Profile  
 
PostPosted: Mon Feb 22, 2016 10:26 pm 
Offline
Contributing Member
Contributing Member
User avatar

Joined: Mon Mar 19, 2007 7:05 am
Posts: 9191
Location: United States
First name: Waddy
Last Name: Thomson
City: Charlotte
State: NC
Focus: Build
Status: Semi-pro
I cut according to the diagram. Actually, I cut downhill each time. and came back around counter clockwise for a clean up pass. I found a piece, but it won't fit the blow out. I'm going to just have to splice in a piece from the best matching piece of one of the binding strips.

This is the first time I've ever had this kind of problem. My first time with Indonesian Rosewood too. It's more chippy than EIR.

_________________
Waddy

Photobucket Build Album Library

Sound Clips of most of my guitars


Top
 Profile  
 
Display posts from previous:  Sort by  
Post new topic Reply to topic  [ 75 posts ]  Go to page 1, 2, 3  Next

All times are UTC - 5 hours


Who is online

Users browsing this forum: Bing [Bot] and 11 guests


You cannot post new topics in this forum
You cannot reply to topics in this forum
You cannot edit your posts in this forum
You cannot delete your posts in this forum
You cannot post attachments in this forum

Jump to:  
Powered by phpBB® Forum Software © phpBB Group
phpBB customization services by 2by2host.com