Official Luthiers Forum!

Owned and operated by Lance Kragenbrink
It is currently Tue Jul 22, 2025 3:05 pm


All times are UTC - 5 hours


Forum rules


Be nice, no cussin and enjoy!


Post new topic Reply to topic  [ 22 posts ] 
Author Message
PostPosted: Thu Nov 04, 2010 2:08 am 
Offline
Contributing Member
Contributing Member
User avatar

Joined: Tue Jan 04, 2005 10:03 am
Posts: 6680
Location: Abbotsford, BC Canada
OK, I'm really excitted about finally getting a buffer set up. Here it is.

1" dia shaft, 36" long, 1/4HP 1725 RMP motor, stepped down to 750 RPM with my home made pully :D . Total cost was $140 including the buffs and the Menzerna componds from Shane at highmountain.

I should mention that my buffer is going to be wall mounted with the motor hanging down and the pully out of the way. This is upside down just to set it up.

Image

Here it is running. It's very smooth. I'm looking forward to getting to use it soon.

Image

Here's my question. What do you do when buffing necks with frets already installed? Of course I don't want the fret material to imbed into the fretboard so what do I do to finish the fretboard?

Thanks to all who have posted pictures of their buffers in the past. I've spent a lot of time in the archives to get this thing done.

Cheers.

_________________
My Facebook Guitar Page

"There's really no wrong way, as long as the results are what's desired." Charles Fox

"We have to constantly remind ourselves what we're doing....No Luthier is putting a man on the moon!" Harry Fleishman

"Generosity is always different in the eye of the person who didn't receive anything, but who wanted some." Waddy Thomson


Top
 Profile  
 
PostPosted: Thu Nov 04, 2010 6:11 am 
Offline
Brazilian Rosewood
Brazilian Rosewood

Joined: Wed Apr 08, 2009 9:34 am
Posts: 3081
Rod, I tape off the fretboard (I put frets in after the instrument is together, but buffing is the same whether you fret first or not), finish, buff. I let the finish overlap the fretboard about 1/32", then clean up the edges after it's buffed.


Top
 Profile  
 
PostPosted: Thu Nov 04, 2010 9:02 am 
Offline
Contributing Member
Contributing Member
User avatar

Joined: Fri Apr 03, 2009 2:46 pm
Posts: 243
First name: Mark
Last Name: Morris
City: Sedona
State: AZ
Zip/Postal Code: 86339
Country: USA
Focus: Build
Status: Amateur
Rod, where'd you pick up the shaft/bearings? Seems like an optimal size and yet my question seems...a little off.


Top
 Profile  
 
PostPosted: Thu Nov 04, 2010 9:35 am 
Offline
Brazilian Rosewood
Brazilian Rosewood
User avatar

Joined: Mon Dec 27, 2004 3:50 pm
Posts: 4662
Location: Napa, CA
Looks good...and thrifty too, Rod! I'd cover that pulley and belt and pad as much as possible so you don't have damage from inadvertent bumps.

_________________
JJ
Napa, CA
http://www.DonohueGuitars.com


Top
 Profile  
 
PostPosted: Thu Nov 04, 2010 10:44 am 
Offline
Mahogany
Mahogany
User avatar

Joined: Mon Feb 11, 2008 10:15 pm
Posts: 94
Location: Washington State
First name: Mark
Last Name: Schrier
State: Washington
Focus: Build
Status: Amateur
Rod,

Yours is pretty similar to what I came up with a while back, except I got carried away with a 54" shaft length for clearance to the pillow blocks. Ended up with a little shaft wobble but it is tolerable.

Attachment:
IMG_2245 LF.JPG


One thing that I have found is that the speed is a little slow. I am running at about 735 RPM shaft speed with 14" dia. buffing wheels. Now that I have gotten used to it, I'm thinking of bumping the speed up to somewhere around 850-900.


You do not have the required permissions to view the files attached to this post.

_________________
A world without music would Bb.


Top
 Profile  
 
PostPosted: Thu Nov 04, 2010 10:48 am 
Offline
Brazilian Rosewood
Brazilian Rosewood
User avatar

Joined: Fri Jan 15, 2010 3:34 pm
Posts: 2047
First name: Stuart
Last Name: Gort
Country: USA
Focus: Build
Status: Semi-pro
It may not be an issue on a 750 rpm buffer but on all the buffers I've used the threads on the left side are opposite threads....which will work to tighten a loose buffing wheel assembly as buffing pressure is applied. This is a safety thing that won't be an issue....if the nut never comes loose.

In this case I'd want to see two nuts on the left side....one acting as a locknut.

Also...I believe there are set screws on the inside collars of the pillow blocks to hold postion on the shaft. I don't see a flat on the shaft so there is some concern that the set screws will be able to hold the shaft in a vibration environment. Usually, when vibration is present, a shaft with a flat would be the first choice. The thing to do here is mark the shaft on each side of the pillow block with a Sharpie and get used to looking for any sign of movement. Chances are this is going to be fine but the way that's designed....it's going to get ugly if that shaft doesn't stay put.

_________________
I read Emerson on the can. A foolish consistency is the hobgoblin of little minds...true...but a consistent reading of Emerson has its uses nevertheless.

StuMusic


Top
 Profile  
 
PostPosted: Thu Nov 04, 2010 1:41 pm 
Offline
Contributing Member
Contributing Member
User avatar

Joined: Tue Jan 04, 2005 10:03 am
Posts: 6680
Location: Abbotsford, BC Canada
NWflyonly wrote:
Rod, where'd you pick up the shaft/bearings? Seems like an optimal size and yet my question seems...a little off.


Hey Mark, well I use to work in a machine shop so I have connections ;) The shaft cost me the eventual buffing of a friends guitar (which I help him make). The bearings I got at a local bearing supply company (these seem to be in most mid size cities in Canada, but for you guys in the US it seems more difficult to obtain idunno 
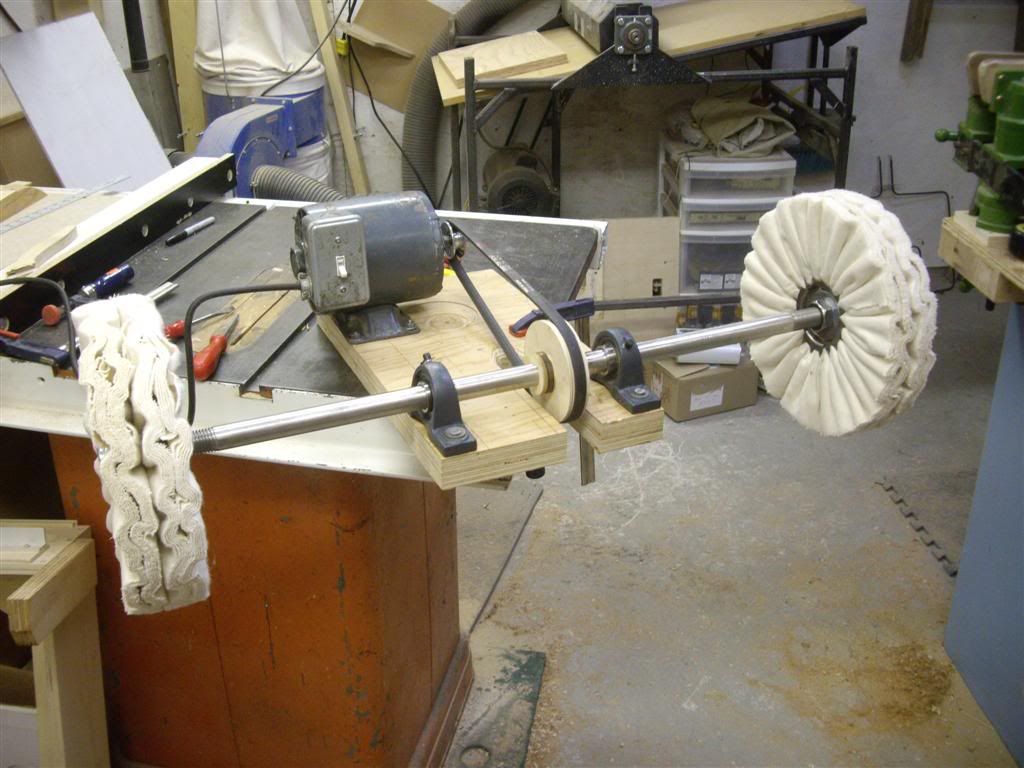
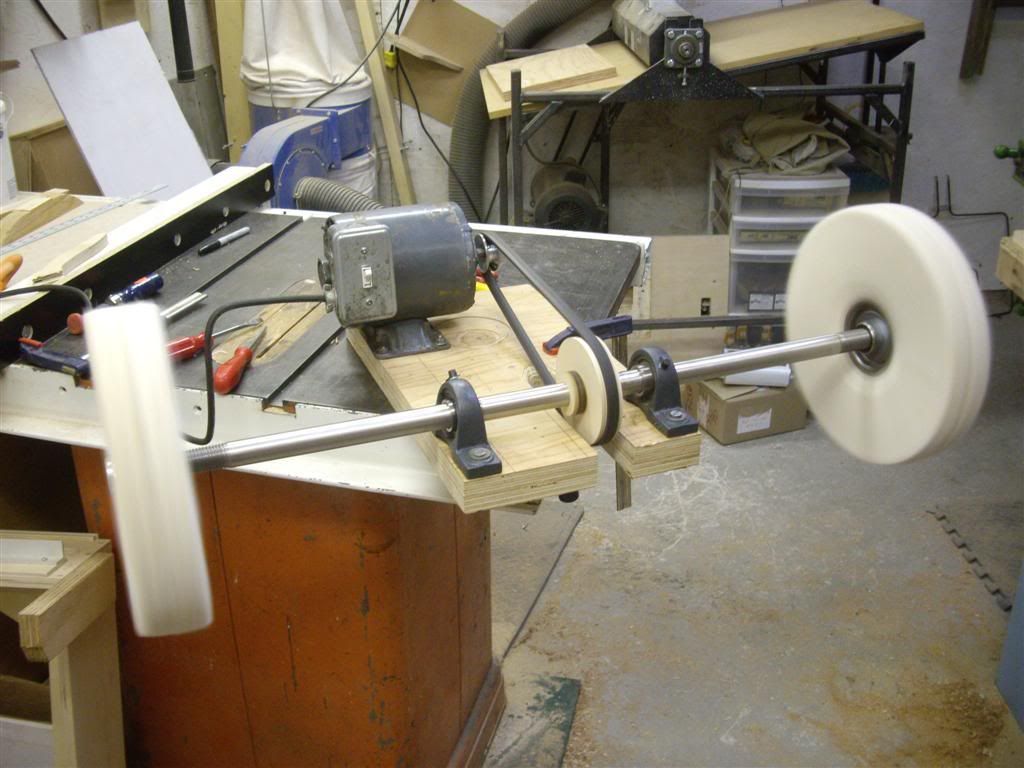
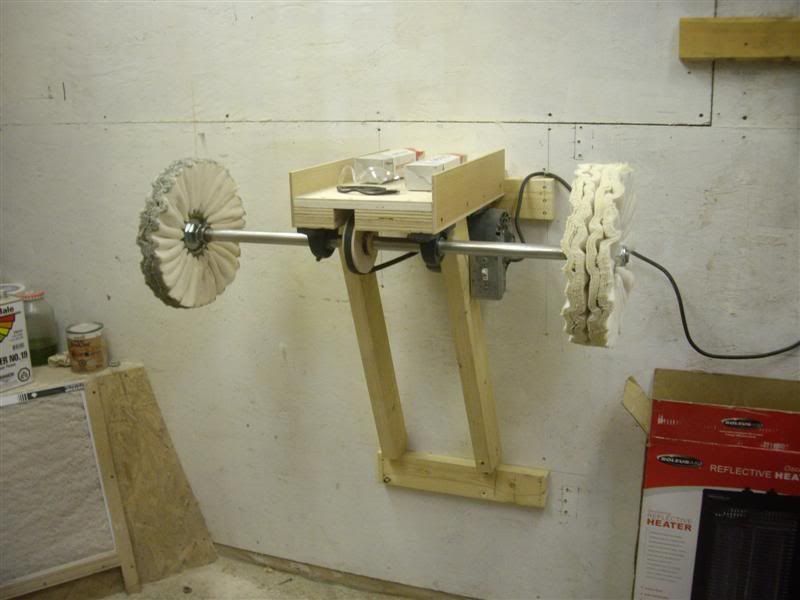
). The bearings totaled $22.62

JJ Donohue wrote:
Looks good...and thrifty too, Rod! I'd cover that pulley and belt and pad as much as possible so you don't have damage from inadvertent bumps.


Ya, when I flip this thing over and mount it to the wall, the pulley and belt will be out of the way, none the less, I'm going to put some sort of covering on it as well as padding the base, shafts and anything else that may be a possible ding waiting to happen.

woodbutcher50 wrote:
Rod,

Yours is pretty similar to what I came up with a while back, except I got carried away with a 54" shaft length for clearance to the pillow blocks. Ended up with a little shaft wobble but it is tolerable.

One thing that I have found is that the speed is a little slow. I am running at about 735 RPM shaft speed with 14" dia. buffing wheels. Now that I have gotten used to it, I'm thinking of bumping the speed up to somewhere around 850-900.


Ya, I was also thinking of going to a longer shaft but I don't have the room (don't really have the room for this either :OL). With yours, you could have put the bearings closer together to make the same room. I just copied the Stew Mac specs to make mine.

Image

Bearing spacing was based off the stew mac specs.

Also, my buffs are 12" so my surface speed at 750 rpm will be lower than yours at with 14" buffs.

Zlurgh wrote:
It may not be an issue on a 750 rpm buffer but on all the buffers I've used the threads on the left side are opposite threads....which will work to tighten a loose buffing wheel assembly as buffing pressure is applied. This is a safety thing that won't be an issue....if the nut never comes loose.

In this case I'd want to see two nuts on the left side....one acting as a locknut.

Also...I believe there are set screws on the inside collars of the pillow blocks to hold postion on the shaft. I don't see a flat on the shaft so there is some concern that the set screws will be able to hold the shaft in a vibration environment. Usually, when vibration is present, a shaft with a flat would be the first choice. The thing to do here is mark the shaft on each side of the pillow block with a Sharpie and get used to looking for any sign of movement. Chances are this is going to be fine but the way that's designed....it's going to get ugly if that shaft doesn't stay put.


I think I'll add a second jam nut on the inside of the buffs to lock the inside nuts in place. The outside nuts are nylon lock nuts which would take a lot to get off.

As for the flats, I ground flat spots for all set screws on the bearings and the pully.

Haans, I'm not totally following, but I think it best to start a new thread on my fretboard buffing question. I'll quote you in the new thread.

Thanks ya'll

_________________
My Facebook Guitar Page

"There's really no wrong way, as long as the results are what's desired." Charles Fox

"We have to constantly remind ourselves what we're doing....No Luthier is putting a man on the moon!" Harry Fleishman

"Generosity is always different in the eye of the person who didn't receive anything, but who wanted some." Waddy Thomson


Top
 Profile  
 
PostPosted: Thu Nov 04, 2010 2:04 pm 
Offline
Contributing Member
Contributing Member
User avatar

Joined: Tue Jan 04, 2005 10:03 am
Posts: 6680
Location: Abbotsford, BC Canada
Haans wrote:
Rod, I tape off the fretboard (I put frets in after the instrument is together, but buffing is the same whether you fret first or not), finish, buff. I let the finish overlap the fretboard about 1/32", then clean up the edges after it's buffed.


I just realized I asked my question wrong, you answered my question as asked thanks Haans :)

I ment to ask about the fretboard with frets installed.... Again, I'll post a new thread with the question.

_________________
My Facebook Guitar Page

"There's really no wrong way, as long as the results are what's desired." Charles Fox

"We have to constantly remind ourselves what we're doing....No Luthier is putting a man on the moon!" Harry Fleishman

"Generosity is always different in the eye of the person who didn't receive anything, but who wanted some." Waddy Thomson


Top
 Profile  
 
PostPosted: Thu Nov 04, 2010 7:02 pm 
Offline
Contributing Member
Contributing Member
User avatar

Joined: Wed Oct 22, 2008 9:31 pm
Posts: 1877
First name: Darryl
Last Name: Young
State: AR
Country: USA
Focus: Build
Status: Amateur
I like it Rod! I'm wanting to build a buffer myself so this is timely for me.

I like how you used nuts inside the wheels......cheaper than trying to machine a step in the shaft. An extra jam nut on the inside against the existing nut would be ideal and easy as you mentioned.

Did you machine the shaft to fit the pillow block bearings? Where you machined the flats on the shaft for the set keys, does it make the shaft unbalanced at all (or is the RPM not high enough to matter)?

Which Mazerna buffing compounds did you go with? Any particular reason you went with 12" wheels over the 14"? Curious since I need to make a decision on wheel size.

Overall, I'm debating if it's better to build this style or buy the Shop Fox. Seems the longer shaft in this design would give a little more clearance around the buffing wheel.

_________________
Formerly known as Adaboy.......


Top
 Profile  
 
PostPosted: Thu Nov 04, 2010 7:22 pm 
Offline
Contributing Member
Contributing Member
User avatar

Joined: Wed Oct 22, 2008 9:31 pm
Posts: 1877
First name: Darryl
Last Name: Young
State: AR
Country: USA
Focus: Build
Status: Amateur
Just did a search and found these 1", cast iron pillow block ball bearings at Surplus Center for $8.95 each. Any reason this bearing wouldn't work?

Image

_________________
Formerly known as Adaboy.......


Top
 Profile  
 
PostPosted: Thu Nov 04, 2010 8:33 pm 
Offline
Contributing Member
Contributing Member
User avatar

Joined: Tue Jan 04, 2005 10:03 am
Posts: 6680
Location: Abbotsford, BC Canada
Hey Darryl, see answers in Red

Darryl Young wrote:
I like it Rod! I'm wanting to build a buffer myself so this is timely for me.

I like how you used nuts inside the wheels......cheaper than trying to machine a step in the shaft. An extra jam nut on the inside against the existing nut would be ideal and easy as you mentioned.

Did you machine the shaft to fit the pillow block bearings? No, I did have to sand the inside of the bearings slightly to fit the shaft. I used my spindle sander to do it. Where you machined the flats on the shaft for the set keys, does it make the shaft unbalanced at all (or is the RPM not high enough to matter)? The flat on the shaft only needs to be 1/16" deep, I just used a file to do it. It's not enough material removal to unbalance the shaft, besides this is the support location of the shaft not hanging out at the end.

Which Mazerna buffing compounds did you go with? I went with #16 & #18 which is what seems like most others use. I'm only going off what I've read here in the archives. I got the Menzerna from Shane at High Mountain Tonewood. Any particular reason you went with 12" wheels over the 14"? Curious since I need to make a decision on wheel size. Both LMI & Stew Mac sell the 12" buffs, most guys seem to use 12" buffs so I really didn't see any need to go to 14" buffs idunno

Overall, I'm debating if it's better to build this style or buy the Shop Fox. Seems the longer shaft in this design would give a little more clearance around the buffing wheel. If you can get the shaft machined relativly inexpensivly, it's much more economical to make it yourself (IMO) but then, I always think it's better to make stuff myself if I can make it to the same level of quality and/or utility as a commercially sold item.


Darryl Young wrote:
Just did a search and found these 1", cast iron pillow block ball bearings at Surplus Center for $8.95 each. Any reason this bearing wouldn't work?

Image


Those are the same bearings that I have.

_________________
My Facebook Guitar Page

"There's really no wrong way, as long as the results are what's desired." Charles Fox

"We have to constantly remind ourselves what we're doing....No Luthier is putting a man on the moon!" Harry Fleishman

"Generosity is always different in the eye of the person who didn't receive anything, but who wanted some." Waddy Thomson


Top
 Profile  
 
PostPosted: Thu Nov 04, 2010 8:44 pm 
Offline
Mahogany
Mahogany
User avatar

Joined: Mon Feb 11, 2008 10:15 pm
Posts: 94
Location: Washington State
First name: Mark
Last Name: Schrier
State: Washington
Focus: Build
Status: Amateur
Yeah Rod,

You got off easy on the machining of the axle. That's where I got shafted by a machine shop. Pun intended. I did have them do left handed threads, though.

Mark

_________________
A world without music would Bb.


Top
 Profile  
 
PostPosted: Thu Nov 04, 2010 8:47 pm 
Offline
Contributing Member
Contributing Member
User avatar

Joined: Tue Jan 04, 2005 10:03 am
Posts: 6680
Location: Abbotsford, BC Canada
woodbutcher50 wrote:
Yeah Rod,

You got off easy on the machining of the axle. That's where I got shafted by a machine shop. Pun intended. I did have them do left handed threads, though.

Mark


Ya, I know I'm lucky with my machine shop connections :D I use to design machinery so this stuff also comes easy to me...

Mark, where are you located in Washington? I'm just on the WA/BC border.

_________________
My Facebook Guitar Page

"There's really no wrong way, as long as the results are what's desired." Charles Fox

"We have to constantly remind ourselves what we're doing....No Luthier is putting a man on the moon!" Harry Fleishman

"Generosity is always different in the eye of the person who didn't receive anything, but who wanted some." Waddy Thomson


Top
 Profile  
 
PostPosted: Thu Nov 04, 2010 8:52 pm 
Offline
Contributing Member
Contributing Member
User avatar

Joined: Wed Oct 22, 2008 9:31 pm
Posts: 1877
First name: Darryl
Last Name: Young
State: AR
Country: USA
Focus: Build
Status: Amateur
Thanks Rod! I'll check on a 1" shaft and how much it would be to get it threaded.

Looks like there are good deals on e-bay on bearings. usabearingsbelts is a top rated seller and has these 1" pillow block bearings for $7.45 each:

http://cgi.ebay.com/1-UCP205-16-PREMIUM-Pillow-Block-Bearing-NEW-/370449828876?pt=LH_DefaultDomain_0&hash=item564087cc0c

Or he has this set of 2 pillow block bearings for $24.29 and it includes shipping:

http://cgi.ebay.com/2-1-Pillow-Block-Bearings-UCP205-16-Qty-2-/390173665208?pt=LH_DefaultDomain_0&hash=item5ad829a7b8

Image

_________________
Formerly known as Adaboy.......


Top
 Profile  
 
PostPosted: Thu Nov 04, 2010 8:52 pm 
Offline
Mahogany
Mahogany
User avatar

Joined: Mon Feb 11, 2008 10:15 pm
Posts: 94
Location: Washington State
First name: Mark
Last Name: Schrier
State: Washington
Focus: Build
Status: Amateur
About 5 miles East of Exit 200 on I-5.

BTW, my apologies for hijacking your thread. Just intended to share the speed thing with you.

Mark

_________________
A world without music would Bb.


Top
 Profile  
 
PostPosted: Thu Nov 04, 2010 9:15 pm 
Offline
Contributing Member
Contributing Member
User avatar

Joined: Tue Jan 04, 2005 10:03 am
Posts: 6680
Location: Abbotsford, BC Canada
Darryl Young wrote:
Thanks Rod! I'll check on a 1" shaft and how much it would be to get it threaded.

Looks like there are good deals on e-bay on bearings. usabearingsbelts is a top rated seller and has these 1" pillow block bearings for $7.45 each:

http://cgi.ebay.com/1-UCP205-16-PREMIUM-Pillow-Block-Bearing-NEW-/370449828876?pt=LH_DefaultDomain_0&hash=item564087cc0c

Or he has this set of 2 pillow block bearings for $24.29 and it includes shipping:

http://cgi.ebay.com/2-1-Pillow-Block-Bearings-UCP205-16-Qty-2-/390173665208?pt=LH_DefaultDomain_0&hash=item5ad829a7b8

Image


Make sure you bring the bearings with you to the machine shop. That way they can ensure they fit on the shaft. Not all bearings are created equally and as they say, you get what you pay for. Tollerances on the cheaper bearings won't be as tight as on a SKF bearing or something of higher quality.

If you want, I can sketch out the shaft with the locations of the flats for the bearings and the pully (where I placed mine anyway). Or just take the picture of mine along with the Stew Mac specs to them. They will know what you want to do. If getting a machine shop to thread the ends for you, might as well get the left hand thread and right hand thread done. Just make sure you install the shaft the right way for the spin to tighten the nuts and not loosen them ;) or just go with nylon lock nuts and both right hand threads (normal).

_________________
My Facebook Guitar Page

"There's really no wrong way, as long as the results are what's desired." Charles Fox

"We have to constantly remind ourselves what we're doing....No Luthier is putting a man on the moon!" Harry Fleishman

"Generosity is always different in the eye of the person who didn't receive anything, but who wanted some." Waddy Thomson


Top
 Profile  
 
PostPosted: Fri Nov 12, 2010 3:39 am 
Offline
Contributing Member
Contributing Member
User avatar

Joined: Tue Jan 04, 2005 10:03 am
Posts: 6680
Location: Abbotsford, BC Canada
Got the buffer all set up on the wall and did some practice buffing on my first guitar hanging in the shop. Actually, buffing is pretty simple really and the low speed of the buffer is nice. I purposefully put an edge into the buff to see how hard it would grab the guitar, but it was actually quite managable at this speed. The finish never got hot, but wow it did a good job of bringing up the shine.

So glad so many others have asked about setting up a buffer and how even more folks have answered. Tons of great posts in the archives to go off.

Here's the buffer set up and mounted to the shop wall. Very stable and really quiet. This might turn out to be my most favorite part of building :D

Image

_________________
My Facebook Guitar Page

"There's really no wrong way, as long as the results are what's desired." Charles Fox

"We have to constantly remind ourselves what we're doing....No Luthier is putting a man on the moon!" Harry Fleishman

"Generosity is always different in the eye of the person who didn't receive anything, but who wanted some." Waddy Thomson


Top
 Profile  
 
PostPosted: Fri Nov 12, 2010 5:32 am 
Offline
Cocobolo
Cocobolo
User avatar

Joined: Mon Dec 08, 2008 11:55 pm
Posts: 145
Location: Perth, Western Australia
Rod True wrote:
This might turn out to be my most favorite part of building :D

Rod, I'm not sure I'd go as far as that, but having recently dug deep and gone down this path myself, it's no longer something I dread. Previously, buffing by hand, it was a part of the process I strongly disliked, mostly I guess because the results never matched my expectations no matter how much time and effort I put into it. Good move!

_________________
Cheers
Pete


Top
 Profile  
 
PostPosted: Fri Nov 12, 2010 9:03 am 
Offline
Contributing Member
Contributing Member
User avatar

Joined: Wed Oct 22, 2008 9:31 pm
Posts: 1877
First name: Darryl
Last Name: Young
State: AR
Country: USA
Focus: Build
Status: Amateur
Looks great Rod!

My brother is a machinist and he is trying to round a shaft and bearings up for me.....on the cheap. We'll see how that goes.

I like how you mounted the buffer. I was thinking of something similar but had planned for the unit to rotate down and hang from the wall when not in use. Looking at your, it might be more useful to leave it up and make use of the "shelf" as you did. Will need to think about which version I like more.

_________________
Formerly known as Adaboy.......


Top
 Profile  
 
PostPosted: Fri Nov 12, 2010 9:26 am 
Offline
Cocobolo
Cocobolo
User avatar

Joined: Mon Dec 08, 2008 11:55 pm
Posts: 145
Location: Perth, Western Australia
Darryl Young wrote:
I like how you mounted the buffer. I was thinking of something similar but had planned for the unit to rotate down and hang from the wall when not in use. Looking at your, it might be more useful to leave it up and make use of the "shelf" as you did. Will need to think about which version I like more.

Darryl, while I like what Rod has done, I don't have a lot of room so mounted my buffer assembly and motor on a solid piece of wood which can be securely clamped the the corner of my workbench. When not in use - which is most of the time - it can then either be hung on a wall somewhere or stowed away out of sight and harm's way.

_________________
Cheers
Pete


Top
 Profile  
 
PostPosted: Fri Nov 12, 2010 9:46 am 
Offline
Brazilian Rosewood
Brazilian Rosewood
User avatar

Joined: Wed Feb 20, 2008 9:12 pm
Posts: 6994
First name: Mike
Last Name: O'Melia
City: Huntsville
State: Alabama
Focus: Build
Status: Semi-pro
For those without access to machine shops, go-kart stores sell 36" shafts (axles) and I believe one side is reverse threaded. They do tend to have key slots in them.

Mike


Top
 Profile  
 
PostPosted: Fri Nov 12, 2010 11:16 am 
Offline
Contributing Member
Contributing Member
User avatar

Joined: Tue Jan 04, 2005 10:03 am
Posts: 6680
Location: Abbotsford, BC Canada
I have a very small shop at 185 sft in size (I know Waddy's shop is smaller, but they say sized doesn't matter :D ) and I really had a hard time deciding to go with a full size buffer like this.

I set it up right where my spray booth is normally located. I took the spray booth doors off and stored them in my crawlspace. This gave me the space to set up the buffer.

The buffer is mounted to two 2x4's drilled into studs. The 2x4's will remain when I'm done with the buffer, but the buffer will come down and be stored in my loft area. Only need to remove 7 screws and it's off the wall and I can put the spray booth doors back (when it comes time to spraying). With only making 4 guitars a year, I don't mind having to store a few things out of the way for other things to get done.

We'll see how tonight goes with the buffing :D

_________________
My Facebook Guitar Page

"There's really no wrong way, as long as the results are what's desired." Charles Fox

"We have to constantly remind ourselves what we're doing....No Luthier is putting a man on the moon!" Harry Fleishman

"Generosity is always different in the eye of the person who didn't receive anything, but who wanted some." Waddy Thomson


Top
 Profile  
 
Display posts from previous:  Sort by  
Post new topic Reply to topic  [ 22 posts ] 

All times are UTC - 5 hours


Who is online

Users browsing this forum: bobgramann, Colin North, JimKlingshirn and 30 guests


You cannot post new topics in this forum
You cannot reply to topics in this forum
You cannot edit your posts in this forum
You cannot delete your posts in this forum
You cannot post attachments in this forum

Jump to:  
Powered by phpBB® Forum Software © phpBB Group
phpBB customization services by 2by2host.com