Official Luthiers Forum!

Owned and operated by Lance Kragenbrink
It is currently Thu Aug 07, 2025 3:23 pm


All times are UTC - 5 hours


Forum rules


Be nice, no cussin and enjoy!


Post new topic Reply to topic  [ 54 posts ]  Go to page 1, 2, 3  Next
Author Message
PostPosted: Fri Feb 12, 2010 8:25 am 
Offline
Old Growth Brazilian Rosewood
User avatar

Joined: Fri Nov 02, 2007 9:49 am
Posts: 13651
Location: Ann Arbor, Michigan
First name: Hesh
Last Name: Breakstone
City: Ann Arbor
State: Michigan
Country: United States
Status: Professional
With many of us being snowed in this past week hopefully we've had ample time to do our thing in our shops. I know that I certainly had lots of quality shop time in between moving snow and chasing a deer...

Let's see what's happening in YOUR shops folks?

Here is what's happening in mine:

Getting ready to attach a back to the rim with my trusty nail gun.... :D :

Attachment:
DSC02807.jpg


Made a simple wooden rosette:

Attachment:
DSC02808.jpg


Inlaid said simple wooden rosette in a nice WRC top that I received from an OLF auction:

Attachment:
DSC02817.jpg


Though technically not in my shop this deer consumed 1/2 a day trying to get it rescued because someone shot it in the front leg very recently and hunting season ended here Jan. 1.....

Attachment:
DSC02820.jpg


Received a guitar back from Joe White and will get on the final set-up/assembly as soon as it acclimates to my shop:

Attachment:
DSC02823.jpg


Attachment:
DSC02824.jpg


Started a little finger style OM and have the rim and back completed:

Attachment:
DSC02825.jpg


So that's it for me for this past week.... :D Let's see what's happening in YOUR shops?

Thanks :)


You do not have the required permissions to view the files attached to this post.


Top
 Profile  
 
PostPosted: Fri Feb 12, 2010 8:55 am 
Offline
Koa
Koa
User avatar

Joined: Tue Apr 01, 2008 8:51 am
Posts: 1310
Location: Michigan,U.S.A.
Focus: Build
Status: Professional
I have some new residents in my shop that's taking most of my time. gaah :D They got here last Sat. I have managed to get two butt wedges put in along with a rosette in a sitka top. I'm braceing the top right now.


You do not have the required permissions to view the files attached to this post.


Top
 Profile  
 
PostPosted: Fri Feb 12, 2010 9:47 am 
Offline
Contributing Member
Contributing Member
User avatar

Joined: Wed Oct 08, 2008 11:36 am
Posts: 7473
Location: Southeast US
City: Lenoir City
State: TN
Zip/Postal Code: 37772
Country: US
Focus: Repair
Quail?

_________________
Steve Smith
"Music is what feelings sound like"


Top
 Profile  
 
PostPosted: Fri Feb 12, 2010 9:51 am 
Offline
Koa
Koa
User avatar

Joined: Thu Feb 28, 2008 11:45 pm
Posts: 730
Location: Lincoln, NE
First name: Paul
Last Name: Burner
City: Lincoln
State: Nebraska
Zip/Postal Code: 68506
Country: United States
Focus: Build
Status: Amateur
Hesh - a little off topic - but it your gobar deck on a swivel on some kind?

Can you post some photos of this please?

thanks!

_________________
P A U L B U R N E R
Burner Guitars


Top
 Profile  
 
PostPosted: Fri Feb 12, 2010 10:15 am 
Offline
Old Growth Brazilian Rosewood
User avatar

Joined: Fri Nov 02, 2007 9:49 am
Posts: 13651
Location: Ann Arbor, Michigan
First name: Hesh
Last Name: Breakstone
City: Ann Arbor
State: Michigan
Country: United States
Status: Professional
Wow Mark - you are a Papa!!! :) Yeah what kind of birds are those?

Here you go Paul - BTW this idea of using a TV swivel was suggested to me by OLFer Dean [:Y:]

Attachment:
DSC00691.jpg


Attachment:
DSC00695.jpg


Attachment:
DSC00698.jpg


Attachment:
DSC00699.jpg


Also Paul Kathy Matsushita has a great video of this kind of go-bar deck in action on her excellent web site:

http://home.comcast.net/~kathymatsushita/movies/gobarswivel.mov

Back to our regularly scheduled What's Happening In YOUR shops programing.... :D


You do not have the required permissions to view the files attached to this post.


Top
 Profile  
 
PostPosted: Fri Feb 12, 2010 10:17 am 
Offline
Koa
Koa
User avatar

Joined: Tue Apr 01, 2008 8:51 am
Posts: 1310
Location: Michigan,U.S.A.
Focus: Build
Status: Professional
SteveSmith wrote:
Quail?

Chickens.


Top
 Profile  
 
PostPosted: Fri Feb 12, 2010 10:31 am 
Offline
Contributing Member
Contributing Member
User avatar

Joined: Wed Oct 08, 2008 11:36 am
Posts: 7473
Location: Southeast US
City: Lenoir City
State: TN
Zip/Postal Code: 37772
Country: US
Focus: Repair
Guess they're bigger then I thought.

_________________
Steve Smith
"Music is what feelings sound like"


Top
 Profile  
 
PostPosted: Fri Feb 12, 2010 11:11 am 
Offline
Contributing Member
Contributing Member
User avatar

Joined: Tue Jan 04, 2005 10:03 am
Posts: 6680
Location: Abbotsford, BC Canada
Not snowed in here....

Two guitars curing in the booth...

Making a new top for a OSJ I've been working on for about 1.5 years....

Nothing happening today......

I'm going to the Olympics BABY! [:Y:]

_________________
My Facebook Guitar Page

"There's really no wrong way, as long as the results are what's desired." Charles Fox

"We have to constantly remind ourselves what we're doing....No Luthier is putting a man on the moon!" Harry Fleishman

"Generosity is always different in the eye of the person who didn't receive anything, but who wanted some." Waddy Thomson


Top
 Profile  
 
PostPosted: Fri Feb 12, 2010 11:28 am 
Offline
Cocobolo
Cocobolo

Joined: Fri Sep 21, 2007 2:01 am
Posts: 106
Location: Humboldt, Cal.
Focus: Build
Status: Amateur
Design classical rosette, glue up the 'log', sand radius into log, cut into tiles.....so far, so fun.


You do not have the required permissions to view the files attached to this post.


Top
 Profile  
 
PostPosted: Fri Feb 12, 2010 11:57 am 
Offline
Koa
Koa
User avatar

Joined: Sun Jun 21, 2009 6:34 pm
Posts: 1058
Country: Canada
Finally got the new bandsaw wired, setup, and running. Its a very nice machine, smooth and precise. During my first test cuts I cut veneer .25 mm thick consistently. Also ripped some bracing stock.

Attachment:
DSC05001.JPG

Attachment:
DSC05002.JPG


You do not have the required permissions to view the files attached to this post.


Top
 Profile  
 
PostPosted: Fri Feb 12, 2010 12:07 pm 
Offline
Contributing Member
Contributing Member
User avatar

Joined: Mon Mar 19, 2007 7:05 am
Posts: 9191
Location: United States
First name: Waddy
Last Name: Thomson
City: Charlotte
State: NC
Focus: Build
Status: Semi-pro
Just finished gluing the top on #4, last night, and took it out of the solera, for a look-see, this morning.
Attachment:
P1030131 (Large).JPG
Attachment:
P1030135 (Large).JPG
Attachment:
P1030153 (Large).JPG
Attachment:
P1030154 (Large).JPG
Attachment:
P1030155 (Large).JPG


You do not have the required permissions to view the files attached to this post.

_________________
Waddy

Photobucket Build Album Library

Sound Clips of most of my guitars


Top
 Profile  
 
PostPosted: Fri Feb 12, 2010 12:18 pm 
Offline
Koa
Koa
User avatar

Joined: Wed Sep 26, 2007 12:55 am
Posts: 1505
Location: Lorette, Manitoba, Canada
First name: Douglas
Last Name: Ingram
City: Lorette
State: Manitoba
Country: Canada
Focus: Build
I've been building my entry for the MIMF $100 Acoustic Challenge.

Its an exploration of the Torres FE17 with Tornavoz, but simplified greatly. One of these fine days I intend to do a full blown FE17, but that day is not yet upon us.

Nice Pine top, Ash body, Mahogany neck with Lacewood head plate, will be making my own pegs.

I used the plantilla drawn by Luca Waldner from the original, and have been receiving some very generous advice from Gerhard Oldiges in regards to getting the Tornavoz thing right. I will not enter any discussion about the benefits, function, etc. of the Tornavoz. FE17 had one, so will mine.


You do not have the required permissions to view the files attached to this post.

_________________
Expectation is the source of all misery; comparison the thief of joy.
http://redrivercanoe.ca/


Top
 Profile  
 
PostPosted: Fri Feb 12, 2010 4:44 pm 
Offline
Contributing Member
Contributing Member
User avatar

Joined: Fri Aug 26, 2005 5:49 pm
Posts: 2915
Location: Norway
I'm ticknessing and bracing a bunch of guitar plates. I have a simple home made drum sander, but I do most of my thicknessing with hand planes. If the plates are extra thick, like this EIR back, I start with a jack plane that is set up for coarse shavings...
Attachment:
1-2.jpg


...before smoothing things out a bit with a 604 1/2
Attachment:
1-3.jpg


Here's a nice Aussie blackwood back, the figure really comes alive once planed
Attachment:
1-4.jpg


After most of the wood is planed away, I run all the plates through the drum sander. I have no automatic feed system, so the process is rather tedious...
Attachment:
1-7.jpg


You do not have the required permissions to view the files attached to this post.

_________________
Rian Gitar og Mandolin


Top
 Profile  
 
PostPosted: Fri Feb 12, 2010 6:55 pm 
Offline
Old Growth Brazilian Rosewood
User avatar

Joined: Fri Nov 02, 2007 9:49 am
Posts: 13651
Location: Ann Arbor, Michigan
First name: Hesh
Last Name: Breakstone
City: Ann Arbor
State: Michigan
Country: United States
Status: Professional
Wow Arnt you are a machine my friend! How many backs and/or tops are in that stack? That's some great batch processing!

Douglas I see some really cool details in your work - very cool!

Waddy great looking work and great looking pics too. What are you using for your HHG bottle?

Edward congrats on the new saw!

Doug great looking rosette in process there!

Rod remember your OLF bros like pics when you go to the Olympics please... :)

Lets see some more of what's happening in YOUR shops please? :)


Top
 Profile  
 
PostPosted: Fri Feb 12, 2010 7:03 pm 
Offline
Cocobolo
Cocobolo

Joined: Sun Jan 03, 2010 8:30 pm
Posts: 234
First name: Peter
Country: England
Focus: Build
Status: Amateur
I'm still slowly plodding away with build #1.

I waited a while for some stuff to get shipped over from LMI and when it finally arrived I was on duty at work for 7 days straight.

I got some stuff worthy of note done today though.

I made perspex templates for a few of my plans. No pictures but they came out pretty good. This way i can make moulds and do things a lot easier.

I got around to scrapping the rosette down and sanded it with 220 grit sandpaper. I am pretty happy with the final result.
Image

Here is my Peruvian Walnut back thickened down to where I need it. I then cut it out roughly 3/4" away from the template line.
Image

I then glued my spruce back strip on. I don't have a go-bar deck so I improvised using my weightlifting set. I placed a 4"x2" on the back strip, then stacked heavy weights on that. The result was a solid glue joint bliss 
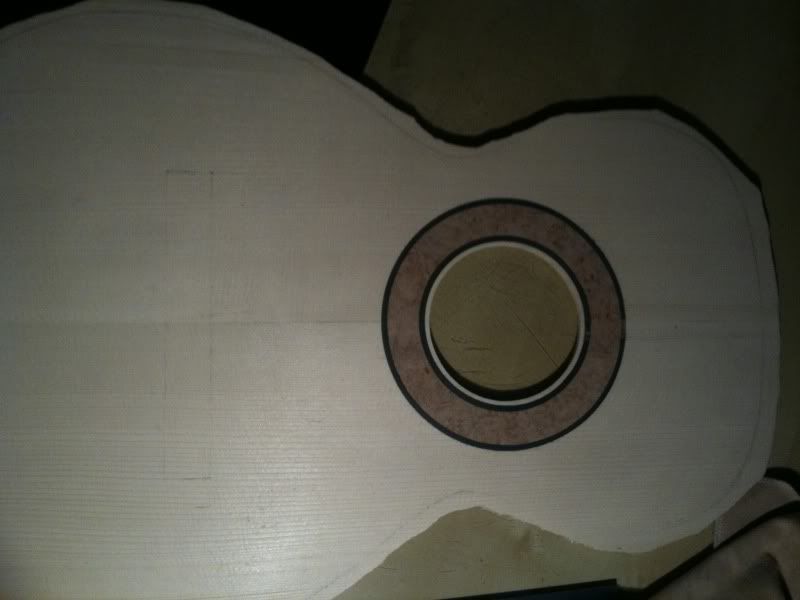
. I've scrapped back the overflow of glue and voila. I'm now just waiting for Tracy at Luthier Suppliers to send out my brace maker and a few other bits and I can get the bracing done.
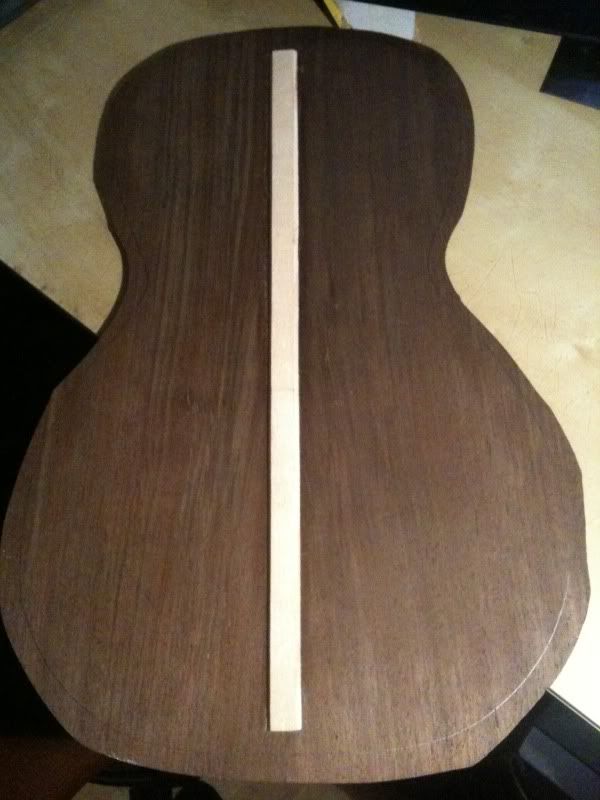
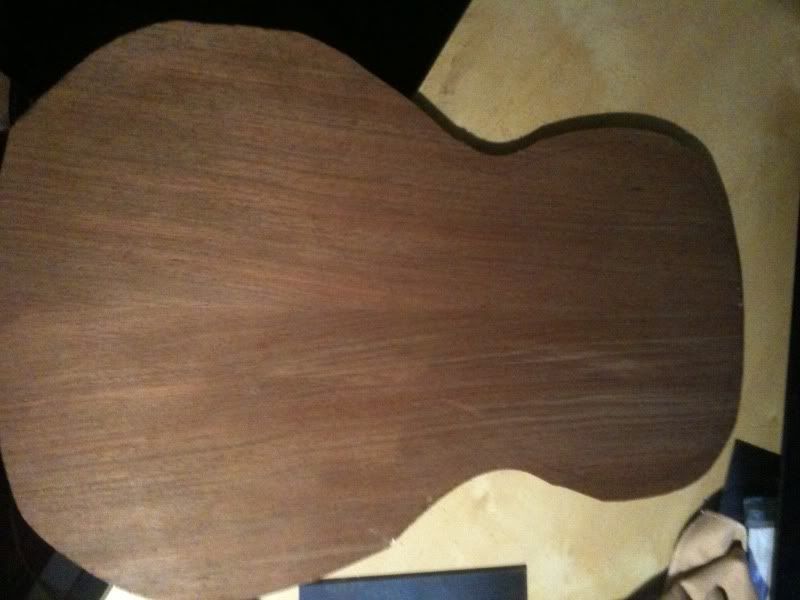
 [:Y:]
Image

I am working all weekend and my next day off is Monday, so I plan to make a new mould. I have already cut out a 3/4" ply template so all I need to do is spend some time getting dusty with the router. If I get that done quickly enough, I hope to spend Tuesday bending my sides with the pipe bender for the first time gaah. I'm still somewhat unsure of how to go about tapering the before the bend though as I'm concerned that I could end up with slightly lob-sided sides...


Top
 Profile  
 
PostPosted: Fri Feb 12, 2010 7:18 pm 
Offline
Old Growth Brazilian Rosewood
User avatar

Joined: Fri Nov 02, 2007 9:49 am
Posts: 13651
Location: Ann Arbor, Michigan
First name: Hesh
Last Name: Breakstone
City: Ann Arbor
State: Michigan
Country: United States
Status: Professional
Looking great Peter!

Here is a trick/method for gluing the back joint reinforcement that I learned from a Frank Finochio and his excellent DVD set. I no longer glue mine this way because I have a go-bar deck but this might help you out until you build a go-bar deck.

It starts with making a stick, quartered and put a 25' radius on one edge. Then write "save" on it so you don't cut it up and use it for other things later.... [headinwall] Don't laugh I had to make this stupid stick 3 times.... :D

Anyway you simply support the back from below and use the stick, radiused side down to clamp the back joint reinforcement by clamping the stick at both ends mashing it down and taking the radius out of it. Because it is proud in the middle it adds clamping force to the back joint reinforcement all along it's length.

Take a look:

Attachment:
DSC00320r.jpg


Attachment:
DSC00322r.jpg


Make the stick about 1/2" wide if your BJR is 3/4" wide so you can get at squeeze-out easily on both sides.

Hope this helps next time.


You do not have the required permissions to view the files attached to this post.


Top
 Profile  
 
PostPosted: Fri Feb 12, 2010 7:27 pm 
Offline
Cocobolo
Cocobolo

Joined: Sun Jan 03, 2010 8:30 pm
Posts: 234
First name: Peter
Country: England
Focus: Build
Status: Amateur
Hesh wrote:
Looking great Peter!

Here is a trick/method for gluing the back joint reinforcement that I learned from a Frank Finochio and his excellent DVD set. I no longer glue mine this way because I have a go-bar deck but this might help you out until you build a go-bar deck.

It starts with making a stick, quartered and put a 25' radius on one edge. Then write "save" on it so you don't cut it up and use it for other things later.... [headinwall] Don't laugh I had to make this stupid stick 3 times.... :D

Anyway you simply support the back from below and use the stick, radiused side down to clamp the back joint reinforcement by clamping the stick at both ends mashing it down and taking the radius out of it. Because it is proud in the middle it adds clamping force to the back joint reinforcement all along it's length.

Take a look:

Attachment:
DSC00320r.jpg


Attachment:
DSC00322r.jpg


Make the stick about 1/2" wide if your BJR is 3/4" wide so you can get at squeeze-out easily on both sides.

Hope this helps next time.


That's a good idea, I will give that a go next time (if there is one, which I hope).

If you don't mind I'll send you a PM with a question.


Top
 Profile  
 
PostPosted: Fri Feb 12, 2010 7:28 pm 
Offline
Contributing Member
Contributing Member
User avatar

Joined: Wed Oct 08, 2008 11:36 am
Posts: 7473
Location: Southeast US
City: Lenoir City
State: TN
Zip/Postal Code: 37772
Country: US
Focus: Repair
So Filippo is that made from Delrin and UHMW (or Nylon)? I'm going to have to steal that one [:Y:]

_________________
Steve Smith
"Music is what feelings sound like"


Top
 Profile  
 
PostPosted: Fri Feb 12, 2010 7:59 pm 
Offline
Contributing Member
Contributing Member
User avatar

Joined: Mon Mar 19, 2007 7:05 am
Posts: 9191
Location: United States
First name: Waddy
Last Name: Thomson
City: Charlotte
State: NC
Focus: Build
Status: Semi-pro
Hesh wrote:

What are you using for your HHG bottle?


Hesh, I'm using a 6oz US Plastics bottle. I use them, because you told me I had to when I first joined OLF. Did I do something wrong? :oops: I love those bottles. I use the 2 oz, the 4 oz and the 6 oz ones, and I use them for glues of all types and for shellac for French polishing. The little tops are perfect for counting drops of shellac or alcohol or oil, or whatever. I took the top off and used a brush for putting the glue on the tentellones though.

_________________
Waddy

Photobucket Build Album Library

Sound Clips of most of my guitars


Top
 Profile  
 
PostPosted: Fri Feb 12, 2010 8:05 pm 
Offline
Koa
Koa
User avatar

Joined: Tue Jul 04, 2006 4:09 am
Posts: 841
Location: Auburn, California
First name: Hank
Last Name: Mauel
City: Auburn
State: CA
Zip/Postal Code: 95603
Focus: Build
Status: Professional
Well, I have "the pedal to the metal" so to speak.
I signed on with Denis Merrill's Sonic Sitka Project last year. Denis had about 80 sets of bearclaw sitka, all cut adjacent to each other from one section of the tree. His idea was to have a number of luthiers build guitars and then submit them for sonic testing, both current and ongoing, to see what effects age, amount of playing, etc etc etc will do to the various instruments. They will all have tracking microchips placed in them for future reference.
Well, I misunderstood the time line for this and Denis called last week and asked if I'd be ready for the Florida show April 15. SAY WHAT? wow7-eyes
Anyway, I started everything yesterday and here are some photos of what I've got today. Hope to have the box closed this weekend.
It's my Rubicon model with Cuban mahogany and the Sonic Sitka bearclaw top, a conservative rosette of lacewood and I'm going to keep the color palette in the brown/tan/chocolate hues through out the instrument. Also going to do a varnish finish if time and weather permit.
All this while doing all the other chores around here and keeping normal builds on course.


You do not have the required permissions to view the files attached to this post.

_________________
Hank Mauel


Top
 Profile  
 
PostPosted: Fri Feb 12, 2010 11:03 pm 
Offline
Contributing Member
Contributing Member
User avatar

Joined: Wed Oct 08, 2008 11:36 am
Posts: 7473
Location: Southeast US
City: Lenoir City
State: TN
Zip/Postal Code: 37772
Country: US
Focus: Repair
Filippo Morelli wrote:
SteveSmith wrote:
So Filippo is that made from Delrin and UHMW (or Nylon)? I'm going to have to steal that one [:Y:]


UHMW. The white piece has fingers, cut at 22.5 degrees. I set two brass 1/4-20 threaded inserts into the UHMW base, slotted the white featherboard so it will slide back and forth.

Per Todd, run your purfling on the featherboard side. The piece of purfling against the featherboard, run a bit taller so it is like a fence for the CA. Use CA (thin or super thin), just enough to wick in.

Filippo


Thanks!

_________________
Steve Smith
"Music is what feelings sound like"


Top
 Profile  
 
PostPosted: Sat Feb 13, 2010 7:23 am 
Offline
Old Growth Brazilian Rosewood
User avatar

Joined: Fri Nov 02, 2007 9:49 am
Posts: 13651
Location: Ann Arbor, Michigan
First name: Hesh
Last Name: Breakstone
City: Ann Arbor
State: Michigan
Country: United States
Status: Professional
Waddy I meant what are you keeping your HHG bottles in to warm it? :? :)

Looking great Hank!


Top
 Profile  
 
PostPosted: Sat Feb 13, 2010 8:47 am 
Offline
Contributing Member
Contributing Member
User avatar

Joined: Fri Aug 26, 2005 5:49 pm
Posts: 2915
Location: Norway
Hesh wrote:
Wow Arnt you are a machine my friend! How many backs and/or tops are in that stack? That's some great batch processing!


Machine, me? (I'll be baaack...your rat is dead... 8-) )

Its plates for 11 guitars, but it is only semi batch processing I guess; I plan to thickness, inlay rosettes and brace the plates, and then build each instrument separately. Of course, I also cut and glue up necks, make fingerboards, kerfed linings, back reinforcement strips etc in batches, I find it saves a lot of time. I couldn't stand to actually build and finish 11 instrument at a time though, I'd have to have a lot more jigs and things, not to mention be better organized! That's like...work!

_________________
Rian Gitar og Mandolin


Top
 Profile  
 
PostPosted: Sat Feb 13, 2010 10:24 am 
Offline
Contributing Member
Contributing Member
User avatar

Joined: Mon Mar 19, 2007 7:05 am
Posts: 9191
Location: United States
First name: Waddy
Last Name: Thomson
City: Charlotte
State: NC
Focus: Build
Status: Semi-pro
Hesh wrote:
Waddy I meant what are you keeping your HHG bottles in to warm it? :? :)

Looking great Hank!


That would be a baby bottle warmer, Hesh!

_________________
Waddy

Photobucket Build Album Library

Sound Clips of most of my guitars


Top
 Profile  
 
PostPosted: Sat Feb 13, 2010 12:36 pm 
Offline
Cocobolo
Cocobolo

Joined: Sat Mar 29, 2008 9:45 am
Posts: 430
Hesh wrote:
Here you go Paul - BTW this idea of using a TV swivel was suggested to me by OLFer Dean [:Y:]

Also Paul Kathy Matsushita has a great video of this kind of go-bar deck in action on her excellent web site:

http://home.comcast.net/~kathymatsushita/movies/gobarswivel.mov

:D


After seeing Kathy's go-bar deck on her web site, I built one like it last week.

I used a TV swivel that I found on ebay for $59. I like the new go-bar deck....makes it much easier to get to all sides when doing a glue-up.

http://cgi.ebay.com/EZ-Fit-TV-Pull-Out- ... 5ad67116ef


Top
 Profile  
 
Display posts from previous:  Sort by  
Post new topic Reply to topic  [ 54 posts ]  Go to page 1, 2, 3  Next

All times are UTC - 5 hours


Who is online

Users browsing this forum: No registered users and 8 guests


You cannot post new topics in this forum
You cannot reply to topics in this forum
You cannot edit your posts in this forum
You cannot delete your posts in this forum
You cannot post attachments in this forum

Jump to:  
Powered by phpBB® Forum Software © phpBB Group
phpBB customization services by 2by2host.com