Official Luthiers Forum!Owned and operated by Lance Kragenbrink |
| It is currently Fri Apr 24, 2026 2:18 am |
|
All times are UTC - 5 hours |
 
|
Page 1 of 1 |
[ 16 posts ] |
|
| Author | Message | ||||||
|---|---|---|---|---|---|---|---|
| Dan Pennington |
|
||||||
Joined: Fri Nov 13, 2009 8:56 am Posts: 388 Location: Minneapolis First name: Dan Last Name: Pennington City: Brooklyn Park State: MN Zip/Postal Code: 55428 Country: United States Focus: Build Status: Semi-pro |
|
||||||
| Top | |||||||
| Rob Warren |
|
|||||
Joined: Wed Jan 23, 2008 7:41 am Posts: 223 Location: Naugatuck, CT |
|
|||||
| Top | ||||||
| Lillian F-W |
|
|||||
Joined: Fri Jun 30, 2006 4:23 pm Posts: 1694 Location: United States First name: Lillian Last Name: Fuller-Watson State: WA Country: USA Focus: Build Status: Amateur |
|
|||||
| Top | ||||||
| JohnAbercrombie |
|
|||||
Joined: Fri Nov 03, 2006 6:50 pm Posts: 2711 Location: Victoria, BC First name: John Last Name: Abercrombie Status: Amateur |
|
|||||
| Top | ||||||
| JohnAbercrombie |
|
|||||
Joined: Fri Nov 03, 2006 6:50 pm Posts: 2711 Location: Victoria, BC First name: John Last Name: Abercrombie Status: Amateur |
|
|||||
| Top | ||||||
| Antonio |
|
||||||
Joined: Wed Dec 03, 2008 10:27 am Posts: 161 Location: Portugal Focus: Build Status: Amateur |
|
||||||
| Top | |||||||
| Mike Lindstrom |
|
|||||
Joined: Sun Oct 28, 2007 4:40 pm Posts: 763 Location: United States |
|
|||||
| Top | ||||||
| Stephen Boone |
|
||||||
Joined: Thu Jan 01, 2009 9:43 am Posts: 601 Location: Bozeman, Montana Focus: Build |
|
||||||
| Top | |||||||
| Flori F. |
|
|||||
Joined: Wed Apr 09, 2008 11:13 am Posts: 281 Location: Los Angeles |
|
|||||
| Top | ||||||
| Dave Livermore |
|
|||||
Joined: Sun Sep 16, 2007 1:27 pm Posts: 725 Location: United States First name: Dave Last Name: Livermore State: Minnesota Focus: Build Status: Semi-pro |
|
|||||
| Top | ||||||
| Dan Pennington |
|
||||||
Joined: Fri Nov 13, 2009 8:56 am Posts: 388 Location: Minneapolis First name: Dan Last Name: Pennington City: Brooklyn Park State: MN Zip/Postal Code: 55428 Country: United States Focus: Build Status: Semi-pro |
|
||||||
| Top | |||||||
| Markus Schmid |
|
|||||
Joined: Sun Oct 11, 2009 4:39 pm Posts: 210 |
|
|||||
| Top | ||||||
| truckjohn |
|
|||||
Joined: Thu Feb 12, 2009 10:27 pm Posts: 2109 Location: South Carolina First name: John Last Name: Cox Focus: Build Status: Amateur |
|
|||||
| Top | ||||||
| Dan Pennington |
|
||||||
Joined: Fri Nov 13, 2009 8:56 am Posts: 388 Location: Minneapolis First name: Dan Last Name: Pennington City: Brooklyn Park State: MN Zip/Postal Code: 55428 Country: United States Focus: Build Status: Semi-pro |
|
||||||
| Top | |||||||
| truckjohn |
|
|||||
Joined: Thu Feb 12, 2009 10:27 pm Posts: 2109 Location: South Carolina First name: John Last Name: Cox Focus: Build Status: Amateur |
|
|||||
| Top | ||||||
|
|
Page 1 of 1 |
[ 16 posts ] |
|
All times are UTC - 5 hours |
Who is online |
Users browsing this forum: meddlingfool and 12 guests |
| You cannot post new topics in this forum You cannot reply to topics in this forum You cannot edit your posts in this forum You cannot delete your posts in this forum You cannot post attachments in this forum |


![[headinwall]](./images/smilies/headbangwalluf8.gif "Mad") .
.
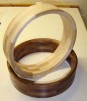
 but for the sides and back I start with this machine to sand 1-2 mm (sorry, I don't know the name in English) and then finished with the hand plane and the scraper plane.