this thread was originally posted on http://www.luthierforum .com by the PadmaWell would you look at that.
Me very own forum Yay!
Thank you very much.
Mom would be proud.
So me committed to fidgeting around with six strings. Hmmmm.
Probably would a been better to just have me committed.
So me looked up the word committed....
# 1 bound or obligated, as under a pledge to a particular cause, action, or attitude
Yup thats my part...Me gonna use hide glue to hold this thing together.
# 2 associated in an exclusive long-term emotional or sexual relationship
Well dudes....if you ain't caressing and fondling the wood with love in yer hart and passion in yer groin...then I here stamp colleting is a nice hobby ...no noise...no sawdust...
# 3 to refer to a committee for consideration and report...
now that would be your part dudes, your imput. Which I welcome with open heart.
Is best to start at the beginning.
Many years ago the Padma had a vision....a 3d holographic vision, as if rendered by a cad program of a string, its nut, bridge, tailpiece and its accompanying frets, all attached to a wishbone neck with the heal at about the 11th. The structure, its materials and all its parts were totally transparent and radiating light. I could see the plates the braceing.... I could see the harmonic nodes...and not just on the strings but on crucial points of the structure ...all which was morphing, breathing under me mesmerized gaze. I could see inside and outside from any position in space all at the same time and I could fly thru the vision, just like in an animation. As a string was plucked I could see the transfer of the kinetic energy (waves) moving thru the structure. I could see where the material had to be removed or not to be removed. I could see mandalas upon mandalas (circular designs) morphing from one into another and the key nodal points that overlapped, fused and became the position of the back or ribs or curve of the top.
When I came out of that me said to me self, me said "Hmmm, looks like spirit got another job for me to do"
Was about this time my lady friend shows up with a string on a stick with a beer can.
So to understand the string thing, her and I made about 400 to 500 necks, used dulcimer fret patterns, strung em up on various tin cans using various string lengths and sold them to the kids in these here parts for $20 each, most of them we just gave away. It got so that kids would see them and say ..."we got one of them things in my class room, I play it all the time, but I've never seen a 3 stringer before ...can I try it". YES! me thinks...the seeds have been planted...hopfully some will actually make it to maturity and there better be some instruments out there for them to play and grow further. Or as the labels on the inside of the builds say...
The power of music can be healing, energizing and life supporting. It brings people together, builds communicationand community beyond words. It is the true language of the people on this planet and with these simple instruments, all can speak .
So I built. I built dozens and dozens of simple wooden wishbone dulcimers. Some of them became quite complicated and evolved (see me IF build thread) which I suggest you glance at some times...it will help you get the jist of me drift about what me about to attempt here with this build.
Now a few weeks back I had another vision...this one had six strings and was fully fretted...Hmmm...me thinks...If you don't follow your visions...what do a person follow? So here we are with you reading me babble and me off to find my compasses and some drawing paper. Gonna lay out the divine monochord....on a 24 inch scale, place in the givens...you know the zero frets fulcrum, the bridges fulcrum, the string fulcrum on the tailpiece and so on and start to work up her shape based on the nodals, troughs and waves. Gonna use Fibonacci series of numbers, or the golden section... very close to one another. Might even attempt to pull in some of Buck Fullers geodesic maths...but probably save that for another build. This ain't nothing new...The violin family makers have perfected and been using these design principles for centuries...What's somewhat new here is the shape and construction methods, it purpose and its goal.
I am interested in the harmonics above and below our hearing range...especiallly the sub harmonics that move our emotions. Although all of this is understandable from a physics point of view ...I'll be the first to confess I don't have a clue what I'm doing.
Now if you have read this far and haven't fallen off the truck, I thank you.
Laying down the maths.

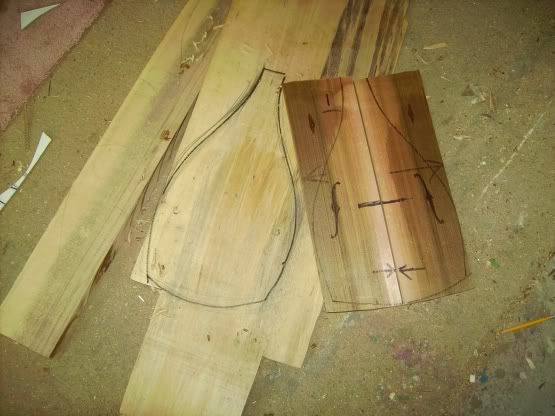
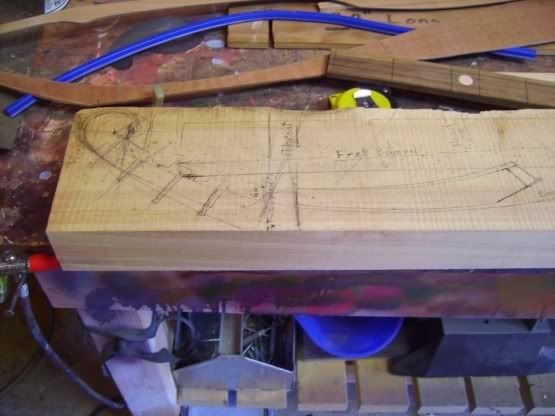
Well I looked at the maple and said ummm...nope.
Looked at some birch and cedar...hmmm yup.
Looked at the finished template...don't look like no guitar... but das what she is gonna be...wait you see!
Eben tells me that Dean said that Mario gonna come up with a top for "Gratidude". (pun intended), So maybe I won't have to use the cedar. Yay!
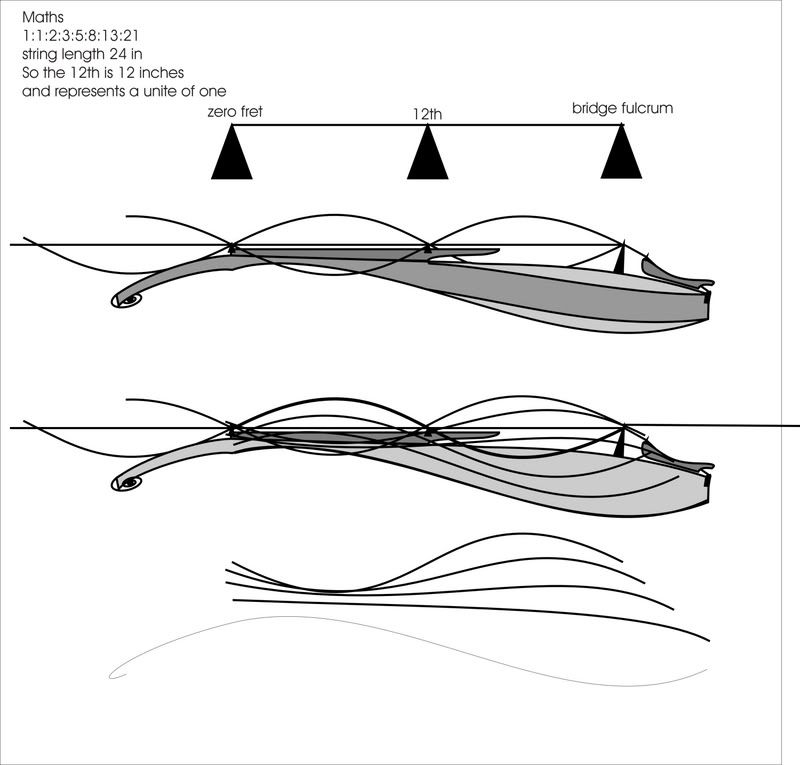
Based on the mono cord/string length and the Golden ratio of numbers where any two consecutive numbers equal the third number. The first and second number lengths are the length of the 12th. So if the string length is 24 in then the first number in the sequence is 12 inches long and so is the second number in the sequenced so the first number plus the second number is the third number of the sequence and so on. So 12 + 12 = 24 or the third number in the ratio 1:1:2:3:5:8....the mystic spiral.
I am actualy skipping a hell of a lot of the maths out here and laying in the curves more intuitively after the fulcrum points have been determined...bridge, zero nut, the 5th, the 12th and the fret in the tailpiece for after string length harmonics.
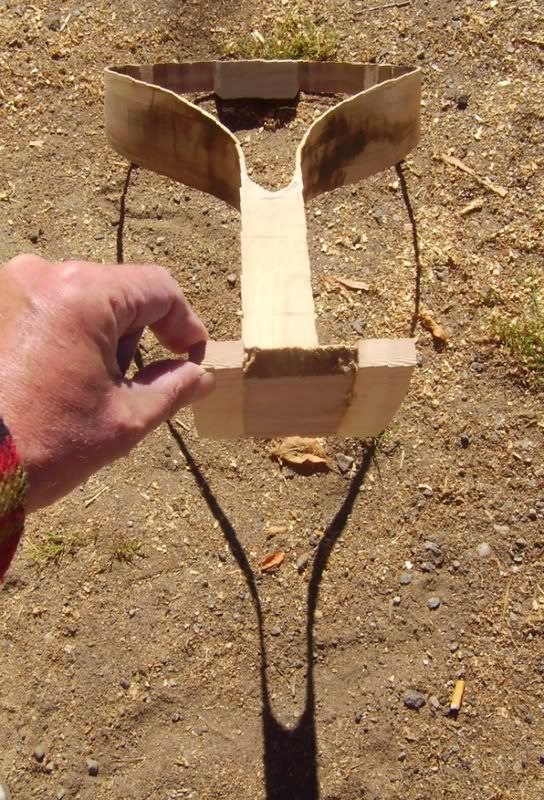
The 3 ply templates that you see in the pics were taken and evolved from various experimental builds along the way and are now being "morphed" in to this build.
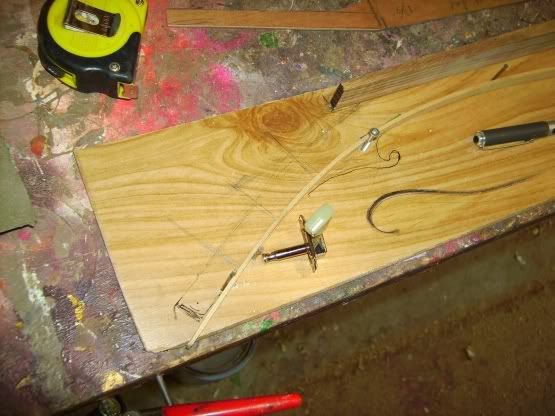
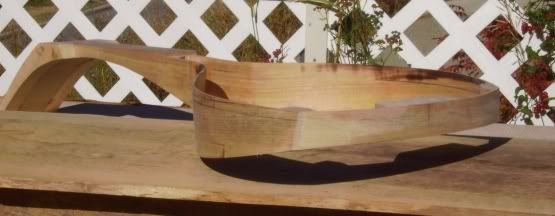
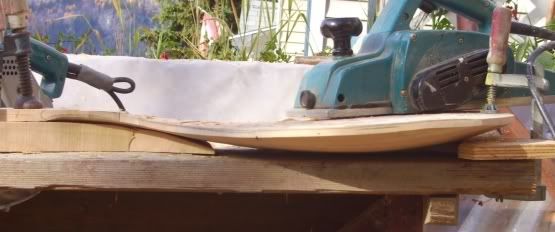
Since the neck and sides are one piece, the need for a heal is redundant. This mass of weight at the 12th is still there but now greatly reduced and becomes more of a nodal point in the line morphing from neck to the back. The heal cap is gone. The line of the neck and back are now one gentle curve as seen in the thin piece of bent fir held in place with finishing nails on this piece of 8th in ply.


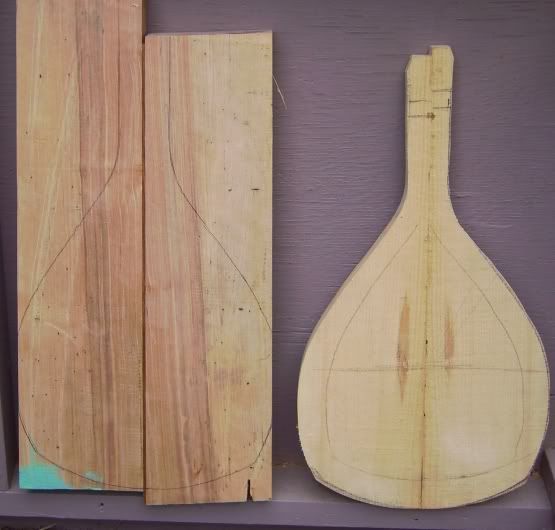
Ban sawed out.

Transfered to the birch. notice the maple board underneath.
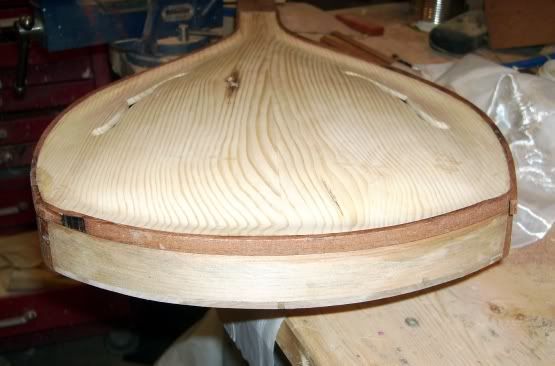
At this end of the body, the cross section of the back is laid out on the board to help decide if I can then bend the back after it has been carved out of 3/4 in stock to
the curve of the rib, which is much deeper than 3/4 inches.


Notice the heal has gone away, never to return. Glad to loose it, don't need it.
I had thought of bending the necks curve from the Zero fret to the end of the head stock but
figured to hell with it. Too much hassle to bend such a short little piece. But one day I will set it up for such an operation As I wonder just how much kinetic sound energy is disrupted in such a cut shape as the gain of the wood is no longer being followed.
Quote:
Padma:
That is going to be a real work of art. I'm inspired. Are you going to make a full set of drawings? I just might like to try something like that one day . ~ Jesse
Drawings. hmmm....here me trying like hell to stay away from drawings ....well Jesse, alls I can say is...perhaps one day.
Guess what Jesse
To day happens to be that one day.
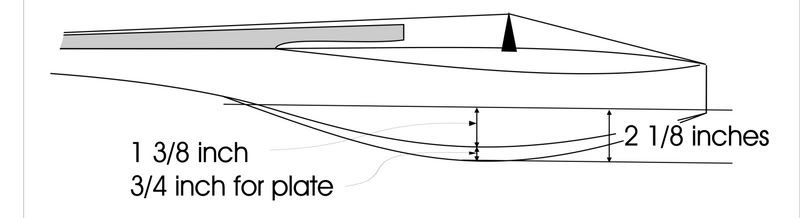
Here be the drawing. Well part of the drawing. Will add the plates later. Some day.
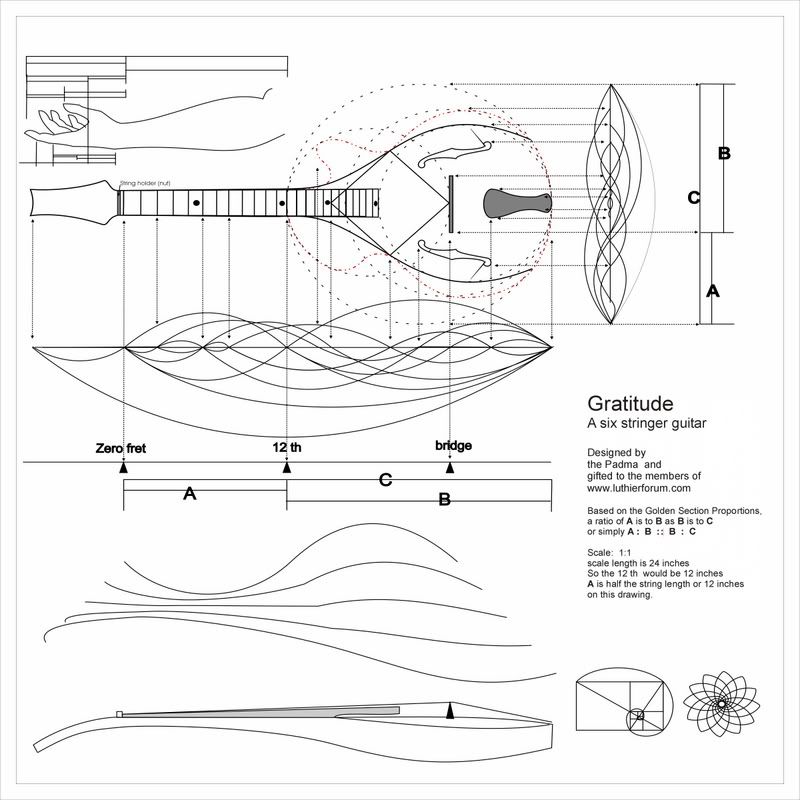
Dudes, I've kept it real real simple and only put in one measurement. Every critical point / measurement is a musical interval of some sort or other... all are nodal points relating back to the fret board ...all based on a relationship to the 12th of 1:1:2:3:5:8:13:21:34:53
So the 12 th fret is unite 1 or A. Then the ratios may be expressed as A is to B as B is to C with A plus B equaling C
or A + B = C Now how simple can it get?
All the rest of the numbers can easily be worked up by applying the Golden Section Ratios, which are on the drawing. Of course if any of you wish, you may print out the page to any scale or size and take measurements from the drawing.... but why?
The whole idea of this drawing is to help someone become a luthier. Translation. You only need one measurement ...and thats the scale length. Learn how the ratios work. Then you will start to understand why the bend should be here and not there.. Or the sound holes this big or the f holes this large ect.
THATS IT DUDE! One measurement!
Every thing else is Golden Section ratios. ... I said it twice now and me gonna say it again, just in case ya mist it...A Luthier needs to know only one measurement and thats the string length. Unless of course they into doing repros of other masters resolved nightmares. Is called production. We have machines to do that now a days.
So many wanna become luthiers...schools all over the continent, all over the planet. Skill levels of construction so very high. But nobody wanna learn the maths...allas so few true luthiers who can still build from scratch. Dieing breed. What to say, what to do? Oh well.
How many times we played 1:4:5, 12 bars straight up till we got it and its umpteen million variations...
How many instruments we gotta make before we get it? But how can we ever get it if we don't take the time to grok the golden section maths that make it work? Just a thought.
Now I ain't all that fancy shpancy of a skilled wood butcher (although I make really good sawdust) and much of the skill level here on the forum is so high it leaves me in tears. But me likes to think of meself as a luthier, of sorts, especially in the moments of the self induced hallucinogenic grandeurs of me deluded mind. wacko.gif
But this too will pass.
I think me better shut up before I start to piss of the friends I've made hear at the forum.
End of this rant.
Please, enjoy the drawing.
Quote:
Padma,
A guitar as unique as you are? That's saying a lot, but I think you may be on the path.
I love the ergonomic proportions blended with your artistry. There's also a Medieval or Renaissance feel to the design - not clunky like a lute or gawky like a viol da gamba, but sort of blending the best artistic attributes from both, and then refining them several more steps. This body shape may also work out well for a cittern.
Just a wonderful combination of art and science! ~ Dennis
-------------------------------------------------------------
Ah yes!!! One measurement. I read an article by Fred Carlson somewhere...I cant remember...maybe one of the GAL quarterlys...but he says relatively the same thing. He starts with a straight line, and on that line marks the nut and the saddle, and then starts to draw....
Now this is not an exact quote from Fred, and hopefully he will chime in here, but I think you get the drift.
Padma my friend...I like it!!! ~ David
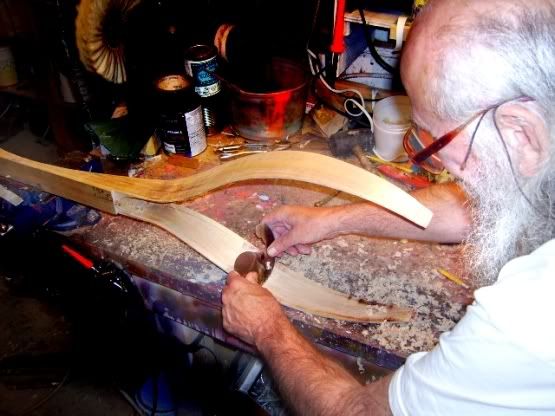
Band sawed her out.

Bent the sides.
Then concaved them with a scraper to about as thin as me fingers dare say I go. I build by feel not calipers. The reason for concaving is two fold. One is to be able to curve the ribs or sides of the body for that voluptouse feel in the instrument to the player and two is to get rid of as much meat in the ribs as possible as I am after a clear high ringing sound in this build. I believe the feel of an instrument to the player is very important. If it feels full, warm and inviteing, I belive the player will repond in kind.

Glued on her headstock ears.
Tomorrow will it will be a new jig for this larger size. I don't use molds...much preferring adjustable jigs. Then maybe even the kurfing.
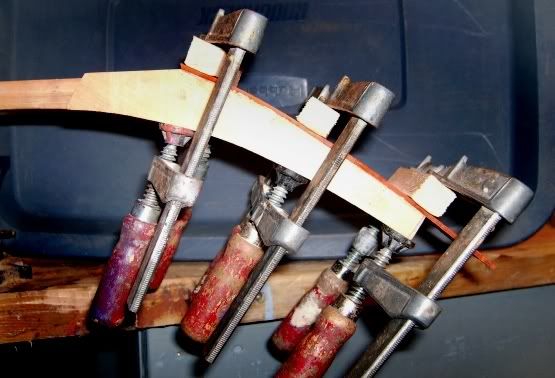
Well here be Gratitude in her jig with the bend end piece being glued in place.
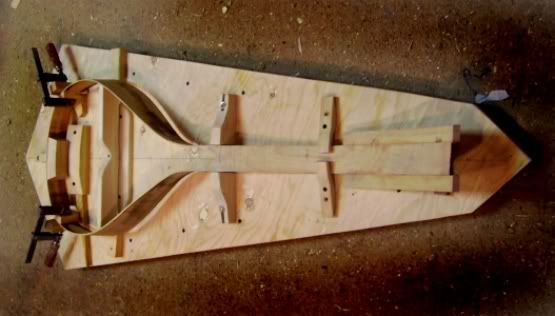

Unfortunately I did not think (not all that unusual) that with the increased size of this build compared to
my dulcimers, that the ribs should have been at least 3/16 thick so as to have some meat in them for sculpting the body after the plates have been glued. This means that the sides will be far less sculpted than I had hoped for. Oh well.
Gonna run some 3/16 and some 1/4 inch birch strips and do tests to see if that thickness can be successfully bent with me pot. Now for those of you who don't know what me referring to, go here.
Looking at the plywood shape of the jig has given me an idea for its case. All them angle joints are not difficult to construct ... just a lot of work....who knows, when Gratitude is finished she just might be worth the effort.
Also ran 32 yards of kerffing. Once I cut a few I just kept on going figuring I'd need it anyways. Is good therapy doing repetitive work. Boaring, but is done. Yay!
Now that I'm into this build (just barely) I realize that the tooling procedure for this design could have used much more gray matter. Another Oh well.
Ya, I know, next time.
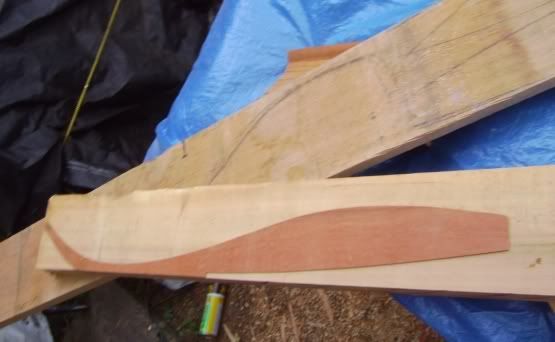
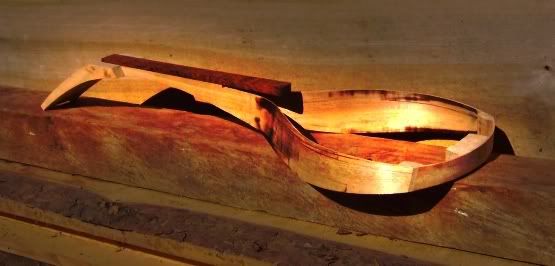
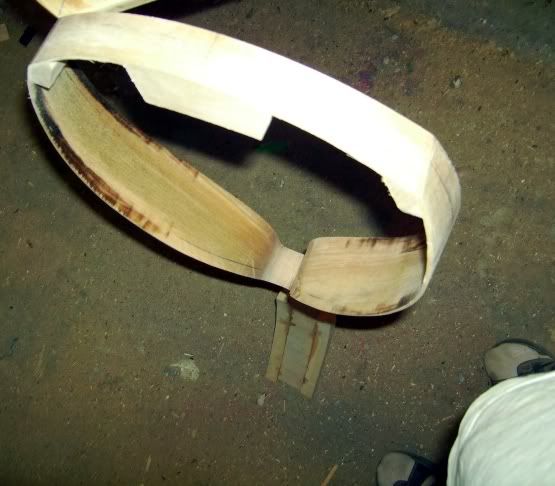
Here she be out of the jig and after cleaning up the edges, corner blocks and end piece to match
the curves of the ribs, back and top plates.
The only straight line is the fret board and thats because the string is supposedly straight (not considering the minute effects of mass and gravity which are just too infinitesimal for our purposes.
The straight edge is a nice convenient mechanical contrivance for the linear brain but it don't work too
well organically speaking. Good for measuring the basics like crystalline structures, building upright pianos and oh ya table saws understand a straight line real gooder but it just don't cut it on a biodegradable organic planet. Even the oceans horizon line is an arc with a raduis of about 6,378 km. Yet we build our instruments using the straight edge and T squairs. Go figure how come.
Is true that backs are radiused and sides are bent in an attempt to mimic nature but me thinking says its only a token gesture and that even though we supposedly be in the "Golden Age" of guitar making, me thinks we got a long way to go to break thru the barrier to the other half of our hemispherical (there that curve again) brains gray matter.
But then me be babbling.
Here are some pics.

Gotta get me some thinking done...actually its re thinking.
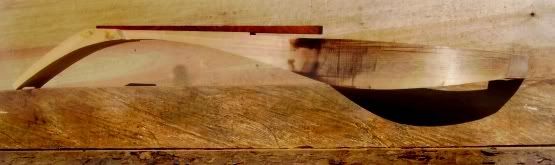
The rise in the back belly form where the heal use to be (I've eliminated it) to the end block is 1 3/8 inches.
Add another minimum 3/4 inches for the belly and that means I need a back bolt of birch that's 2 1/8 inches thick. I could get away with 1 7/8 in. piece by flexing the plate but birch don't like to flex that much with a curve carved into her.
Also 2 1/8 inches is a lot of wood to waist hand chiseling it away
Looks like I'm gonna haft use up some of that 4 inch stick I've been saving for the cello and the upright bass that I have had in the back of me head for 4 years waiting for the wood to dry. Don't wanna but got no choice. Dang plank is at the bottom of the lift. Me getting to old to be flipping planks. Sold or married off the kids so me army of helpers is gone. Oh what to do? Shudda become a lawyer...momma always said me could talk me way out of anything.... but the wood, she don't listen all that good.
Is just another oh well.
Quote:
Hi Padma,
A bowl back... Hmmm... how about if you made the back from 2 stacked pieces (face-to-face glue-up)? Then, you could jigsaw out most of the center from one piece, so you won't have to carve it out.
If you start with 10/4 wood, you could first resaw it into the 2 plates. Then (after hollowing out the upper plate with a jigsaw), you could glue it back together, to get a good grain/color match.
If you are willing to make the back with a center seam, you could start with a piece of 12/4 that is about twice as long as you need, crosscut it in half, and fold it. Again, since it is all one piece of wood, the grain and color will match. That would allow you to use a board about half as wide as your back, which might not be at the bottom of the stack!
I'm not looking forward to you carving Birch, (I'd have to be a cruel sadist), but I am looking forward to seeing the completed back carved.
Take care, ~ Dennis
Gee Dennis
That was some thinking you come up with there. Thank you.
At first I rejected the idea but it has started to sink in while soaking me hide in the tub. Went form 2 pieces to a "terraced" back of several 1/4 inch pieces, each laminated to the first layer which is bent to fit the back and each successive layer bent to fit the preceding one. This would require only 3 layers, saving a lot of wood. It would produce a morphing pattern similar to growth rings on a belly side cut . Now if only me had some very dark veneer to laminate between each layer....and use for the top binding and and and.....
Thank you Dennis....
Me gonna go look at the wood pile.
Me gonna look into a sheet of 1/8 baltic birch ply for the veneer.
Me Gonna look..Ya, me gonna alright.
Birch aint all that hard to carve. Actually it is a nice easy carve com paired to some woods.
Quote:
Hi Padma,
How wide do you need the black veneer leaves to be? And, if what I have is too narrow, would you consider using it anyway, by seaming it? If the answer is yes, then let me know about how much you need and PM me your mailing address. Now you know that if I send it by mail on Monday, you'll have to wait a few days for the US post and Canada post to strap is from one turtle to another, so you'll need to switch to another operation for a few days, eh?
~ Dennis
Thank you for your very kind offer. After much thinking, doing flex tests on 1/4 birch, very closely studying the knots in a piece of 2 inch stock and using a 1/8 stip of zebra up the center, I believe the back can be liberated out of a chunk of 2 in. spalted, worm holed birch.
Bottom line at this moment is ..."can I take a rain check on that veneer?"
After getting the kerfing in, several construction/ design flaws became apparent. Conceptually the lines of the design hold water, but making it happen and making it playable are that different coloured horse.
This builds construction needed much more though to it than I had originally put in, and am now having to wing it as I proceed. This is not unusual for the way I build. A song and a dance, much fidgeting, a prayer or two and the instrument comes together, although I had hoped this one would go real smooth. Seems I am on track again, however the snafus are so numerous, it has required a big rethink and to be honest with self, I must now treat this as a prototype, work out the bugs and then go for the final build of this concept.
I even thought of chucking it and starting all over again.
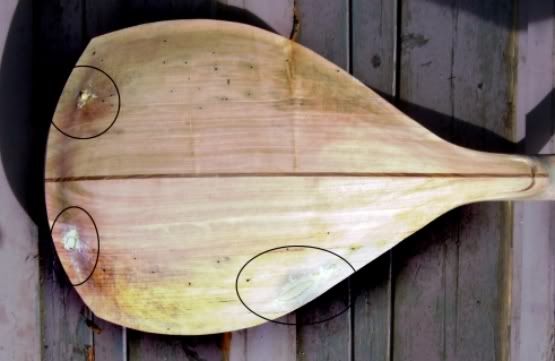
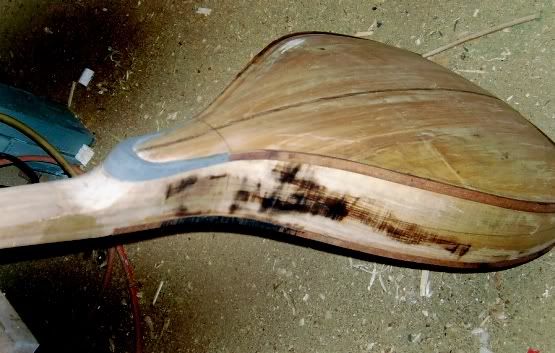
Attached are pics of where its at at the moment. Because the back is not bookmachet and all the other considerations, I am putting on a top of much lesser quality sitka. Note where the redish marks are on the top. The left is a small tight knot and is right under the bass side of the bridges foot...should prove interesting.
A guys gotta know when to read the signs.
That tight knot opened up into a big huge pitch pocket.
End of that top. Just another Oh Well amongst many oh wells on this build.
As such, the Padma has encountered enough snafus on this one to hang it up for a while. Gonna rethink the whole build through all over again, keep the same lines but redesign the process. Is not defeat...just a complete rethink.
I have not posted all the snafus. But the first was breaking the bandsaw blade on the very first cut of one inch. Bad omen. The rest however they are just too numerous to mention.
Humans, we ain't fishes and as such are not ment to spawn a streams with boulders in it. Gotta read the signs.
Must admit me state of mind is no longer one that is condusive to a build called "Gratitude" As such I WILL NOT proceed with where me head is at. I don't want the current vibe in me head transfering in to this build, although a acid rocker might like it if it were amplified. The only gratitude I can muster is that of being made aware of all the pitfalls encountered, be thank full, rethink and come back with an attitude adjustment.
Perhaps contemplation of the sublime secrets of the universe or communion with me belly button is in order here. What ever, and non the less, I will start this puppy again from scratch when me head is clearer.
Me should a pay attention to me own by line..."were you head at when the chisel slipt" ...that includes the two knuckle cuts on me two middle fingers which are constantly getting banged.
So status is "SHOP CLOSED"
I hear Mexico is cheap this time of year.
Quote:
Padma,
We'll be here when you're ready to take another run at it. In the meantime, figure out what wood would be ideal, and put out feelers. You might just be surprised what some folks have stashed away...
And, enjoy a cup of herb tea.
~ Dennis
------------------------------------
While Mexico is cheap any time of year, and probably a great place to contemplate your belly button, I have a feeling you will have this sorted out before you can even take the time to make your travel plans. Besides, if it was easy, everybody would be doing it. smile.gif
Gratitude for you Gratitude,
~ Glenn
Well wooden't you know it. Our tallestleprechaun (Glenn) was right.
Yup Glenn you were.
Is like this. Buddy who owns a couple of me builds and was actually the dude who first turned me on to the wishbone design shows up last night. We twisted of a few and him started playing the 3 of the 4 dulcimers that are now finished and were meant for this years build off.
Showed him the status of the Gratitude build, and he listened to my rant about it.
Him just picked away . Made ever so slight bridge adjustments and picked. Made an od comment or two every now and again and kept on picking. Him a mountain, back hills kinda guy. Real slow in getting to the point, which was the why and the how I do my builds. Well by the time he left me brain was rewired and back on track.
Weren't nuffin wrong with how the build was going. Was all me desires getting in the way of what the wood she was saying to me. I wasn't listening.
This morning I booked me flight and started carving the top. What about them pitch pockets. Well I took comfort in a pic in the Benedetto book , which I have posted here.
 original photo John Bender
Guitar serial #29293, made from inferior tone woods: Two-piece top carved from flat sawen
construction grade 2' x 10" pine. Back carved from two piece flat sawen unmatched maple, riddled
with small knots,weather checking and discoloration. Sides and neck are plain maple,
Despite the obvious, this guitar plays and sounds as good as
one made from expensive tone woods.Yup me had to say to me self, before I started hanging out the this forum, me built with whatever woods I could scrounge up. Never had a problem with any of them. In fact many of them came from cord wood for the fire and old cedar fence posts. Were some of me best builds as me buddy the picker pointed out.
Yup, me back on track.
Here is the carved top pitch pockets and all.
Quote:
I suppose that tree had reason to make those pitch pockets in just that particular place. Granted, it may have been just to irritate you when it came around time for it to become a guitar, but there's probably a reason.
Funny, you got the same reassurance from that picture of the "lumber guitar" that I did. The point I got from that is that it is rarely the wood, but the craftsman that coaxes beauty out of anything made by hand. Must go for guitars a well.
Glad you are back in the groove!
~ Glenn
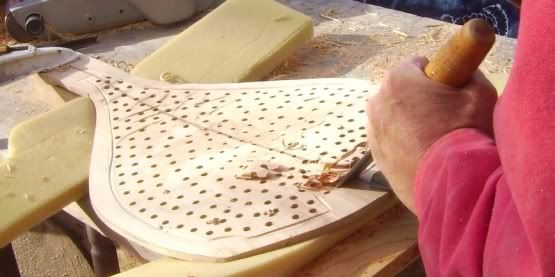
Did some more tooling of the top.
The flat center area of the back gets eaten out with the router.
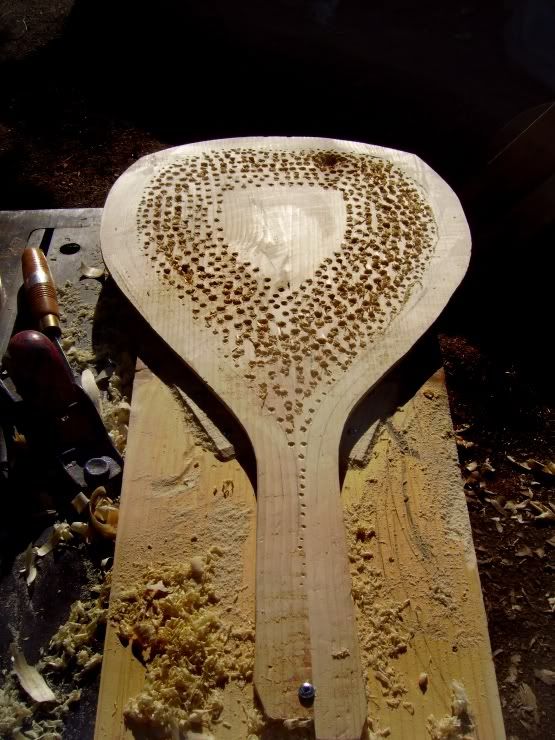
Bulking out the recurve depth to 1/8 inch

widening the re curve with scrapers
The center of that pitch pocket ( it does not transfer threw to the back side) is where
the bass side of the bridge foot sits. After she be strung up in the white I will decide if
she needs to be drilled out right under the foot and a spruce dowel set threw the top and into
the bass bar.
The shorter narrow lower pitch pocket is not quite 1/32 of an inch deep and again I will decide when in the white as to weather or not I scrape her out or do some sort of inlay work to hide it and the other one.
Carving this top was a challenge with the grain changing drastically in several places.
thats it for a few weeks
Me of to Mexico tomorrow.
Blessings
Quote:
Looks intersting Padma.
Can't wait to see her strung up when you're finished. Have fun in Mexico, and oh yeah, don't drink the water! Drink the tequila instead!! ~ Looks intersting Padma.
~ Vinman
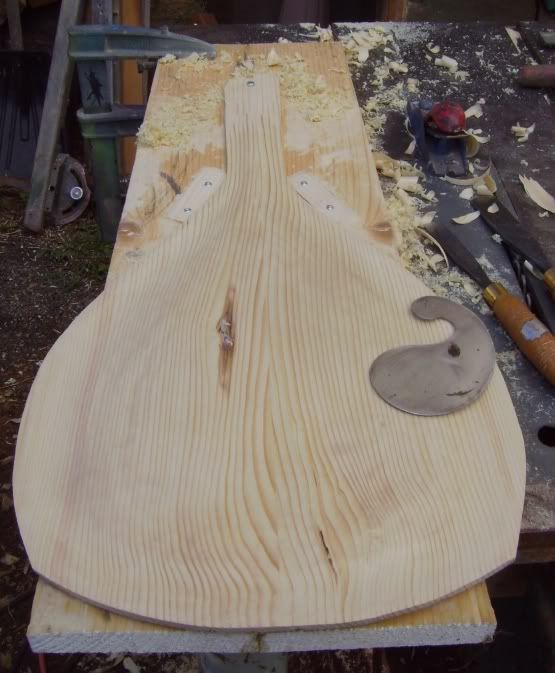
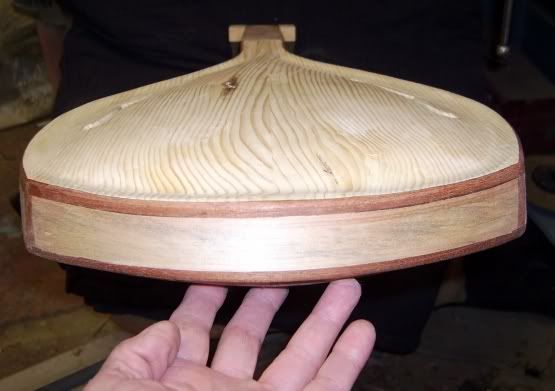
So the shop is up and running and me finally started to make sawdust on this beautiful Indian summer we is having.
This hunk of birch is 2 inches thick. You can see the pencil marks of the profile to fit the ribs in this pic.

Used me saws all to get her into shape.
Then on to me handy little wood carver...4in. blade...works real good. Then on to belt sander.
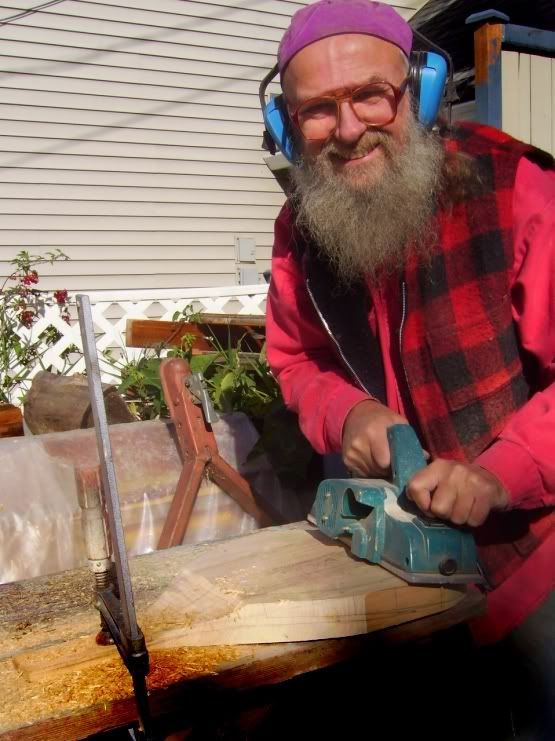

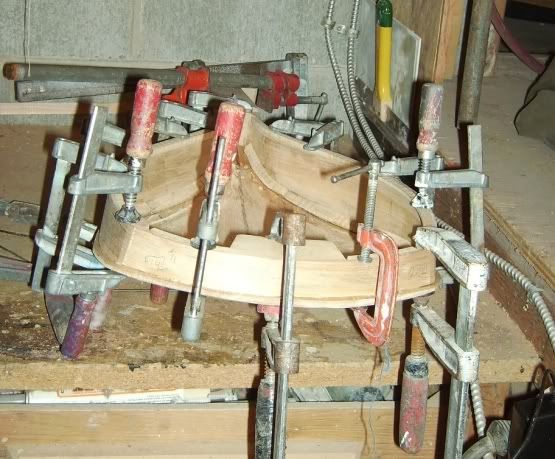
Now this is where the fun really begins. The 2 inch thick back is just an inch to thin. So I will have to clamp spring the back down into place on the ribs ... but the ribs are curved, and the back is a bowl which means its a compound curve fit....fun yes? Was gonna waste the material on the table saw but since me had the hand held jointer/planer all up and running use it instead.

Note the nice weather in this pic.

The first cut.
More cuts.

Unfortunately I have not been able to figure out a mechanical way of making the lip match the ribs and kurfing ... so its eyeballing the lip of the back to fit the ribs. This is not so had to do if there is no spring in the back ... this back has to be bent onto the ribs...compound curves done by hand to give a tight fit are a challenge. I use the wheel on the end of the belt sander and gut feeling to keep the lip "flat" and "square" Sorry the pics of me sculpting the fit didn't work...
Nor did the pics of sculpting the recurve on the belt sander wheelie and the making of the bracing ...me camera is acting up...think its time for a new one....any one got and old digital camera to donate to the Padma?
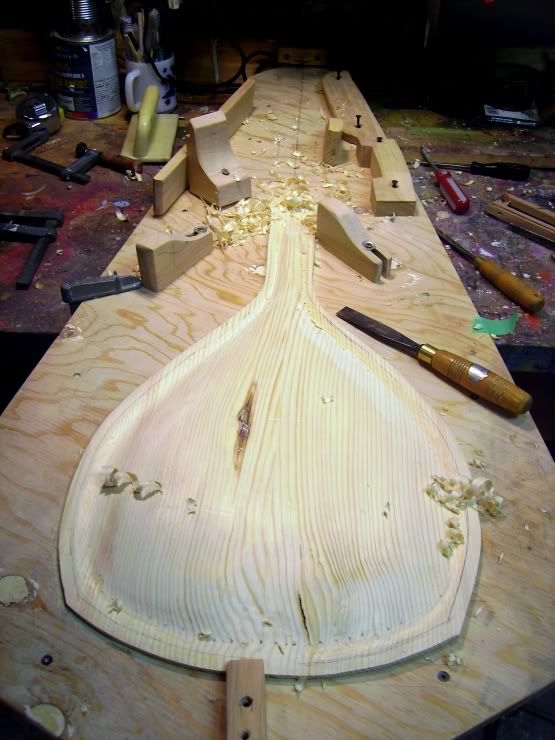
Go baring the bracing.
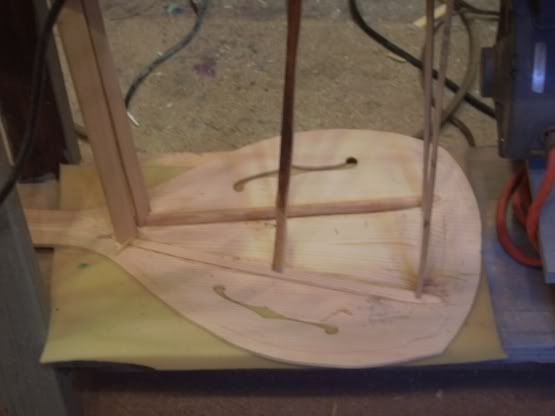
Gluing on the back.
Well thats it for the day. Gonna let the glue set a full 24 hours.
Then see how the tops gonna fit.
Quote:
Mexico must have really agreed with you... a frenzy of activity up there going on! Sure that is your shop though? It's all clean and sparkly and bright looking! That cleaning you did made the place look totally different. I like it!
I didn't quite understand the part about using the jointer though. How did you put a compound curve in a curved piece of wood with a jointer? I need to know that trick for boat planks if you can explain it to me in a few words.
Great to see the new progress!
~ Glenn
Well Glenn the answer is simple... I didn't. What I did do was to remove the bulk of the wood down to about an 1/8 of an inch from the line with the hand held planer. The rest was then chiseled and belt sanded.
Sorry to have left that impression....If you look close at the following pic you can see the 3/16 steps left by the edge of the planers blades.

Crying , weeping an gnashing of teeth but me over came the hole-ey hole in the back from this chisel and

decided she needs some thinning on the recurve before I put a patch on the hole and so went at it with the scrapper on the inside of the back.
That was nice and relaxing, scraping away on the back inside , left fingers and palm caressing and feeling the vibes commin thru the back from the scrapper...oh that feels good, oh that feels gooder... oh that feels real good ...oh that feels like me finger prints just got a thou or two taken off.
Thats right ... another ... um sound port or an anus horriblus in latin.
So status of Gratitude is now...gonna patch up her two unwanted sound ports, slap on the top and fret board, spray some paint around the edges, no banding, cheap tuners, and some strings. Learn my lessons, lick me wounds and remake her with a little more care and thought.
I will finish this build and this thread.
All things being symbols of things, me gonna go meditate on why me been having nothing but umm...situations with a build called Gratitude. Me thinks she be trying to tell me some thing.
Quote:
Ok... this is going to sound pretty strange, so I apologize ahead of time.
When I first saw your post and was thinking about what kind of inlay that called for, I had a very clear thought about a butterfly butt cheek tattoo I saw once. Just seems right for some reason.
~ Glenn
---------------------------------
Some people wait a lifetime for a hole in one!
I don't know how I would react to such a thing. I've had problems and accidents before but not like this one. Why just last week I was making a minor adjustment to an almost ready to install ebony fret board with snake wood binding when my edge sander decided that might just taste really good. Not only that, but the dust collector made a feast of it as well. Share and share alike I say. Love that sound of little bits of ebony bouncing along the overhead duct and then around and around in the separator.
I vote to keep the sound port.
~ Greg N
So ....
me rummage through the paint cabinet looking for some bondo to patch up the holes
and found a can of Durhams Rock Hard Water Putty. YES!
Hears what the patching looks like from back. Them small black spots are worm holes in the wood. Kinda funky.
and from the inside.

Then I get the idea in me head to line the inside back with fabric...So me go to me fabric closet and
guess what popped out...a white silk Tibetan Kata Blessing Scarf with a white silk screening of the eight auspicious symbols of "good fortune" on it. YES. Perfect for a build called Gratitude.
So I glued her down.

Here is what the 8 symbols look like...

And for those of you who may be interested the eight auspicious symbols are:
An image of two fish, it represents the goodness of living beings who are fearless and in no danger to "drown in the ocean of sufferings". Instead, beings are free to roam as they wish like fish swim fearlessly through water. Early Christianity began using fish as symbolic of Christ.
The Endless Knot, a lattice-like drawing with ribbon threads and represents the intersection of religious principles and secular matters - also symbolizes the joining of wisdom and method, the "inseparability of emptiness", and upon enlightenment, the union of compassion with wisdom.
Right-Coiled White Conch-This image is a seashell that signifies the expansive and beautiful sound of the teachings of Dharma, which reach out to all Buddhist followers to awaken them from their sleep of ignorance. Also, the conch aids worshipers to take care of themselves and others.
Victory Banner-The Victory Banner represents victory gained over issues and negativities using one's own and others' bodies, voices, and minds. The victory of Buddhist Doctrine over destructive, unfriendly forces.
Precious Umbrella-The image of the umbrella stands for the healthy aspect of protecting beings from sickness, negative powers and obstructions in this life. In addition, the umbrella assures safety from many short-term and long-term sufferings and desires.
Vase of Treasure-The vase connotes a never-ending long life, perpetual wealth and riches, and the assets of the world and freedom.
Lotus Flower-Denoting purification of all that disgraces the body, speech, and mind, the lotus flower is one of the eight auspicious symbols. The lotus also stands for the full "blossoming" of nourishing behaviors and perfection.
Got some of the banding underway.

Slowing down on the build as this week I am putting in the tile floor in the upstairs bath.
This build has been nothing but saves. It will not end up as prime example of craftsmanship
but then she is the prototype of the first wishbone 6 stringer.
Her tap tones are interesting with different voices all over the sound box The lining of the back
seems to have a super thin hard shell quality to the back.
the "parallel" braces, one is hemlock and runs under the knot directly under the bass foot of the bridge, the other bar is spruce and runs under the treble. The two tap tones on the deck were the bridge sets
sound and respond the same. So I don't anticipate and further effects of the knot on the sound board.
So far so good.
Quote:
Padma
Glad you have moved on with this build.
Now you will be able to find out how it sounds - that is an important part too.
Good for you.
~ Steve
------------------------------------
Padma:
You da man, man. That may turn out to be the best sounding instrument you ever created. I love the way it looks, don't call them worm holes, they are sound chambers . Glad to see you back in the grove.
~ Jesse
---------------------------------------------
A unique instrument, with a unique story, by a unique person.
Good to see that you are carrying on with "Gratitude"
~ Brian
---------------------------
Padma,
I just want you to know my "gratitude" for how you share your thoughts, ideas, philosophy and methods. I am really looking forward to hearing how this instrument sounds.
~ Tom
Thanks guys.
Hokay,
Here we go again. Worst banding job me ever did. Oh well.
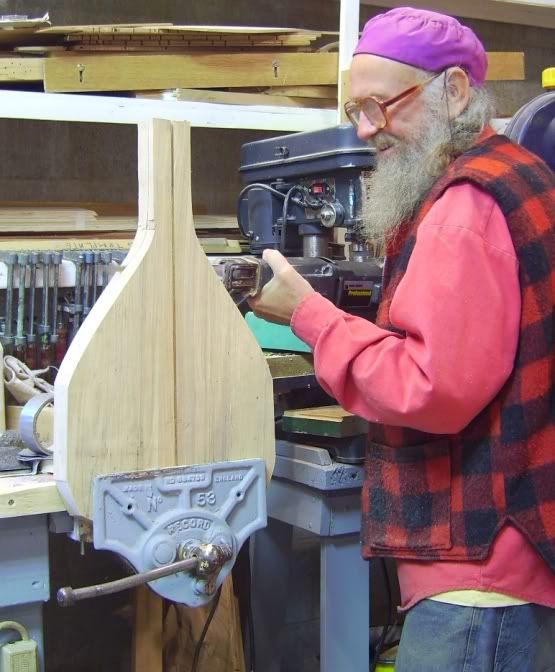
Was not suppost to have a heal. However after the top and back were on and I held her with a temporary fretboard, I realsied that the neck was just too thick, the band saw solved that problem but gave me the heal back to deal with...so out comes the bondo and some black colourant...great stuff....
Bondo no stick to masking tape...see pics.

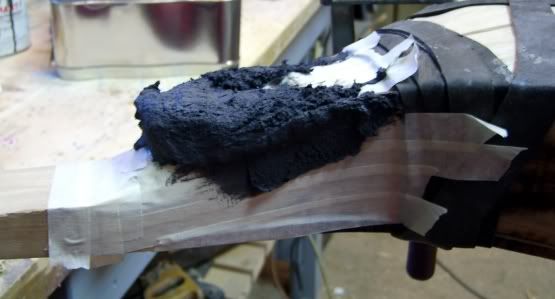
When she cures to the cheese stage...I went at it with carving tools.

Looks like I didn't use enough pigment...wanted it black...oh well.
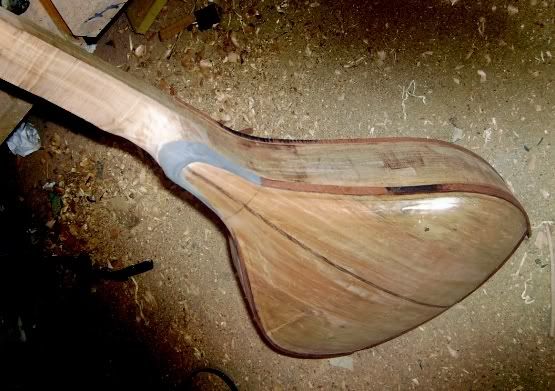
So me been scraping away all the patch ups on the banding...
put a recurve into the sides on the back edge so now the sides are an "S" curve in the middle and convexed at the heal and bottom.


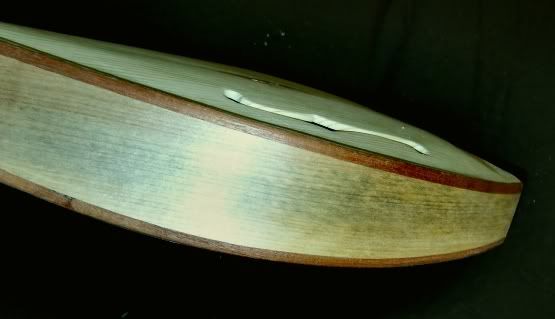


Sure has a different look ..feel to the original drawings...sometimes the lines don't translate all that well...
will deal with that on the next version of her incarnation into this dimension.
Not to happy with the bondo heal. Will see what will happen.
Quote:
Padma
Nice shape.
I sure hope you like the sound well enough to make a "second in the series" because the shape is very pleasing.
It will be fun to see what you do with it.
Don't worry about the Bondo - it's a proto type for gosh sakes.
Keep it going - those curves are great.
~ Steve
-----------------------------------------------------
Very cool, Padma!
If you just cannot live with the Bondo cap, maybe use a burst finish? I'm with Steve - it is a prototype - but if it bothers your (considerably talented) artistic eye...
Can't wait to hear it!
~ Dennis
Bending the fret wire
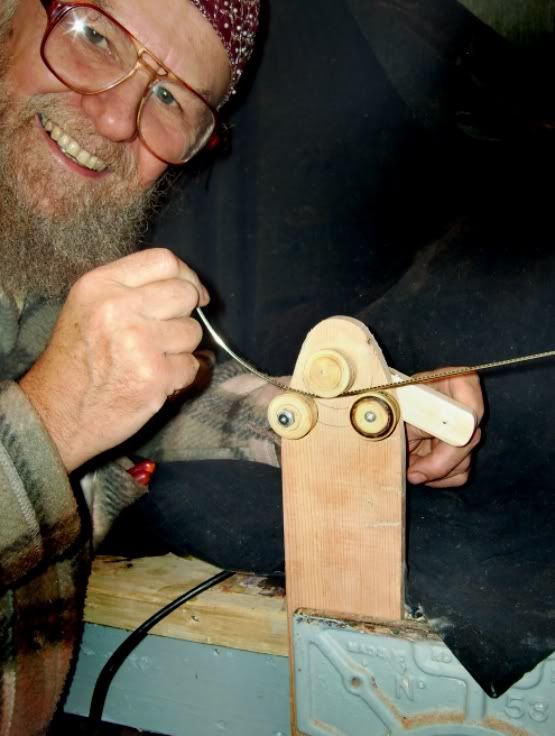
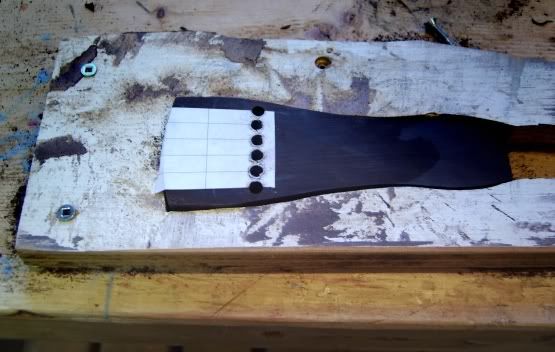
Setting the 11th into Paduk finger board.

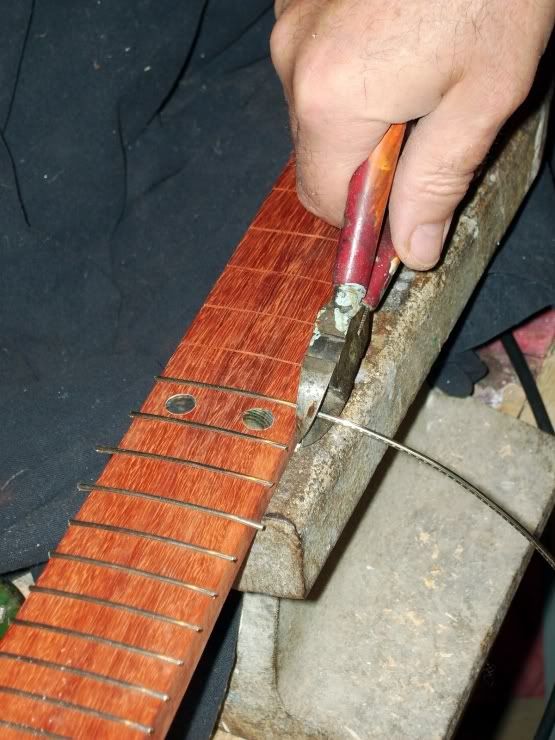
Cutting off the wire. Ain't it a drag to hear them words "Ok, your cut off."
Taking care of loose ends.
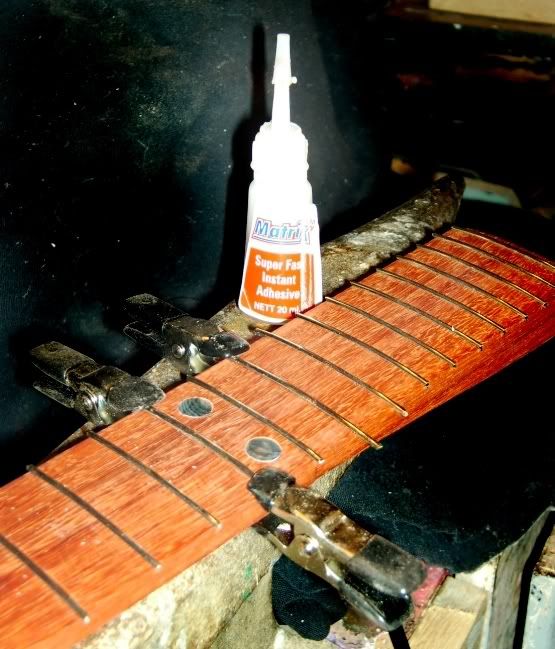
Little bit of file work and she look ok. Yes?
Gonna have paduk tail piece, pic guard and head stock cover plate. The banding is a dark mahogany. Dots are abalone. Maple and black wood bridge and black wood nut. So look like she gonna be red white and black... very strong statement for sure.

So there be the fret board done did, will glue it down later. On to the peg head next.
Quote:
I like the arched top, it looks so nice!
everything is special on this instrument, can't wait to see the shape of the headstock. I enjoy to watch your build.
Thanks for the pictures. Let me know when you are in town. A promise is a promise!
Best regards
~ Dan
Yes me too, is coming along eh! (thats Canadian)
Thank you Dan, is special instrument being built here
patients...perhaps by end of today it will emerge
thank you, me enjoy being watched....hope that ain't some exhibitionist facit in me personality
pics are me pleasure, your welcome
Re. let you know when me in town, you gotta be kidding...the Padma pass up food in me alms bowl....never!
Quote:
Good progress there - Padauk makes nice fingerboard wood too.
Gonna need to put a string on that one and hang it from your neck so it doesn't slip off on the floor while you play.
Tail piece ?
Seems we have addressed that subject before.
What design have you been considering ?
Gonna use a tail gut ? or some metal ? How about that bell brass you talk about ? Maybe hammer it to shape that matched the guitar ?
Fun to consider.
Good show.
~ Steve
Thank you Steve
Ain't got to the tail piece yet...is gonna be paduk and real simple drop the ball into the hole and slot. Use gut or a mono fiber.
Don't got a big enough piece of brass. Xmas coming, alms bowl near empty so won't be buying any.
POST FISH PICS. Me staring to wonder if you really catch them things or just like sitting in the boat.
Quote:
OK. Truth now Padma. Just how many shots did it take to get that really cool effect?
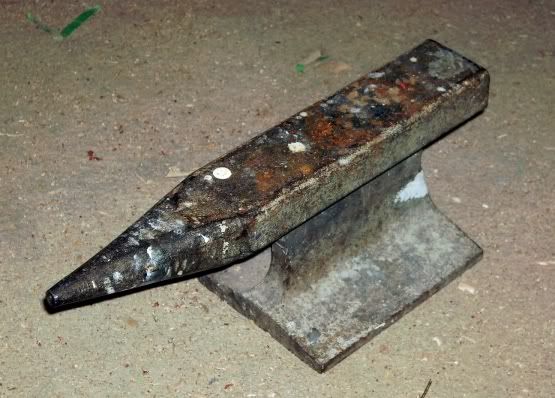
Is that a piece of railroad track you are using for an anvil?
~ Greg N
Gee Greg
you gotts a gooder eye than most .... yup railroaded
don't know who made it...me sweetie showed up with it one day.
So you wants the truth eh! Hmmm...well truth be known ... its a smudge effect in Corel Photo Paint called
motion blur. Even the star on the fret wire is done in photo paint. What you spect from an artist?
Now if you go back through Eric's build threads, he tells how he does it the old fashion way...which I believe is something like keeping the lens open a bit longer and a flash or something like that and the use of a star filter. Check out his photos...A1 first class stuff and his wood butcher skills are nothing to laugh at to boot.
I was thinking of pulling your leg on how I did it but you is such a gooder kind hearted wood butcher and all them buttering on the bread sort of words...I just couldn't lead you down the garden path.
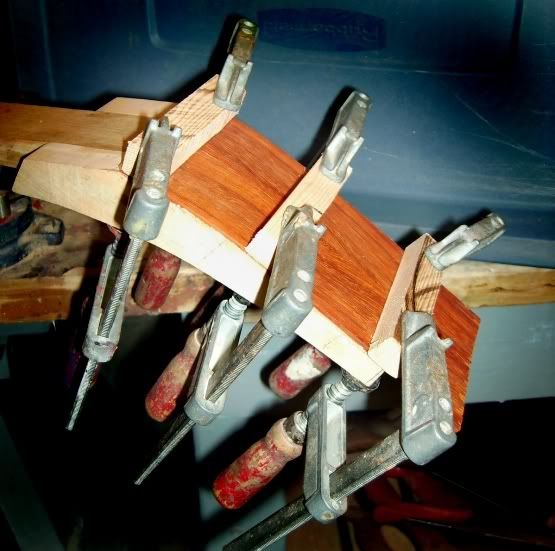
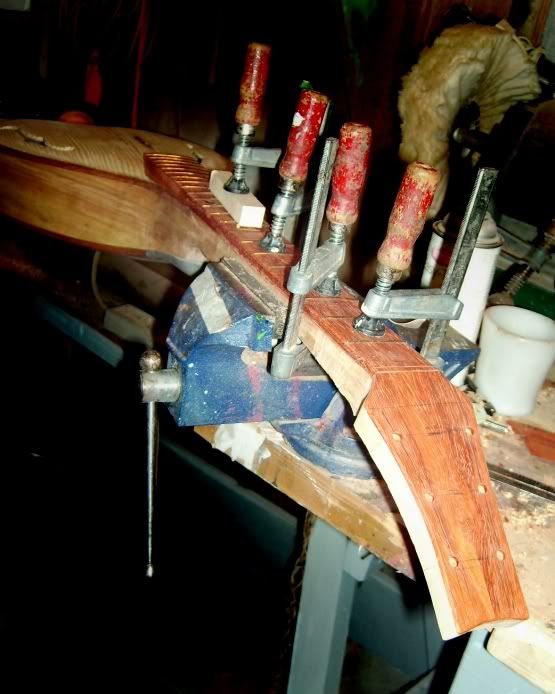
Here be the start of the shaped head stock
Book faced paduk from the same chunk as the fret board and future tail stock.Split on band saw.
Thicknessed on belt sander, glued up just like a top or back. Thicknessed again, scraped,
washed with lacquer thinners to get off the oils, and this paduk gotta be the oiliest me ever seen.
Then glued and clamped down to the curve. Leave dry over night.
Quote:
That's it!
Another pretty piece of padauk to create her head plate. The outcome must be perfect!
Hurry up, I can't wait longer!
Thanks
Best regards
~ Dan
Dan, you gotta be kidding me. The Padma hurry...ya right is like this Dan... I usually don't remember what me ate for breakfast, what day of the week it is, or if me even ate. Don't got no watch and the only reason I happen to know what time it is is because me computer came with a clock in the right hand corner of the screen, which ain't the right time anyways. I've sold or married off the kids, the wife she split, me roof she don't leak and so if it feels good me do it. Some time me don't do nothing...for days even...and some times me be doin it all day, all night....but not with Mary-Ann. You gettin the gist of me drift here. Patience Dan, patience. ..Apparently its even a virtue. Although I must admit getting antsie waitin for glue to dry.
don't know how that happened why just yesterday it seems me was 20. Oh well.
Now fortunately me was in the shop today so here is where it got to.

Funky eh!
Quote:
THANKS !
You are so quick, the glue has surrendered your actions!
Look at the HEADSTOCK and her entire body. In the second picture, she looks like a dancer. May I call her "THE DANCER IN THE DARK" ???????????????
YEAH!!!!!!!!!!!!!!!! THE DANCER IN THE DARK! THe DANCER IN THE DARK !
I'm totally convinced!
Great Padma, no doubt!
Best regards
~ Dan
-------------------------------------------
Hey Padma:
It is like the monkey when the cat got his tail, It want be long now . You are about ready to string her up. The over all shape is wonderful, I like it.
Later
~ Jesse
Yes dudes, is getting closer and closer.
Did the tail piece today. Was gonna use paduk, couldn't find the piece I had put some wheres but this
chunk of black wood just kept jumping out at me so I used it instead.
band sawed, drilled and layed out in her tooling jig
string slots cut.

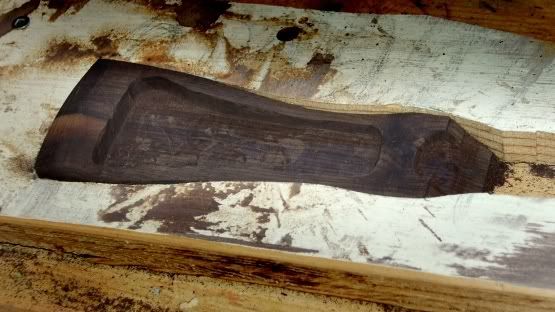
Back drilled out ready for carving
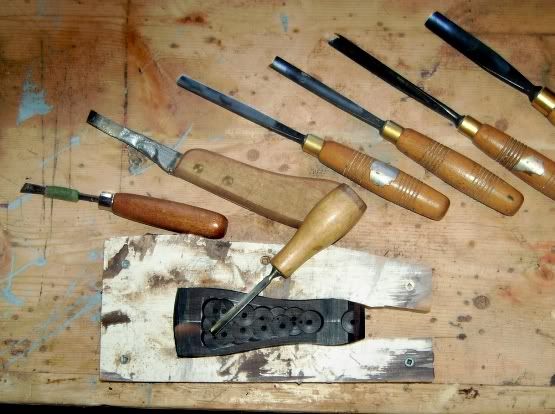
back carved
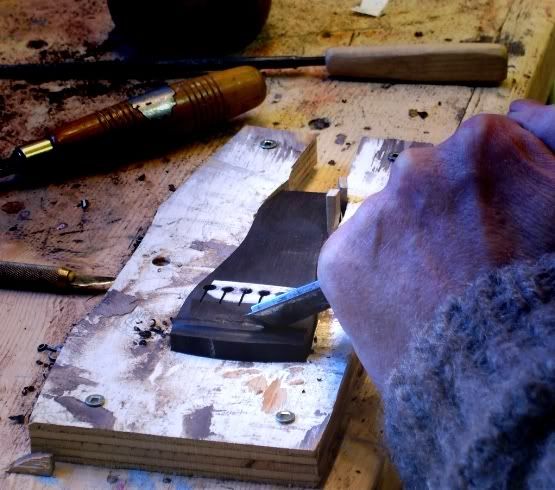
carving the fret on the front. Hopefully I got the angles right so the string will sit on the fret
shaped and inlayed with abalone...needs final scraping and buffing.
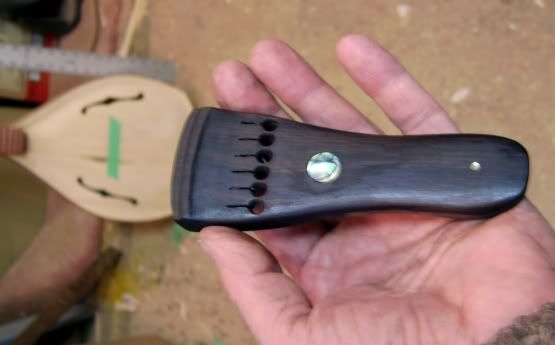
just sitting on the deck.

One tail piece = one days work.
Quote:
Nice for a day's work Padma! I have been long awaiting the tailpiece design. Can't wait to see how you suspend the works.
Can you tell me about that chisel you are using to furrow out the saddle (fret) slot? It may just be the picture, but it looks like it has a right angle shoulder milled in the end. Has my mind working overtime.
~ Glenn
It is called a parting chisel....is a "V" shaped blade.

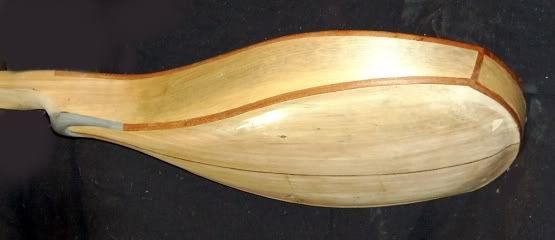
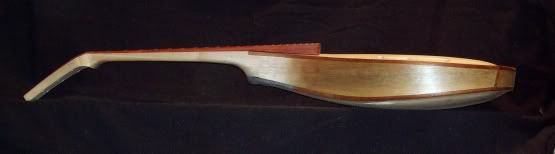
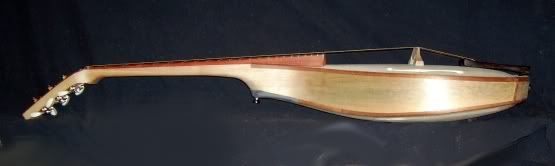
Well here she be in the white.


One loose fret
3 frets need a bit of file work and one small buzzie wuzzie on bass string coming from the fret on the tail piece....hmmm
Gonna make the bridge just a tad higher, the amt you see under the feet by adding a black wood strip to the top and reset the strings into it.
All in all she has good sustain and clear ring up high, just what I was after. Some jazz player gonna love her all up.
Sweetie coming over to-night...she gonna be the first to plays it. My ear ain't all that good, so I value her opinion. I value her too.
I might change the G string to an unwound, raise the Zero fret and slide around on her for a bit.
She is heavy, even after taking the back down paper thin. Thats what I didn't want, but the tone is good.
You would think that without a waist, she would be hard to hold when sitting down...but not so as there is a tendency to wanna cuddle her up in yer right arm while playing so she immediately becomes intimate before you even pluck a note. Seems the golden section maths I used on the body paid off. She is real comfortable with that big bowl back.
Other than some sound files and a few pics if and when I get the finish on, I consider the thread of this build finished.
Building Gratitude was one situation after another, constantly saving it from the wood stove. I don't know if I'll ever scrape her down and do a high end finish...probably just rub in some linseed oil and hang it up in the UV lights for a fast cure.
Did I learn a lot...hell yes...will I remember it ...hopefully, as a lot of things gotta change and be applied to her reincarnation with the original top that Mario sent for her.
In hindsight,
the gratitude I have felt most while building Gratitude
is to and for all the members of this here forum,
and so
to all of you
I thank you from the bottom of my heart for
being there and sharing with kindness, your wealth of knowledge, from your heart.

Wanna see / hear the Gratitude build?
Go here.
or copy and past into you browse
http://luthiertube.com/mediadetails.php?ke...356a81fba190f9dQuote:
Padma:
One word BEAUTIFUL
~ Jesse
---------------------------------------
Padma, what a great journey you took us on! I love the shape, it is a classic beauty. Please bring her and/or other incarnations of her to the Gathering 2008. I wanna meet you in person, and I wanna play Gratitude!
Thank you!
~ Dennis
------------------------------------------------
Padma
I continue to think this shape is very pleasing. Those curves flow and the entire instrument seems a single unit.
The wish bone sides / neck construction offers unique advantages for weight reduction and strength.
Congratulations on getting her completed.
Hopefully everyone who matters will like the sound.
Nice job.
~ Steve
------------------------------------------------------
Nice Padma- very nice. Gratitude looks grand in your hands!
Does she run with standard tuning? or the open C# minor?
Like Steve says, the curves flowing design is beautiful. I love it!
~ Dean
-------------------------------------------------
She's a beaut!
Her lines are sweet.
~ Brian
Thanks Dudes
Is currently strung up to standard "E"
Gonna change the G string to an unwound, raise the zero fret, open tune to 136.1 hz and see/hear what we gets. Gonna hafta wait a few days. Will post the sound files as soon as the techie finishes wiring up the studio. All the gear is sitting there...me never joined the cult of the black snake so don't know what wires go were. Could figure it out but ummmm no. Don't pull no wires and don't fix no cars no more no more.
Besides me head has really been seeing mandolins...gotta follow the vision.
Then there is the wishbone buzoookie me about to put the fretboard on...never mentioned it before...will post pics and sound in time....Oh ya and then there is the reso aluminum roaster build....and and and Santas coming and and...
Quote:
Padma,
Gertrude is a beautiful lady. I am sure she will return the love that you have put into her.
~ Lefty
---------------------------------------
Just expressing my gratitude that you finished her and didn't give up when you were stuck, (and when she was stuck as well).
The whole look of her is wonderful. If I had made her I would spend hours just holding and looking at her, waving her around and watching those curves catch the light.
Make some more of those.
~ Tom
Ummm, Lefty its
Gratitude, not Gertrude.
One is a womans name, the other is a virtue.
But you may call her Gertrude if you like.
Quote:
I like her. Does her sing sweetly? Wonderful journey you've taken us on Padma!!
~ Vinman
---------------------------------
I love it ,your a genius...
~ Mike
Well Mike
I wish to thank you for your kind compliment. Glad you like the Gratitude build.
But me thinks your label of genius could and would be debated by some...but it sure
do me ego good.
thank you
it was a fun ride
the
Padma
PS: and it ain't over yet...been watching what Gratitude has been shape shifting into over
this last year. Decided to remove and remake the back. When this goes down, I don't know, but
I will post pics of the process.


![[:Y:]](./images/smilies/smiley20.gif "Thumbs Up")
![[clap]](./images/smilies/smiley32.gif "adulations")


