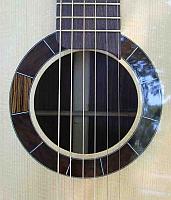
Well I had to add 1/2" to the rear of my
bridge plate because of the pinless
bridge and the way the ball ends are anchored as the pinless
bridge was a deviation from the original plans and the
bridge plate fell short. A good lesson learned as to have all that stuff worked out at the start.

Well when I was
gluing in the extra piece which was just curved to match the back of the
bridge, using 5" C clamps (harbor freight @ $5) with a bottom caul it appeared to me to be a somewhat tricky precisure. First being careful putting the clamp into the sound hole with a caul attached to it I had to worry about scratching the edge of the sound hole and then alining the caul with the piece of plate double sided taped to the caul wasn't easy. It took quite a bit of fumbling and caution which got me to thinking there has to be an easier and quicker way when it comes to the
bridge. Take it
for granted that my technic isn't honed as this is my first acoustic as my past builds are resos and electrics (no bridges glued
on there or top voicing). So it's probably my nature that when I find something that seems to be clumbersome
for me or overly complicated I tend to think if there is a way I fix it to work
for me. By the way I put a magnet
on the plate piece with double stick tape in the center and put glue
on it and reached inside and put the piece in place and centered it by watching the top magnet. Then put more magnets to each side. Then clamped it with a C clamp and top and bottom caul
for a few minutes and the removed loosen the clamp removed the magnets and tighten the clamp up. Back to the point, first I thought of just making a vacuum press. Then there was the fact that with the pinless
bridge I didn't have a pin hole to keep the
bridge from moving while
gluing it either. So I got to thinking and thought I could route the shape of my
bridge like in my
bridge jigs into some corian I have and make it a vacuum clamp to hold the
bridge in place and then just slap some HHG in the template/vacuum clamp and pop the saddle in and put 3-4
gobars on it and be done. I figured I'd cut the clamp flush with the front of the
bridge so that the clamp was opened and could be removed after the HHG/Titebond has set up some and I could clean it up. But my plans could change.