Official Luthiers Forum!
https://www.luthiersforum.com/forum/

OH NO!!! I've done it now...
https://www.luthiersforum.com/forum/viewtopic.php?f=10101&t=42676
Page 1 of 2

Author:  Linus [ Sat Feb 08, 2014 4:04 pm ]
Post subject:  OH NO!!! I've done it now...

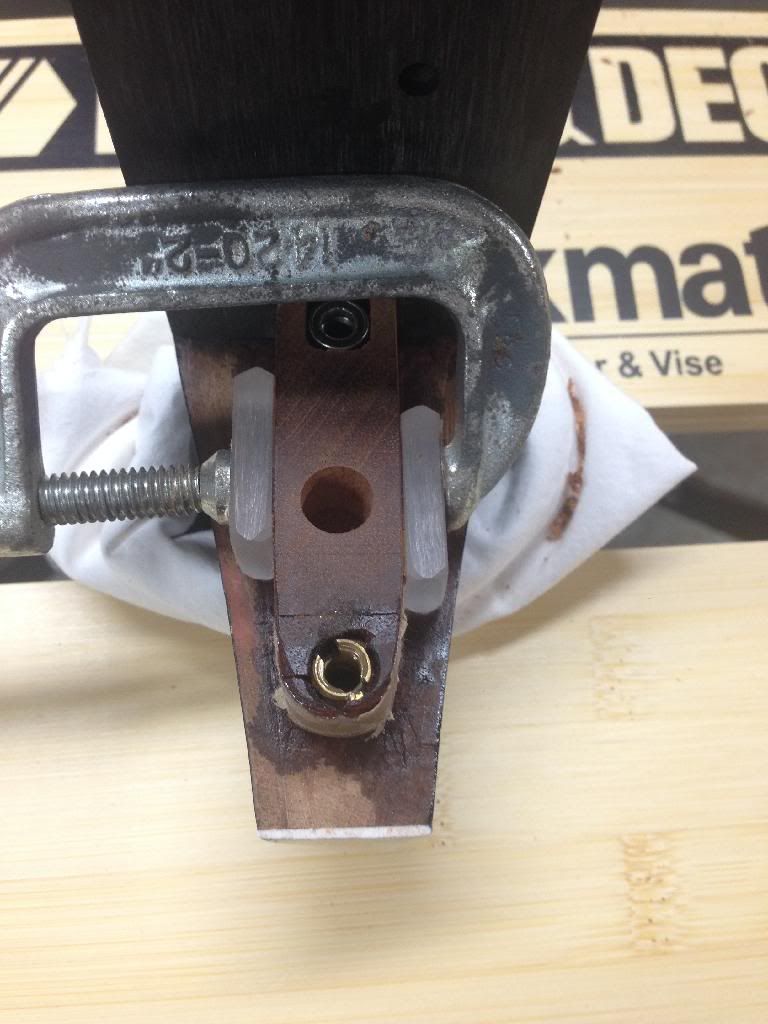
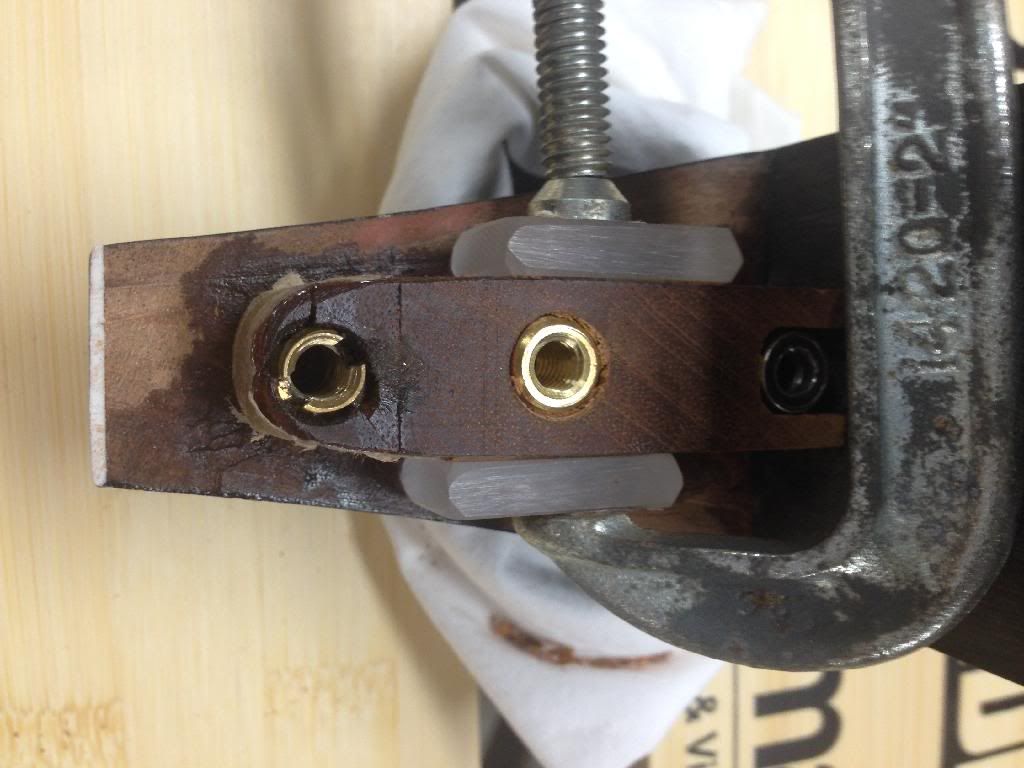
Oops... I've split the wood holding the bolt on insert in the neck heal. Bummer.

I was doing the final fit before assembly. Lots of on and off and just over tightened. I heard a snap and this is what I was left with.

Image

Image


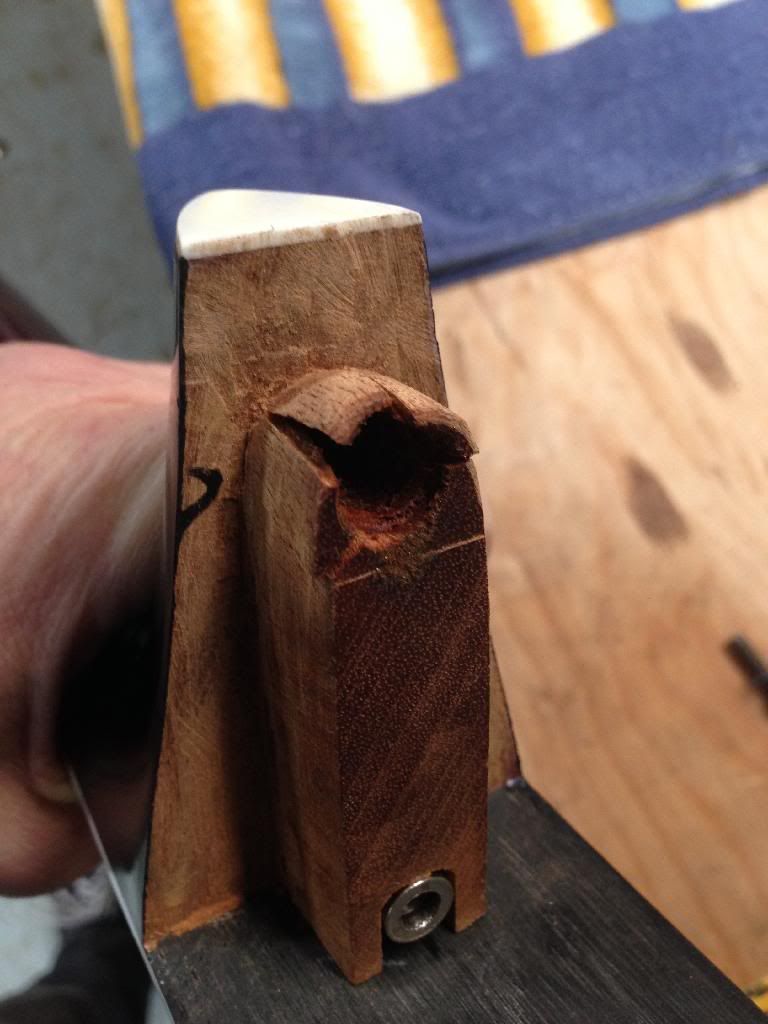
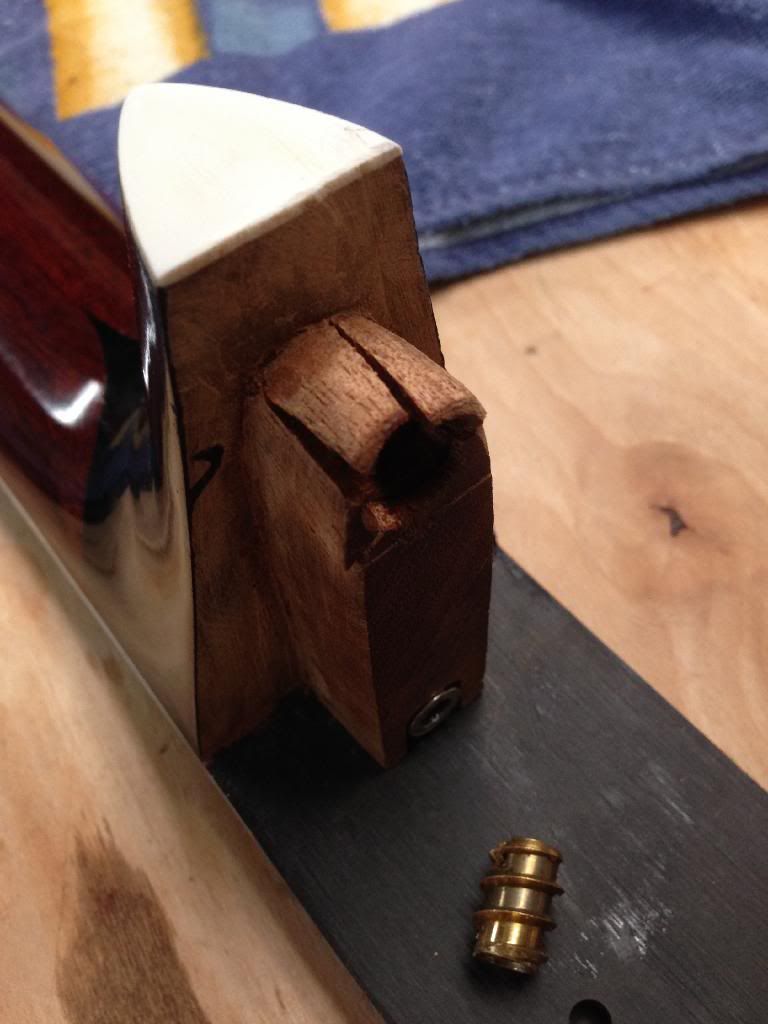
How do I best fix this? It seems like there is enough room for a new insert higher up on the heal. Do I try to repair this busted out insert or not? If so, how? Epoxy? Superglue?

HELP!!!!!!!

Author:  RichB [ Sat Feb 08, 2014 4:19 pm ]
Post subject:  Re: OH NO!!! I've done it now...

I've done that b4. Looks nasty! I put mine back together w/ superglue & it's held since. I do think adding a 2nd attachment bolt higher up is a more secure way to go since your bolt is near the bottom of the tenon...

Author:  StephenW [ Sat Feb 08, 2014 4:22 pm ]
Post subject:  Re: OH NO!!! I've done it now...

You could insert a dowel to add strength and use hanger bolts . . . .

http://www.luthiersforum.com/forum/viewtopic.php?f=10101&t=41855&p=551897&hilit=hanger+bolt#p551897

Easy search to find other discussion on this method.

Author:  Joe Beaver [ Sat Feb 08, 2014 4:35 pm ]
Post subject:  Re: OH NO!!! I've done it now...

That points out the weakness of using a threaded insert. What Rich suggested may work for you.

Another way is to convert it to a barrel nut type of system but you will need to add the wood fillets on the side of the tenon as show by William Cumpiano. You can just google it and get a good picture.

I would superglue the broken wood back in place, take out the upper threaded insert. Drill the holes out and insert a wood plug in the holes. Then make two fillets and chisel down the sides of the tenon and epoxy the fillets in place and go from there

Author:  mkellyvrod [ Sat Feb 08, 2014 5:31 pm ]
Post subject:  Re: OH NO!!! I've done it now...

There are several good suggestions on the link Stephen provided. I kind of like the hanger bolt suggestion for fixing your immediate problem. For future reference, I wonder about how coarse the threads are on the insert you used, and also the diameter of the insert. Although I've yet to use them, I purchased the ones recommended by Mottola (see below) for a future build. The recommended inserts from McMaster Carr, although somewhat pricey at about $2.50 each, have much finer threads (think they were made to insert into aluminum) and seems to me that they might work better. Good luck on that repair.
Marty

http://liutaiomottola.com/construction/Bolton.htm

Author:  Toonces [ Sat Feb 08, 2014 6:17 pm ]
Post subject:  Re: OH NO!!! I've done it now...

This was a poor design decision due to the bolt being too close to the edge. You really want more wood around the insert.

The threaded inserts work very well but you need a few things in place:

1) As much wood as possible surrounding the insert. I use a 1" wide tenon for this very reason.

2) Don't tighten the bolts too much. I tighten as much as I can with my fingers and then 1/2 a revolution and that is it.

3) Once installed, drench the outside of the inserts with thin CA glue. I also drench the entire tenon with thin CA glue as well as this really strengthens the Mahogany end grain.

Author:  DannyV [ Sat Feb 08, 2014 7:34 pm ]
Post subject:  Re: OH NO!!! I've done it now...

I'm sure you can fix that, but I will share one thing. It's way easier to get at the bolts if you go inboard on the tenon by about 3/4" on both. That way you won't have to fight your way around the UTB and the upper back brace, when you want to bolt the neck on.......... and take it off............ several times. That is crappy for sure. I think I know what you said when it happened. You could cut that part of the tenon off and go into the heel with the insert and use a longer bolt. Should work. I'm pretty good at fixing screw ups. That's the sign of a good carpenter. :lol:

Good Luck,
Danny

Author:  the Padma [ Sat Feb 08, 2014 7:50 pm ]
Post subject:  Re: OH NO!!! I've done it now...

Ya. Ok....
I, me duh ?adma has snapped the odd time...alright, occasionally... maybe one or twice..alright...a lot! But I was justified at it! Ya right :roll:....After all me walk on two legs ...just like you.

So...is simple...plug the sucker how ever you wish...take your pic at any of the above suggestions, they will all work and send that sucker on down the line. Then go build another one.

the thing here is ...whad-ya learn from this?

Peace and carrots.
duh ?adma

Author:  Ruby50 [ Sat Feb 08, 2014 8:58 pm ]
Post subject:  Re: OH NO!!! I've done it now...

It's not a mistake unless you can't fix it

Ed Minch

Author:  Clay S. [ Sat Feb 08, 2014 9:30 pm ]
Post subject:  Re: OH NO!!! I've done it now...

I like to use the coarse threaded inserts with the interrupted thread. They seem to go in easier, grab better, and put less stress on the wood around them. When going into end grain I install the insert, back it out, soak the sides of the hole with super glue, then reinstall the insert.

I like Danny's suggestion - put the insert into the heel. That is no different than what we do for a butt joint bolt on neck.

Author:  the Padma [ Sat Feb 08, 2014 10:15 pm ]
Post subject:  Re: OH NO!!! I've done it now...

Filippo Morelli wrote:
the Padma wrote:
the thing here is ...whad-ya learn from this?

That building guitars can frequently suck.

Filippo


Ya, like the chrome off of a trailer hitch. Especially when you forgot to get her phone #. [headinwall] laughing6-hehe

Author:  DannyV [ Sun Feb 09, 2014 12:03 am ]
Post subject:  Re: OH NO!!! I've done it now...

Filippo Morelli wrote:
the Padma wrote:
the thing here is ...whad-ya learn from this?

That building guitars can frequently suck.

Filippo


Your right about that, but oh wait, I'm down to about 30 or 40 sets. Must be time to re-order. :lol: Better go see if Aaron has anything cool.

Author:  Shaw [ Sun Feb 09, 2014 12:06 am ]
Post subject:  Re: OH NO!!! I've done it now...

I would plug the hole and glue it back together and re drill the hole. Is it possible for you to adjust the placement of the hole? Move it a little further from the edge? If you already drilled the hole thru the body that can be plugged to. You should always lube these anchors up with some paste wax. Make them easier to install. The first time I used these types I cracked a neck. I just eyed the drill bit size since there was no instructions on what size to use since they were bought loose. What a mistake. Later I bought some in a bag which had instructions and drill size. Let us know how it turns out Linus...Mike

Author:  RusRob [ Sun Feb 09, 2014 2:39 am ]
Post subject:  Re: OH NO!!! I've done it now...

Quote:
:roll:....After all me walk on two legs ...just like you.


I am not too sure about that... I have heard storys... Eat Drink


He's right though, any one of the answers you got will work.

Me? I much prefer a dovetail joint over a bolt on. I somehow picked up the concept of reseting them right away, plus I like the fact it is a self locking joint.

Cheers,
Bob

Author:  jfmckenna [ Sun Feb 09, 2014 9:58 am ]
Post subject:  Re: OH NO!!! I've done it now...

I use threaded inserts but I don't thread the inserts in instead I drill the whole the same width (actually just a hair smaller) then epoxy them in. My thinking there was that I won't stress the wood around it.

Author:  WudWerkr [ Sun Feb 09, 2014 11:28 am ]
Post subject:  Re: OH NO!!! I've done it now...

Put a dowel in there and glue it in tite . Leave the dowel long as a Guide pin for the hole in body . Move up and reset the insert . Then with the "guide pin" it will look planned and as a design Feature NOT like a Mistake or repair . [:Y:]

Author:  the Padma [ Sun Feb 09, 2014 12:14 pm ]
Post subject:  Re: OH NO!!! I've done it now...

Filippo Morelli wrote:
RusRob wrote:
Quote:
:roll:....After all me walk on two legs ...just like you.


I am not too sure about that... I have heard storys... Eat Drink

True. After all that brown beer, he might have been on 4 legs for a while ...

Filippo


Yo Flipo,

me drink,
me get drunk,
me fall down.

No problem.

Author:  Linus [ Sun Feb 09, 2014 1:15 pm ]
Post subject:  Re: OH NO!!! I've done it now...

Thanks for all the advice everyone. This wealth of wisdom is amazing.

I'll get to work repairing this one and put in another insert higher up the heal.

I've certainly learned my lesson about over tightening these.

Author:  Linus [ Sun Feb 09, 2014 1:18 pm ]
Post subject:  Re: OH NO!!! I've done it now...

What is the drill bit called that can drill a relief circle on the INSIDE of the neck block? The bit is inserted through a hole in the neck block from inside the guitar, the hand drill is outside the guitar, and you pull back while the bit is spinning. I know I've seen discussion of it but can't think of the words to search.

Author:  ZekeM [ Sun Feb 09, 2014 3:34 pm ]
Post subject:  Re: OH NO!!! I've done it now...

Linus wrote:
What is the drill bit called that can drill a relief circle on the INSIDE of the neck block? The bit is inserted through a hole in the neck block from inside the guitar, the hand drill is outside the guitar, and you pull back while the bit is spinning. I know I've seen discussion of it but can't think of the words to search.


reverse counterbore

Author:  J De Rocher [ Sun Feb 09, 2014 4:41 pm ]
Post subject:  Re: OH NO!!! I've done it now...

Also called a reverse spot facer. MSC has them.

Author:  Clay S. [ Mon Feb 10, 2014 5:46 pm ]
Post subject:  Re: OH NO!!! I've done it now...

Linus wrote:
What is the drill bit called that can drill a relief circle on the INSIDE of the neck block? The bit is inserted through a hole in the neck block from inside the guitar, the hand drill is outside the guitar, and you pull back while the bit is spinning. I know I've seen discussion of it but can't think of the words to search.

You can also regrind the back edge of a spade bit to do this.

Author:  Linus [ Wed Feb 19, 2014 11:55 am ]
Post subject:  Re: OH NO!!! I've done it now...

Based on the advice from forum members I repaired the split and have installed another insert higher up the tenon.

Progress...

Image


Image

Author:  Spyder [ Wed Feb 19, 2014 4:06 pm ]
Post subject:  Re: OH NO!!! I've done it now...

Looks good, that should hold. I think you need a minimum thickness all around the insert. Not sure exactly how much, but there is probably an old rule of thumb somewhere. Looks like the original one was just too close to the end, that's probably where the split started.

Author:  Linus [ Wed Feb 19, 2014 4:25 pm ]
Post subject:  Re: OH NO!!! I've done it now...

And I fell into the "if a little tight is good a LOT tight is better" trap.

Page 1 of 2 All times are UTC - 5 hours
Powered by phpBB® Forum Software © phpBB Group
http://www.phpbb.com/