Official Luthiers Forum!

Owned and operated by Lance Kragenbrink
It is currently Sun Jun 08, 2025 3:11 pm


All times are UTC - 5 hours


Forum rules


Be nice, no cussin and enjoy!


Post new topic Reply to topic  [ 43 posts ]  Go to page Previous  1, 2
Author Message
PostPosted: Sat Mar 13, 2010 12:06 pm 
Offline
Old Growth Brazilian Rosewood
User avatar

Joined: Fri Nov 02, 2007 9:49 am
Posts: 13574
Location: Ann Arbor, Michigan
First name: Hesh
Last Name: Breakstone
City: Ann Arbor
State: Michigan
Country: United States
Status: Professional
Finally got caught up here and took a minute to take some pics:

This is a great time of year in my shop because the RH stays nearly perfect with very little assist from the dehumidifier. So my shop is nice and quiet....

Attachment:
DSC02924.jpg


I was fortunate enough to snag the last set of fret cauls that John Watkins made and sold. We use these in the Ann Arbor shop all of the time and they are invaluable.

I just finished making a quick-and-dirty little box/stand for them so that I can read the radi and grab easily. This box is EIRW with Lowes pine molding ripped and sized as dividers. The finish is non-existent and I think that I will keep it that way since it is going to get knocked around. She sounds great with great attack, sustain, and range.... laughing6-hehe 
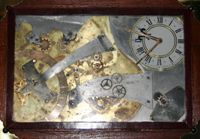
Sorry I couldn't resist, other than guitars this box is one of the only things besides trouble that I have ever made.... :roll: :D

Attachment:
DSC02929.jpg


I had some HHG in the pot and instead of wasting it I used if for my box.

Attachment:
DSC02925.jpg


Bracing a top and nearly ready to attach it to it's box.

Attachment:
DSC02926.jpg


Attachment:
DSC02927.jpg


Stew-Mac is GREAT!!! I placed this order on-line yesterday at 4:30 PM and selected standard shipping. It arrived at 10:00 AM this morning!!!! That's 17 1/2 hours!!! Amazing!!!

Attachment:
DSC02933.jpg


Here are my headlights for my new OptiVisor when that thing arrives next week. Should have ordered it from Stew-Mac and would have had it today.

Attachment:
DSC02934.jpg


That's it for me this week.


You do not have the required permissions to view the files attached to this post.


Top
 Profile  
 
PostPosted: Sat Mar 13, 2010 12:08 pm 
Offline
Contributing Member
Contributing Member
User avatar

Joined: Mon Jul 27, 2009 7:52 am
Posts: 4524
First name: Big
Last Name: Jim
State: Deep in the heart of Bluegrass
Country: usa
Focus: Build
Status: Amateur
WaddyThomson wrote:
Getting close to the finish on #4. Got the fingerboard glued down and bridge placed for gluing. Here are a few shots from the bench.


Attachment:
P1030323%20(Large).JPG


Attachment:
P1030321%20(Large).JPG


Man I LOVE that headstock ! [:Y:] [clap] [clap]


You do not have the required permissions to view the files attached to this post.

_________________
The Shallower the depth of the stream , The Louder the Babble !
The Taking Of Offense Is the Life Course Of The Stupid One !
Wanna Leave a Better Planet for our Kids? How about Working on BETTER KIDS for our Planet !
Forgiveness is the ability to accept an apology that you will probably NEVER GET
The truth will set you free , But FIRST, it will probably Piss you Off !
Creativity is allowing yourself to make Mistakes, Art is knowing which ones to Keep !
The Saddest thing anyone can do , is push a Loyal Person to the point that they Dont Care Anymore
Never met a STRONG person who had an EASY past !
http://wiksnwudwerks.blogspot.com/
http://www.facebook.com/groups/GatewayA ... rAssembly/


Top
 Profile  
 
PostPosted: Sat Mar 13, 2010 12:27 pm 
Offline
Contributing Member
Contributing Member
User avatar

Joined: Fri Jul 10, 2009 4:44 am
Posts: 5565
First name: colin
Last Name: north
Country: Scotland.
Focus: Build
Status: Semi-pro
Got fed up of the choking in the dust mask, and the mess when sanding, so made a compact downdraft table (small shop) to take 1 guitar and it works great, so pleased with that.
So just prepping a couple of guitars.

_________________
The name catgut is confusing. There are two explanations for the mix up.

Catgut is an abbreviation of the word cattle gut. Gut strings are made from sheep or goat intestines, in the past even from horse, mule or donkey intestines.

Otherwise it could be from the word kitgut or kitstring. Kit meant fiddle, not kitten.


Top
 Profile  
 
PostPosted: Sat Mar 13, 2010 2:21 pm 
Offline
Contributing Member
Contributing Member

Joined: Fri Jan 25, 2008 9:51 pm
Posts: 1134
Location: Albany NY
First name: David
Last Name: LaPlante
Status: Professional
Into the polishing on my current commission #95 as well as some touch up on #92 to prepare for shows this spring in Saratoga N.Y. and Austin TX.:
Attachment:
Finishing#95#92.jpg


You do not have the required permissions to view the files attached to this post.


Top
 Profile  
 
PostPosted: Sat Mar 13, 2010 4:34 pm 
Offline
Contributing Member
Contributing Member
User avatar

Joined: Wed Oct 08, 2008 11:36 am
Posts: 7465
Location: Southeast US
City: Lenoir City
State: TN
Zip/Postal Code: 37772
Country: US
Focus: Repair
Working on a walnut 13-fret 000. Pretty much got the rims ready, next is to brace the top and back, get the top voiced and get the box put together.

Attachment:
DSCF0614.JPG


Attachment:
DSCF0612.JPG


Attachment:
DSCF0613.JPG


Attachment:
DSCF0601.JPG


You do not have the required permissions to view the files attached to this post.

_________________
Steve Smith
"Music is what feelings sound like"


Top
 Profile  
 
PostPosted: Sat Mar 13, 2010 5:56 pm 
Offline
Koa
Koa
User avatar

Joined: Thu Dec 18, 2008 11:42 am
Posts: 1135
Location: Hudson, MA
First name: Kevin
Last Name: Quine
City: Hudson
State: MA
Country: Usa
Focus: Build
Status: Amateur
Here's my next one....koa tenor uke
I don't know why I torture myself with this rope binding gaah


You do not have the required permissions to view the files attached to this post.


Top
 Profile  
 
PostPosted: Sat Mar 13, 2010 9:25 pm 
Offline
Contributing Member
Contributing Member

Joined: Fri May 09, 2008 2:25 pm
Posts: 1958
First name: George
City: Seattle
State: WA
Country: USA
Focus: Build
Status: Amateur
Wow, some great looking work going on out there. I love seeing all the pics, as it inspires me to be more creative. I'm just getting started on an L-00. Glued the kerfed lining on this afternoon.

George :-)

Attachment:
kerfed_lining_sm.jpg


You do not have the required permissions to view the files attached to this post.


Top
 Profile  
 
PostPosted: Sun Mar 14, 2010 8:00 am 
Offline
Old Growth Brazilian Rosewood
User avatar

Joined: Fri Nov 02, 2007 9:49 am
Posts: 13574
Location: Ann Arbor, Michigan
First name: Hesh
Last Name: Breakstone
City: Ann Arbor
State: Michigan
Country: United States
Status: Professional
Man you guys are good!!! :)

I have been trying to work on organizing my shop this weekend and promised myself that I would NOT work on any guitar building which is not all that easy I am finding... I probably should have put the current guitar project out of site because I keep gravitating toward it....

Anyway I just completed a second box and this one is for my nut files and engineer's scales.... The engineer scales are probably my single most used tool/thing so having it always in one place will be helpful going forward.

Attachment:
DSC02935.jpg


I need to get a handle on the additional nut files that I am likely to use and order them but that is why the box has more slots than I currently have files to fill - planning for expansion here.... :)

So here are my two new boxes and I have to admit that since I was planning on not doing any guitar building this weekend but could not stay out of the shop building boxes is pretty fun.... :lol:

Attachment:
DSC02936.jpg


You do not have the required permissions to view the files attached to this post.


Top
 Profile  
 
PostPosted: Sun Mar 14, 2010 11:11 am 
Offline
Contributing Member
Contributing Member
User avatar

Joined: Wed Feb 15, 2006 7:37 am
Posts: 4817
Started some of the real work on the Les Paul. I used tracing paper to approximate where I wanted things, then roughed it out. It's ready to trim up as soon as the templates get here.
Attachment:
IMG_1179.jpg

Attachment:
IMG_1185.jpg

Attachment:
IMG_1190.jpg


You do not have the required permissions to view the files attached to this post.


Top
 Profile  
 
PostPosted: Sun Mar 14, 2010 5:56 pm 
Offline
Mahogany
Mahogany

Joined: Thu Feb 11, 2010 6:40 pm
Posts: 57
First name: Keith
Last Name: Lally
City: Brookhaven
State: New York
Focus: Build
Status: Amateur
Working on my first build. Carving out the back of the top today.

Attachment:
carving-top.jpg


You do not have the required permissions to view the files attached to this post.

_________________
Keith Lally
http://krl-guitar-building.blogspot.com/


Top
 Profile  
 
PostPosted: Sun Mar 14, 2010 8:40 pm 
Offline
Koa
Koa
User avatar

Joined: Wed Jan 24, 2007 2:45 pm
Posts: 1370
Location: Calgary, Canada
Status: Amateur
Looking good Keith. I started two archtops myself. They are 34" scale acoustic bass guitars. Ever since I saw Bill Moll's on MIMF some years back, I've wanted to build one. Make that two as my wife wants one as does my best bud. They have 20" lower bouts and 4" ribs. I've already resawed and thicknessed the ribs ready for bending. Drilled all the depth holes on the tops today and roughed all four out on the safety planer. Carving starts tomorrow!

Some great looking stuff going on in peoples shops.
Attachment:
wedges.jpg
Attachment:
bench blanks.jpg
Attachment:
planer carving.jpg


You do not have the required permissions to view the files attached to this post.


Top
 Profile  
 
PostPosted: Sun Mar 14, 2010 11:30 pm 
Offline
Cocobolo
Cocobolo
User avatar

Joined: Tue Jun 30, 2009 1:00 pm
Posts: 247
First name: Matthew
Last Name: Dollinger
City: Beaverton
State: Oregon
Zip/Postal Code: 97005
Country: United States
Focus: Build
Status: Amateur
Finally got pics done of an electric bass build for myself. Body is solid redwood burl (was a gift from friend's step dad...about 10 or 20 years old). Neck is maple with a purpleheart fret board. Electronics and neck measurements match up with Fender's P-Bass.


You do not have the required permissions to view the files attached to this post.


Top
 Profile  
 
PostPosted: Mon Mar 15, 2010 4:30 am 
Offline
Koa
Koa

Joined: Mon Jul 02, 2007 1:22 pm
Posts: 766
-


Last edited by TonyFrancis on Wed Dec 04, 2013 2:56 am, edited 1 time in total.

Top
 Profile  
 
PostPosted: Mon Mar 15, 2010 9:20 am 
Offline
Koa
Koa
User avatar

Joined: Thu Sep 24, 2009 9:50 am
Posts: 941
Location: Ellicott City, Md - USA
First name: John
Last Name: A
Focus: Build
Status: Amateur
OK -

finished thicknessing my side and marking them for the pipe bending.
I was able to bend one side - my first real bending - I burnt some side a few weeks ago so this is my second chance on a new set of sides. I used a paper towel on the pipe - which made a world of difference.
Then I finally came to revelation - that the bending is the easy part - the hard part is holding the side in the proper shape or curve while it dries out in the minute after !! I was bending an rebending ! I figured out that setting or waving the side in the air after the bend sets it and then it sticks.
Well after 1 hour bending 1 side - I realized this and then I was happy. My side was slightly damp - I brought in the house and boom - springback. I need to make a little drying rack for my just bent sides.... but man I think I just got the hang of this !! Next up are my walnut sides....


You do not have the required permissions to view the files attached to this post.

_________________
It's this new idea from recent decades that everyone gets a participation award. - MUX


Top
 Profile  
 
PostPosted: Mon Mar 15, 2010 11:40 am 
Offline
Contributing Member
Contributing Member

Joined: Wed Jul 02, 2008 11:44 am
Posts: 1005
Location: SE Michigan
First name: Kenneth
Last Name: Casper
City: Northville
State: MI
Country: U.S.A
Focus: Build
Rod True wrote:
...here's something I learned from Tony Karol. Inlay the wood rosette on the top then cut the outer and inner channels for your black purfling lines...


That's a great tip, Rod.

Ken

_________________
http://www.casperguitar.com


Top
 Profile  
 
PostPosted: Mon Mar 15, 2010 12:03 pm 
Offline
Cocobolo
Cocobolo
User avatar

Joined: Mon Jan 03, 2005 7:06 am
Posts: 460
Location: United States
David LaPlante wrote:
Into the polishing on my current commission #95 as well as some touch up on #92 to prepare for shows this spring in Saratoga N.Y. and Austin TX.:
Attachment:
Finishing#95#92.jpg


David,

What's going in Austin this spring? I know there's a show this weekend for SXSW. I hadn't heard of any others, but I don't get out much.

_________________
Jimmy Caldwell
http://www.caldwellguitars.com


Top
 Profile  
 
PostPosted: Mon Mar 15, 2010 12:30 pm 
Offline
Contributing Member
Contributing Member
User avatar

Joined: Wed Oct 08, 2008 11:36 am
Posts: 7465
Location: Southeast US
City: Lenoir City
State: TN
Zip/Postal Code: 37772
Country: US
Focus: Repair
Ken C wrote:
Rod True wrote:
...here's something I learned from Tony Karol. Inlay the wood rosette on the top then cut the outer and inner channels for your black purfling lines...


That's a great tip, Rod.

Ken


That's the way I did the rosette in this thread - sure works better than the other way around.

_________________
Steve Smith
"Music is what feelings sound like"


Top
 Profile  
 
PostPosted: Mon Mar 15, 2010 12:54 pm 
Offline
Brazilian Rosewood
Brazilian Rosewood

Joined: Fri Nov 03, 2006 6:50 pm
Posts: 2711
Location: Victoria, BC
First name: John
Last Name: Abercrombie
Status: Amateur
SteveSmith wrote:
Ken C wrote:
Rod True wrote:
...here's something I learned from Tony Karol. Inlay the wood rosette on the top then cut the outer and inner channels for your black purfling lines...


That's a great tip, Rod.

Ken


That's the way I did the rosette in this thread - sure works better than the other way around.


You can also rout the channel with the wood section cut to fit in the middle and then just select veneer strips to fill up the space 'left over'. Using the same router jig adjustment settings to cut the wood inlay and the channel works for this.

Lots of ways to get there...
Cheers
John


You do not have the required permissions to view the files attached to this post.


Top
 Profile  
 
Display posts from previous:  Sort by  
Post new topic Reply to topic  [ 43 posts ]  Go to page Previous  1, 2

All times are UTC - 5 hours


Who is online

Users browsing this forum: No registered users and 56 guests


You cannot post new topics in this forum
You cannot reply to topics in this forum
You cannot edit your posts in this forum
You cannot delete your posts in this forum
You cannot post attachments in this forum

Jump to:  
Powered by phpBB® Forum Software © phpBB Group
phpBB customization services by 2by2host.com