Official Luthiers Forum!

Owned and operated by Lance Kragenbrink
It is currently Sun Jul 20, 2025 6:26 am


All times are UTC - 5 hours


Forum rules


Be nice, no cussin and enjoy!


Post new topic Reply to topic  [ 19 posts ] 
Author Message
PostPosted: Mon Sep 08, 2008 11:28 pm 
Offline
Cocobolo
Cocobolo

Joined: Fri Nov 16, 2007 6:06 am
Posts: 329
So I got this Stanley Bailey 5 1/4 "Sweet Heart" Type 15. I know It's not Lie Nielsen but I think it will do what I want it to do for now, joining tops/backs. Those of you with these older planes from Stanley Bailey, how do you adjust/set up so that it's being used to it's full capability?

Thanks, David


Image

Image

Image

Image


Top
 Profile  
 
PostPosted: Tue Sep 09, 2008 1:28 am 
Offline
Cocobolo
Cocobolo
User avatar

Joined: Thu Jan 26, 2006 8:03 am
Posts: 225
Location: United States
First name: Rich
Last Name: Barbera
City: Bay Area
State: CA
Status: Semi-pro
What a nice old Plane...

I'm sure that many will add their technique on 'how to' properly setup/tune a plane (something that I'm still working on) to this thread. Although, I'm getting much better at it, I've yet to shave hairs from my arm..lol!

When I first got my #7 Stanley joiner, the fellow who sold it to me was kind enough to send some detailed instructions on how to go about setting up a plane....I though I'd post them for those who aren't in the know? I thought it was a good instructional...

For tuning up a plane, here are some basics:

When you sharpen the blade you should put a very, very slight crown to the blade. I accomplish this by putting extra finger pressure on one corner and then the other when the blade is being sharpened on the 8000 grit stone. You only need to do it for a few strokes. The purpose of this is to prevent plane “tracks”. This is the tell-tale lines on a board that show just were you were planeing.
The frog position is set depending on the species of wood, figure of the wood, and knots/defects in the wood. The frog should be “closed”( moved forward so that a smaller opening is achieved) when you have highly figured wood, cross grain in a piece of wood with knots. The purpose of closing the frog is to prevent tear-out. With an opening that is too big the wood will tend to tear out before the blade has a chance to cut it. By closing the throat you are closing the distance between the blade and the front of the mouth. This tear-out is more likely to happen when the cutter tries to cut in a direction that is not parallel to the grain, such as occurs in highly figured wood or wood where the grain changes direction.

When you do this you must also take a thinner shaving so that the thickness of the shaving is small enough to fit through the opening.

I set the blade in the following steps
Install the chip breaker so that it is square on the cutter and no more than 1/16th of an inch from the cutting edge. This distance can vary depending on your personal preferences, frog setting, condition of the depth adjustment mechanism, and many others. Try this first until you get a feel for things and then try changing it slightly more back from the edge. You will find that as you get better with the plane you will adjust this distance depending on species of wood as well.
Install the irons on the frog and insert the lever cap. The screw holding the lever cap is often over tightened by many plane users. It must be tight enough to hold the irons from unwanted movement, but loose enough so that you can change the depth with the depth adjustment knob without using a lot of force. You should be able to turn the knob with the index finger of the hand on the tote (tote is the rear handle).
Flip the plane over and sight down the sole of the plane. (set the plane on a light colored background) just so that your eye is in line with the sole of the plane. Turn the depth adjustment knob so that you just start to see the cutting edge above the surface of the plane.
With the plane in the same position look at both corners of the blade. Make sure that they are both even in height above the sole. If they are not, move the lateral adjustment lever to one side or the other until they are the same height.
Put a light coat of Paraffin wax on the sole of the plane. Paraffin wax greatly reduces the friction between the wood and the metal and it will not stain or affect the wood.

These steps should give you a good starting position. Put the plane to the wood and try to plane. If the plane digs in adjust the depth with the depth adjustment knob back until you are taking a very light shaving of wood. If the wood shaving is thicker on one side than the other move the lateral adjustment lever to even it out. Remember that the lateral adjustment lever works in reverse of what you think it does. Moving it to the left causes the right side of the blade to extend more into the work. Once you have set the plane, take a few strokes and look at the shavings. You will in all probability need to tweak both the depth and lateral adjustments from their starting positions to get a thin evenly thick shaving. The shaving should be nearly full width of the blade and a uniform thickness.

You must also plane WITH the direction of the grain. If you go against the grain tear-out will happen. If you see this, flip the board end-for-end and a couple of strokes will take out the chip marks.

Practice planning on a good piece of soft lumber like Aspen or knot free pine. Systematically adjust either the depth adjustment or lateral adjustment to see what happens to the shaving.

There is an excellent video and workshop available for planeing and working with hand tools. Go to http://www.robcosman.com to view his videos and see a schedule of his workshops. The Rough to Ready video is about using a hand plane to make a finished board from a rough cut piece of lumber. Rob is a masters master craftsman when it comes to hand tools. I took his “Training the Hand” workshop. This is a hand tools for beginners class. I highly recommend this to anyone who is interested in learning to use woodworking hand tools properly. It is a week long and you will work 12 to 14 hour days, but it is well worth the time and money.


I hope this helps...


Top
 Profile  
 
PostPosted: Tue Sep 09, 2008 1:43 am 
Offline
Contributing Member
Contributing Member

Joined: Thu Sep 22, 2005 11:57 am
Posts: 352
Location: Los Osos CA
Focus: Repair
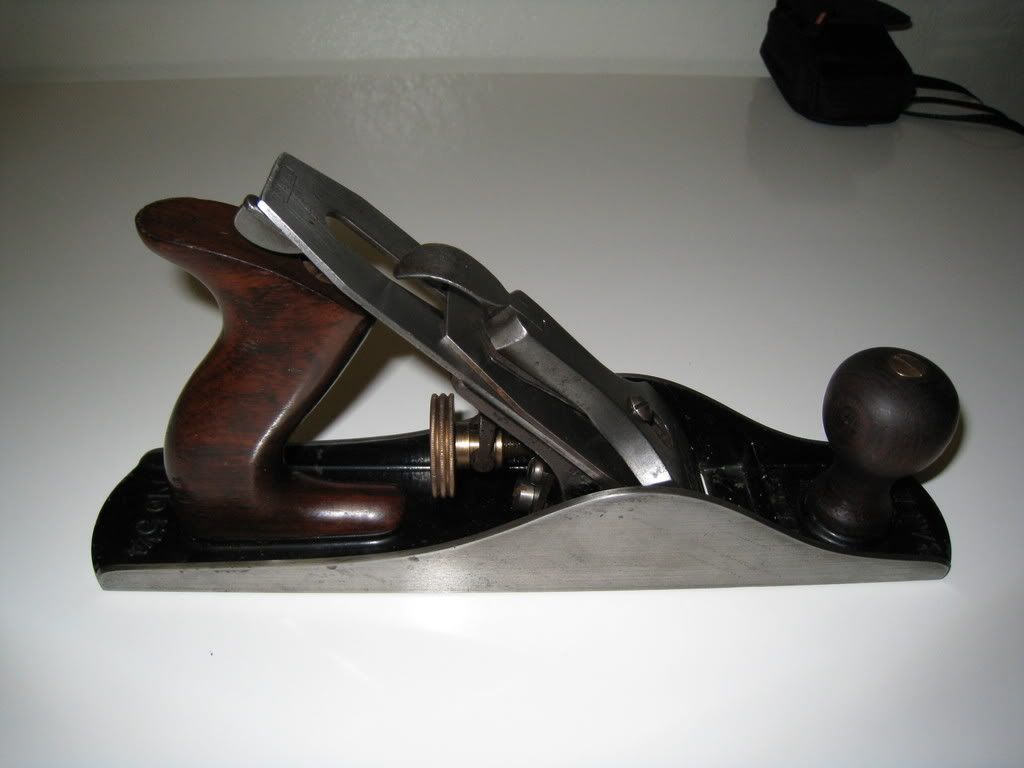
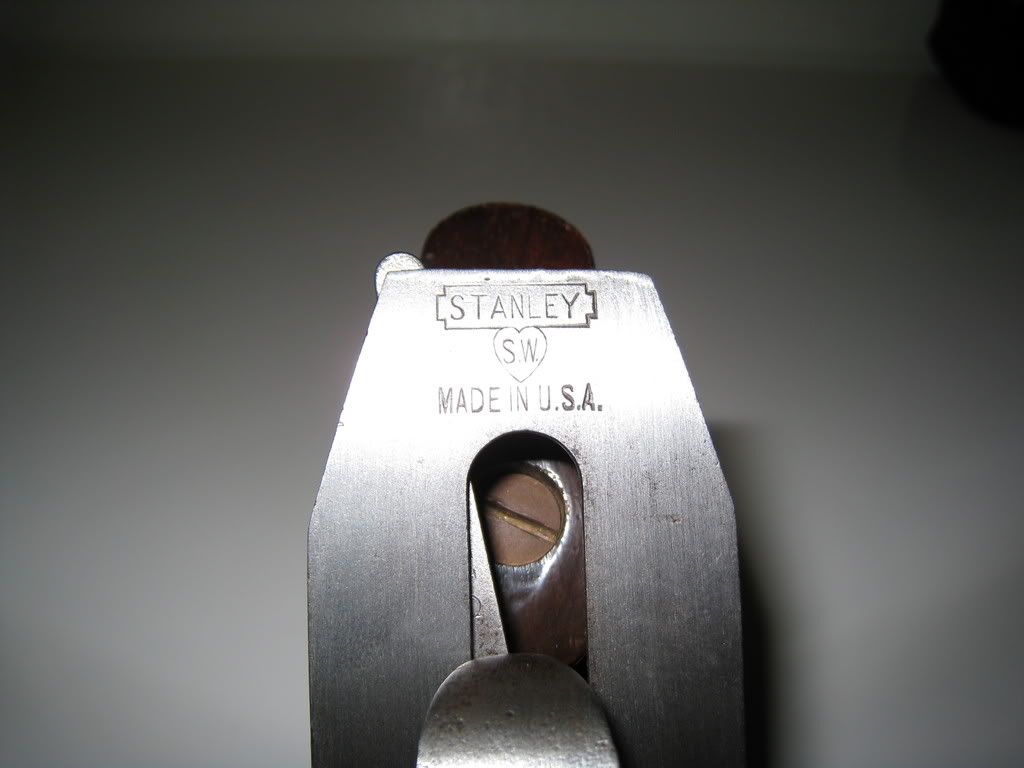
Beautiful Western metal-bodied plane. :) Some say the Sweetheart blades are superior to what Stanley
later produced; I only have one (a #102) so nothing to compare it to.
As for tuning:
1) flat sole; *very slightly* convex in length is ok too, but flat is best for this plane's typical apps.
2) make sure frog is firmly in place, with mouth set for small opening, 1mm/ .040" or less.
3) "chip-breaker" or sub-blade well fitted to main blade, with no visible gaps, and fitted to apply significant downward pressure to main blade. Sub-blade should fit very close to main blade edge.
4) main blade is thin, so should be sharpened with a honing guide for best results. Around 30 degree
bevel angle- how you get there is a matter of opinion. I like a single bevel, but mainly use Japanese
planes. Depending on what you're doing, the blade will be flat straight across (typically jointing)
on have a bit of camber (smoothing) or a lot of camber (cross-grain roughing.)
Depending on the particular stone, sharpen to 4000 grit minimum. Shapton 5000 is good for workaday
stuff; Takenoko 8000 better for fine work.

This and the other suggestions sure to come should get you started.

A good article on planes and the forces acting on them (nominally about block planes, but applicable to any)
-Souping Up the Block Plane, by Richard S. Newman (details methods of Robert Meadow), in
Fine Woodworking: On Planes and Chisels, ISBN 0918804280.

-And if you get tired of fiddling, just send that beauty to me! :) Good luck- CW.


Top
 Profile  
 
PostPosted: Tue Sep 09, 2008 2:24 am 
Offline
Contributing Member
Contributing Member

Joined: Thu Sep 22, 2005 11:57 am
Posts: 352
Location: Los Osos CA
Focus: Repair
A couple of other things I should have mentioned:

- check the sole for twist- this is imp't, often neglected, and makes for a cranky plane- irritating!

- the back, or non-bevel side of the blade, must be finished equally as well as the bevel side.
this can take time, depending on how you do it- carborundum powder, diamond stone or other
ways- one relative shortcut is to hang the last 1/4" or so of the blade perpendicularly across
the side of a coarse, preferably diamond stone, and relieve the back so that you can easily reach
the cutting edge with finer stones. The ridge created at the tip will be honed away in time.
(blades often have a curl toward the bevel side, making it difficult to get a true flat surface
and therefore a uniformly sharp surface.)

- A mildly interesting factoid: if the plane is otherwise well- adjusted, extreme sharpness is not
very important, except for finish-planing in softwoods, which tend to compress under the cutting
edge.


Top
 Profile  
 
PostPosted: Wed Sep 10, 2008 5:36 pm 
Offline
Contributing Member
Contributing Member
User avatar

Joined: Thu Dec 01, 2005 11:38 am
Posts: 639
Location: United States
That is a particularly fine example. Do nothing but hone it and set it up.The square and the flat things are overrated. If it is truly sharp and set up with a fine mouth and full contact between chipbreaker and blade, the lateral adjust lever corrects any square issues, and in fact a plane does not have to have a sole like a surface plate.Just Ole' Mike


Top
 Profile  
 
PostPosted: Wed Sep 10, 2008 7:05 pm 
Offline
Contributing Member
Contributing Member

Joined: Wed Mar 19, 2008 11:49 am
Posts: 897
Location: Northen Cal.
The idea of crowing a blade is fine for a smoother but not good for a plane to be used for edge joining as in joining plates for example. Also it is very important to have a flat sole on a plane you plan on using to edge joint. This is not over rated on a plane to be used to edge joint. You will not get perfect results when edge jointing without a flat sole. It is not hard to get the sole flat. Another thing is that I would relieve the area of the sole just behind the blade. From the opening behind the blade, back to about 1/2" to 5/8" . You can mask off the surounding area and use some 150 grit paper or a file. You only have to relieve it by a few thousands but more is ok. The area can be a bump when you tension the blade. It helps the have the blade retracted and tentioned when flattening but I find it is still helpful to relieve this area. If not it can cause your plane to not cut, so then you extend the blade, not cutting, extend, no cut, extend, grabs, back off, no cut, extend, grabs. If you manage to get it somewhat adjusted it will cut, skip, cut, skip. Pain in the ..... This is a common problem, watch for it. (The hump thing that is)
I would also with a file bevel the edges of the sole all around. Especially I like to round off the area where the edge of the side meets the edge of the front. If this is sharp you can put a pretty nice ding in a soft piece of wood.
One principle you can apply to your tune up is that things should be flat to slightly hollowed. For example you would want the surface of the ramp or frog to be flat or very, very slightly hollowed so that the bade won't rock. (With this in mind I always do a flattening of the front of my iron as well as the back of the iron. I don't take it to a high polish just get it pretty flat. At the least no hump so again it won't rock. Same thing with where the frog sits on the plane. Same with the chip breaker although it is best that this is really flat as shavings could jam under any gaps but it would be better to have this putting pressure on the outside edges of the blade than just in the middle. You want to stay away from the rockin blades. To tune a plane to work like a fine instrument just takes a lot of little things that add up. This assumes that the iron is sharpening properly and the blade adjusted of course as these are the most basic and important things. Take your plane apart, clean it, look at each piece and think about how it works. The time spent in understanding and mastering a hand plane will pay you off many, many times over in saved time, better work and satisfaction. Thats a great looking plane ! Good luck.
Link

_________________
Cut to size.....Beat to fit.....Paint to match.


Top
 Profile  
 
PostPosted: Wed Sep 10, 2008 10:41 pm 
Offline
Contributing Member
Contributing Member
User avatar

Joined: Thu Dec 01, 2005 11:38 am
Posts: 639
Location: United States
If you are not rock solid confident in your plane fettling skills, I beg you to hone properly and try the plane before undertaking any irreversible extended tuning efforts.

I have just returned to this forum and do not want to be contrary right off, but much of the detailed advice offered requires experience. In fact, many efforts to flatten will almost guarantee a convex sole. Google " Cian Perez." He is a fine man who has gathered extraordinary advice. Look for "rfeeser" about planes and "Catch 22." There are other fine article there on tuning planes.

Here, since you do not know my chops, stick with Todd Stock. My apologies to the previous poster , L--. I have some respect in the handtool world and some of your suggestions gave me chills. And, that particular 5 1/4 is in unusually fine condition, is a vintage of some collector value and should be minimally tuned unless its owner consciously decides to work it over in spite of those factors. Just Ole' Mike[url]Image[/url][url]Image[/url]___PS Photos added to show I am not just a "one trick pony" on this topic.


Top
 Profile  
 
PostPosted: Wed Sep 10, 2008 10:51 pm 
Offline
Cocobolo
Cocobolo

Joined: Fri Nov 16, 2007 6:06 am
Posts: 329
So now I should just store this plane for couple of decades and buy me another plane?


Top
 Profile  
 
PostPosted: Thu Sep 11, 2008 4:56 am 
Offline
Brazilian Rosewood
Brazilian Rosewood

Joined: Sat Jun 17, 2006 3:48 am
Posts: 2094
It's entirely up to you, it is your plane.

However I don't think I'd be too happy with using a vintage sought-after plane.

I had been searching for a 5 1/4 for ages, until I was told that they were quite valuable. Anyone that owns an old Stanley #1 should also be laughing, for in the UK they are worth at least $4,000.

I love hand planes; that photograph of hand tool collections is fabulous!


Top
 Profile  
 
PostPosted: Thu Sep 11, 2008 7:05 am 
Offline
Contributing Member
Contributing Member
User avatar

Joined: Thu Dec 01, 2005 11:38 am
Posts: 639
Location: United States
This nice 5 1/4 is not going to pay a semester's college tuition. It is a work plane from a time when quality was much better. So, this one should be used. Everything is debatable when it comes to tuning planes, but usually the less is better. I always do my best honing job and frog setup and mouth adjustment, making sure to have full contact on the chipbreaker and then try out the plane. If it gives me the shavings I expect, then I go no further.That is just me. On sole flattening, one needs a good flat surface to get the sole flat. A table saw with decent cast iron wings will often suffice. On the other hand, I have never taken a file to a plane sole, and if I did , I would drawfile. I like this size enough that I have an LN.Just Ole' Mike-- Edit PS- I jointed my first guitar top with my Dad's post-WW II 5 1/4 with a Hock iron. The iron and chipbreaker were right and otherwise the plane was as inherited and my Dad did not tune planes. The full size top did not become sized for a uke. :P


Top
 Profile  
 
PostPosted: Thu Sep 11, 2008 7:20 am 
Offline
Koa
Koa

Joined: Tue Mar 07, 2006 12:10 am
Posts: 606
Location: United States
Mike, Nice collection. Is that a Lie Nielsen or a Stanley #9 miter plane in your pic?

Miketobey wrote:
Image


Top
 Profile  
 
PostPosted: Thu Sep 11, 2008 9:34 am 
Offline
Cocobolo
Cocobolo
User avatar

Joined: Thu Jan 31, 2008 12:31 am
Posts: 326
Location: New York City
First name: Ron
Last Name: Y
Lots of good information. Does anyone have suggestions for removing rust from a plane?
I have used vinegar in the past which removes the rust, but results in a lot of pitting. Thanks.

Ron M.


Top
 Profile  
 
PostPosted: Thu Sep 11, 2008 10:19 am 
Offline
Brazilian Rosewood
Brazilian Rosewood

Joined: Sat Jun 17, 2006 3:48 am
Posts: 2094
Depending on where the rust is, I usually use wire wool.


Top
 Profile  
 
PostPosted: Thu Sep 11, 2008 11:39 am 
Offline
Contributing Member
Contributing Member
User avatar

Joined: Thu Dec 01, 2005 11:38 am
Posts: 639
Location: United States
The #9 is LN. It is a late one that they drilled and tapped for the now-discontinued side handle/knob. I consider this the one LN that is not replaceable. In case anyone is curious, the infill smoother is a Slater and the big infill panel is a Spiers. To the left are WW II 3 and 4; I like the extra weight. The Bedrock is a 606 and all three have Gabon/Gaboon ebony totes and knobs. On WoodNet Handtools we call this the "Sacred Coffee Table." I use these guys, but wipe them with camellia and return them there. One of the few advantages of a house with a beat up old man and three ankle-biters. BUT-for a laugh, google " Angry Pack of Chihuahuas" jom


Top
 Profile  
 
PostPosted: Thu Sep 11, 2008 5:38 pm 
Offline
Contributing Member
Contributing Member

Joined: Wed Mar 19, 2008 11:49 am
Posts: 897
Location: Northen Cal.
Miketobey,
I am sorry I gave you the chills, have you recovered and thawed out yet? Pretty dramatic statement.
You might explain your position as to it's "value" as a collector piece and how any tuning might devalue it but to make a statment as to me giving you the chills as if I don't know my business at all quite fankly pisses me off. I don't give a shred of advice on this forum that I don't know about from lots of experience and training. I am solid in this area of planes.
I am not a "collector", I just make hand planes and irons and use them to make my living. Woodworking, boat building and furniture building for 33 years. (I am well repected in these circles ) I spent 2 years at a school where for 6 days a week and 8 + hours a day we did nothing but work wood with planes. My mentor is Jim Krenov. That was 25 years ago. I know how to tune and use a plane. What in my sugestions bothered you to the point of losing body temp.
Any relief of a few thousands could be removed in a few minutes. I don't know your chops but being a collector doesn't mean you know how to tune and use a plane. ( I am not saying you don't but I have my doubts if you take umbridge with what I said. )
We are talking about a way over valued (because of collectors and percieved vs. real value ) production plane here. It is not a # 1. Maybe he should sell it and reap the huge returns and buy a Lie-Neilson or a Baliey and put his kids through college with the rest of the money.
Maybe he shouldn't even sharpen the iron, just put it up on the mantle.
You tell me other than as a collector, but looking at the tool as pertains to woodworking what I said that was so chilling.
Link

_________________
Cut to size.....Beat to fit.....Paint to match.


Top
 Profile  
 
PostPosted: Thu Sep 11, 2008 8:03 pm 
Offline
Contributing Member
Contributing Member
User avatar

Joined: Thu Dec 01, 2005 11:38 am
Posts: 639
Location: United States
Apparently a moderator /owner deleted my last reply. I believe it may be best if I take another sabbatical. I apologize to all for my stubborness. I have really hurt Lvc's feelings. It is a bit embarrassing to return and embroil myself in an angry argument. Best regards, Just Ole' Mike


Top
 Profile  
 
Display posts from previous:  Sort by  
Post new topic Reply to topic  [ 19 posts ] 

All times are UTC - 5 hours


Who is online

Users browsing this forum: No registered users and 18 guests


You cannot post new topics in this forum
You cannot reply to topics in this forum
You cannot edit your posts in this forum
You cannot delete your posts in this forum
You cannot post attachments in this forum

Jump to:  
Powered by phpBB® Forum Software © phpBB Group
phpBB customization services by 2by2host.com