Hi Shad,
Here's one option:
Go to
Raka site, click on
Epoxy Pricing, and then scroll way down to the bottom of the list, and get an
Epoxy Sample Kit for $18 that has enough epoxy and hardener to do a bunch of instruments.
You can use those little clear plastic condiment cups you get at restaurants to measure the epoxy components. Set the cup on the table, set a fine tip marker pen on a piece of wood, and spin the cup to draw a line on each cup at the same depth. Now you have accurate disposable measuring cups. Measure carefully, or you could get a goo that won't cure or epoxy that hardens so quickly you won't get done. Mix the epoxy better than you think you should. To give yourself the maximum working time, pour all the mixed epoxy onto a wide surface, such as a plastic lid for margarine or Cool Whip. If epoxy is kept in a deeper container, it hardens very quickly (and puts off a tremendous amount of heat.)
I would wait until the instrument is at the final sanding stage before applying epoxy. That way, you'll be getting the epoxy on the wood the least number of times, and there's no use putting it on the raw wood or rough shaped instrument and sanding it all off.
You have to decide what will look best in any cracks or voids in the Buckeye - clear epoxy is a safe bet as it will look pretty much like the surrounding wood (unless the void is really big), or you can use sanding dust left in the voids and then wick in CA (cyanoacrylate) glue, or use a tinted epoxy, or use epoxy and dust... I have been warned by someone very experienced that black epoxy usually looks bad - looks like black plastic.
Once you have the voids filled (may take several sessions), and everything sanded down smooth again:
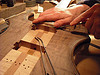
Use a rubbery-plastic squeegee that you can find at an auto parts store (look near the Bondo) to put the epoxy on the wood. I suspect with something like Buckeye burl (kinda soft and absorptive), it will take maybe 3 sessions of applying thin coats of epoxy before you will have it filled, hard, and uniform. Sand lightly between coats to flatten everything out again. Look carefully for surface irregularities, and you may need to "drop fill" any small voids that show up. Your final finish will only look great if your base coat is defect free. For the final epoxy "wash" coat, use a lint free rag (old t-shirt), and quickly spread a thin film of epoxy diluted with some denatured alcohol over the entire surface. 50/50 might be too thin, but you want this water thin. The idea is that you will not sand after this coat (or you'll risk sanding through, and have to keep doing the "final" coat ad nauseum. You'll know when you're done when it almost looks like a finish has been applied. You'll apply a finish over the epoxy.
Speaking of ad nauseum, are you aware of the health risks associated with epoxy and denatured alcohol? Read Kim Hickey's report of what happened to him when he got sensitized to epoxy. Use gloves and have excellent ventilation. Clean up uncured epoxy with white vinegar.
You're not going to be taking photos while your gloved hands are all goopy, so have a friend shoot some progress shots. Then, post them here so we can see 'em!

Good luck, be patient, and be safe!
Dennis
p.s. (I keep thinking of one more thing...) Especially for first few coats: Do your epoxy work in a warm area, or warm the wood first with a hair dryer. Then, as each coat cures, allow it to cure (24 hours) in an area that is slightly cooler than the starting temperature. Another way to say this is to avoid allowing the epoxy to cure in a higher temperature environment than the application environment. Bubbles (outgassing) will likely appear if you forget this step.