Official Luthiers Forum!
http://www.luthiersforum.com/forum/

Making a side profile template
http://www.luthiersforum.com/forum/viewtopic.php?f=10102&t=8117
Page 1 of 2

Author:  Colin S [ Tue Aug 22, 2006 8:25 am ]
Post subject: 

OK those of you with a number of guitars under your belt (mind those buckles don't scratch the back) can go look at the next topic, but some of the newer builders may be interested in the way I produce a side profile template for a new body shape. As I never buy plans and always make my own body shape I have to do this myself. If you have a radius dish and an outside body mould you have all you need to find the profile.

First thing to do is run a piece of low tack tape accurately onto the edge of the mould.


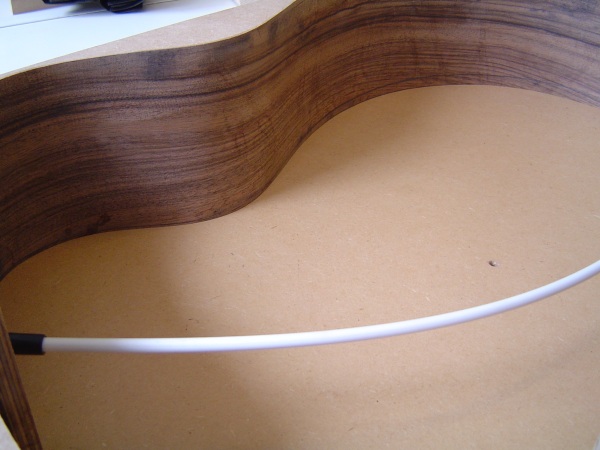
Place the mould into your 15' radius dish, tape towards the dish.


Drill a hole in a scrap piece of wood, round the end off, with a pencil pushed through the hole, run this around the radius dish marking the profile onto the tape.


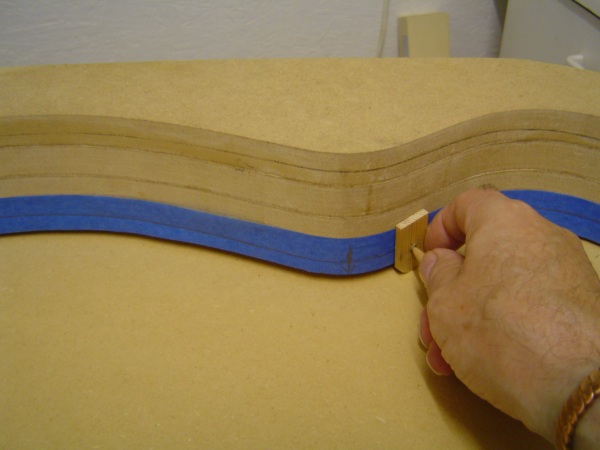
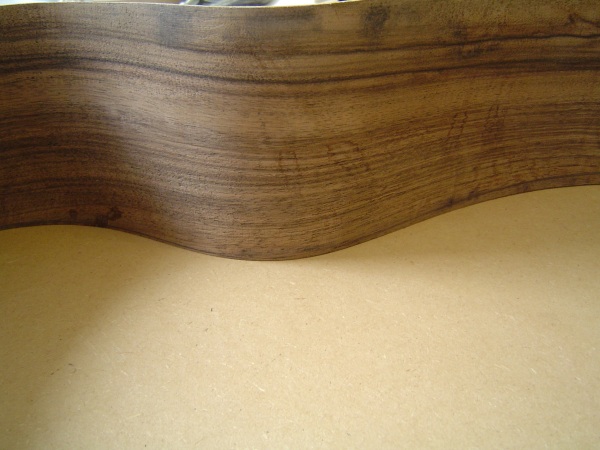
Make sure that you mark the waist and the bottom edge and also the join at head and tail.

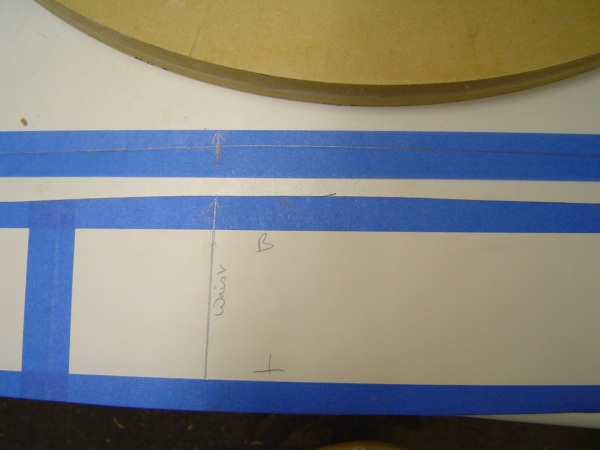
Remove the tape this will now have the profile of the back edge of the side on it. I then stick this tape onto heavy paper and cut to the line giving me a paper template. I also do this for the top profile so that I have a paper template of the final side shape with the top edge perpendicular to the ends and with the the back profile having the correct taper.


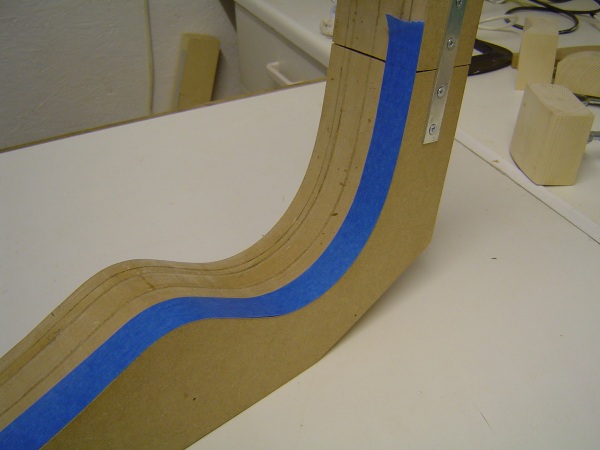
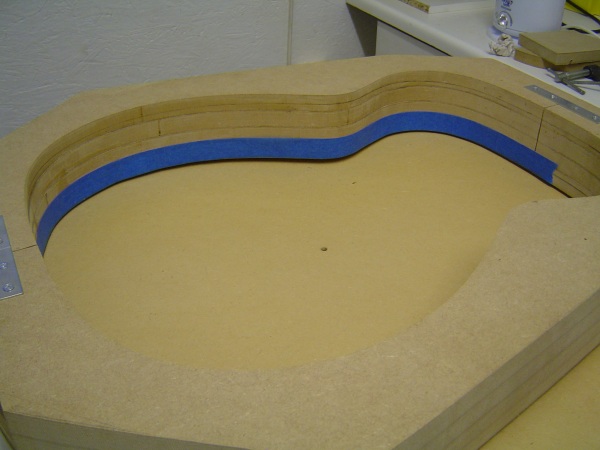
Use this paper template to cut a solid template from hardboard, MDF, whatever you like. This is then used to mark the side and cutting the profile before bending. Don't forget to also transfer the waist reference mark.


I use the paper template to mark the top profile after bending so that I can roughly plane to the line before rotating in the sanding dish.

Hope this helps.

Colin


Author:  Serge Poirier [ Tue Aug 22, 2006 8:32 am ]
Post subject: 

Thank you very Much Colin, great tip!

Author:  RussellR [ Tue Aug 22, 2006 9:42 am ]
Post subject: 

I've a few under my Belt Colin, but you just taught me something, I go through a highly complex series of calculations and plots to achieve the same thing.

Not anymore, Thanks for posting that Colin

Author:  Bill Greene [ Tue Aug 22, 2006 9:43 am ]
Post subject: 

Agreed...thank you.

Bill

Author:  Dave Rector [ Tue Aug 22, 2006 9:48 am ]
Post subject: 

Excellent tip Colin! And timely too. I need to make a side template in the morning and this is just the tip I needed. Thanks!

Author:  JBreault [ Tue Aug 22, 2006 10:05 am ]
Post subject: 

Colin, I follow how you get the profile. However, I guess I'm being daft as I don't understand how you figure out your taper. Thank you for sharing.

Author:  crazymanmichael [ Tue Aug 22, 2006 10:19 am ]
Post subject: 

joe, the pencil indexed to the sanding dish and the mold is going to produce the profile line on the tape. when the tape is placed on the hardboard in a straight line, the pencil line will still retain the tapered side profile to which you can trim your template.

colin, that is just about the simplest method i've seen short of buying a ready made template. thanks!!!! crazymanmichael38951.8061226852

Author:  LuthierSupplier [ Tue Aug 22, 2006 10:38 am ]
Post subject: 

Very cool Colin! I think you could also use a small flat washer with a pencil stuck through the center and just roll it over the 15' dish just as you did with the little square. I love it! Way to go, and thanks for the tip!
Tracy

Author:  Kim [ Tue Aug 22, 2006 11:25 am ]
Post subject: 

Great tip, thanks very much Colin

Cheers

Kim

Author:  old man [ Tue Aug 22, 2006 1:18 pm ]
Post subject: 

WOW!!!, Mr. Mahogany is full of good ideas. Colin, that is so simple and brilliant. I can even do that. Thanks a whole bunch.

Ron

Author:  old man [ Tue Aug 22, 2006 1:28 pm ]
Post subject: 

Dang, that's clever. I don't know if I ever would of thought of this and, to me, it's a major breakthrough.
Sorry for two posts, but I'm excited.

Ron

Author:  Joe Beaver [ Tue Aug 22, 2006 2:54 pm ]
Post subject: 

I think I get it..... Being of a slow nature it may take a few minutes more.

I'm guessing that after you make the top and back profile you just spacing them at the ends to give you your depth at the neck and tail block?

Author:  Serge Poirier [ Tue Aug 22, 2006 3:05 pm ]
Post subject: 

I gotta say it once again too, Thank you very much Colin, really great tip!

Serge

Author:  Anthony Z [ Tue Aug 22, 2006 4:04 pm ]
Post subject: 

Colin -- it slays me how the simplest solutions come from the brightest people.

Just a thought -- your method would make a good GuitarMaker short article or a It Worked for Me in GAL.

Thank you!

Author:  Serge Poirier [ Tue Aug 22, 2006 4:08 pm ]
Post subject: 

Anthony, you got a great idea, and may i suggest that Colin's method stays in the jigs-tools and techniques for every newbie to see? Serge Poirier38952.0480671296

Author:  Anthony Z [ Tue Aug 22, 2006 4:12 pm ]
Post subject: 

A woops on my part - Colin -- by "simplest" I meant most elegant.

Serge - that's a great suggestion! Anthony Z38952.0519328704

Author:  Colin S [ Tue Aug 22, 2006 7:18 pm ]
Post subject: 

Joe, to get the side taper, first draw a line the length of your side on the paper, then at right angles at the ends put lines to the height of head and tail. Then when you put your tape onto the paper, connect the lines together. (Make sure you have the waist towards the head end!) You then have a profile of the back with the right taper as well. I then add the top profile to this, again connecting the end of the lines, the waist will be higher than the head end.

Tracy, you can use a washer, the problem is finding a washer with a large enough diameter but with a small enough centre hole to accurately position the pencil, I always round off the end of the wood so that I have a single contact point with the dish. Make sure if your dish is sandpaper covered that you put some paper on it or you'll sand away the wood!

The advantage of making your own profile is that it will be accurate for your radius dish, I make my own so dish so I don't gaurantee that it is accurately 15'.

Colin

Colin

Author:  ronnmess [ Tue Aug 22, 2006 10:52 pm ]
Post subject: 

What an excellent idea! Thanks! Ron M.

Author:  crazymanmichael [ Tue Aug 22, 2006 11:03 pm ]
Post subject: 

one of the woodworking houses, lee valley if my decrepit grey matter is functioning, sells brass "washers" in various diameters with a pencil lead sized hole specifically for scribing things like this.

Author:  Mark Tripp [ Tue Aug 22, 2006 11:58 pm ]
Post subject: 

Sweet Colin!

Way simpler than the method described in American Lutherie a while back.

Thanks!

-Mark

Author:  dunbarhamlin [ Wed Aug 23, 2006 12:05 am ]
Post subject: 

Good stuff.

I need to make a binding bending form for my ridgeback (a la Vega cylinder back - with a 1" 'speed bump' running from tail to heel) mandolin things and this will nicely give me the contour I need to bend by using my outside molds over the female back mold.

Cheers
Steve

Author:  Colin S [ Wed Aug 23, 2006 12:10 am ]
Post subject: 

Last night I profiled an orphan walnut side using this template and bent it on my bender. As you can see the fit is pretty good before any sanding, in fact, its ready for the kerfing to be attached.


Colin

Author:  Dave Rector [ Wed Aug 23, 2006 12:15 am ]
Post subject: 

Colin, that's impressive! Thanks for the tutorial and the pics of how well it works!

Author:  JBreault [ Wed Aug 23, 2006 2:47 am ]
Post subject: 

[QUOTE=crazymanmichael] one of the woodworking houses, lee valley if my decrepit grey matter is functioning, sells brass "washers" in various diameters with a pencil lead sized hole specifically for scribing things like this.[/QUOTE]

Michael you are spot on. It is Lee Valley and only $8.50 for a set of five. Not bad.

Author:  Kirt Myers [ Wed Aug 23, 2006 3:47 am ]
Post subject: 

Way cool, I'll be using that tip on my current build.

Page 1 of 2 All times are UTC - 5 hours
Powered by phpBB® Forum Software © phpBB Group
http://www.phpbb.com/