Official Luthiers Forum!

Owned and operated by Lance Kragenbrink
It is currently Wed Apr 24, 2024 4:34 am


All times are UTC - 5 hours


Post new topic Reply to topic  [ 29 posts ]  Go to page 1, 2  Next
Author Message
 Post subject:
PostPosted: Sun Dec 30, 2007 3:38 pm 
Offline
Contributing Member
Contributing Member
User avatar

Joined: Mon Mar 19, 2007 7:05 am
Posts: 9191
Location: United States
First name: Waddy
Last Name: Thomson
City: Charlotte
State: NC
Focus: Build
Status: Semi-pro
Well, I finally got some good shop time in over the Holidays.  May get some more on Tuesday.  I got a lot of nit-picky projects out of the way, then today I tried my first side bending on a piece of Poplar, to see if I could match up stuff.  My first real bending attempt on a pipe where I had to try to match up to a shape.

First things first though.  I had been working on a spring loaded go-bar, and posted a prototype before.  Here it is again.
 

Well, I finally got a bunch made, and still have to make some more, but ran out of dowels and CPVC.  Then I built a top for my solera that will break down very easily, since I don't really have room for a standard go-bar deck. I tried it out on a spare top and a 3.5x7mm fan brace to see if it would work.  No glue.  Seems to be OK.


Close  Up
  

My next nit picky project was to make some molds.  I don't know why, but thought they might come in handy.  I made one inside mold and one outside mold.  Using the template method.


Now, some practice.  I resawed a piece of Poplar from some Home Depot stuff that was about 3 1/2" wide, and thinned to about 2mm.  Today I tried my hand at bending on the pipe. 
 

It seems to fit the mold pretty closely, although it took some tweaking to get it there.  I really let it take a long time.  Just went slow, and kept trying it.
 

OK it fits the mold, will it fit the Solera?  Lets see.  I have never tried this before.
 

More tweaking, and it isn't too bad a fit.  Not perfect, but pretty close.  Now, lets see if it will fit my top.  Uh Oh, need to cut out the sound hole.  Haven't done that. Here goes.
 

Alright, now to put the top in the Solera, and see if things fit.
 

That isn't too bad.  More tweaking to get things to fit right.  Had to do some spot sanding the edges of the top where it was a little bumpy, to smooth out the curves.  We're getting there.  Then I cut it to fit the little tongue that fits in the web between the neck slots.


Here is the lower bout.  You can see the raised portion of the Solera under the top.


Now lets see if the neck will fit.  The neck is still very rough, and  will need to be worked some more before fitting to the real sides, but it will do for seeing how things might fit. I still have not cut the rebate where the top will glue to the neck, but it is close enough to see how things might fit up.


Seems like I'm getting close to a good fit.  I wonder how this Romanillos Wedge Neck Joint will work.  Let's try it out.  First wedge in place.


Next wedge locks rib against the neck heel.  Seems to work, at least for a first try without any glue.
 

This would seem to work.  I think I'll have a little more confidence now to actually bend my sides and start this whole assembly process.  Maybe I'll have a guitar closed up in a couple of weeks.  We'll see.  It is very interesting to try out these new things. 

Has anyone ever built a guitar out of Poplar?  It looks nice, and seems to work fine.

Thanks for looking.  I tried to keep the pics small.  I'm working on a couple of on-line build sites to see how they work.  I'll post a link when I get them where I want them.

_________________
Waddy

Photobucket Build Album Library

Sound Clips of most of my guitars


Top
 Profile  
 
 Post subject:
PostPosted: Sun Dec 30, 2007 3:47 pm 
Offline
Koa
Koa

Joined: Fri Feb 16, 2007 12:14 pm
Posts: 1064
First name: Heath
Last Name: Blair
City: Visalia
State: California
Country: USA
Focus: Build
Status: Amateur
waddy,  thats exciting man. youre doing a great job so far. what are your sides going to be made from? i also practiced on some home depot stuff my first few rounds. cant wait to see your progress. happy building!

_________________
sweat the small stuff.


Top
 Profile  
 
 Post subject:
PostPosted: Sun Dec 30, 2007 4:13 pm 
Offline
Brazilian Rosewood
Brazilian Rosewood
User avatar

Joined: Wed Jun 22, 2005 10:11 am
Posts: 2761
Location: Tampa Bay
First name: Dave
Last Name: Anderson
City: Clearwater
State: Florida
Zip/Postal Code: 33755
Country: United States
Wow,looking good so far Waddy!A lot of good pics and your guitar is
going to turn out very nice I'll wager!Good job on your first bend and thanks for sharing this.   

_________________
Anderson Guitars
Clearwater,Fl. 33755


Top
 Profile  
 
 Post subject:
PostPosted: Sun Dec 30, 2007 4:44 pm 
Offline
Cocobolo
Cocobolo

Joined: Sat Aug 25, 2007 12:59 pm
Posts: 241

Looks like you're on the right track Waddy..!...a couple of suggestions though.....


Your "hold down" bar should extend back to the vicinity of the bridge area on the top and should in turn hold a notched bar to jump crosswise over the fan braces (arched to match the curvature). You can then use the notched bar as a bridge caul when you get to that stage.


As we discussed in the other thread you should profile your heel  more closely to it's final form....looks like it's quite a bit more massive than it needs to be at this stage.  


Also find a way to attach your hold down bar so that it can be removed once the body is together......you won't be able to undo that wing nut once the back is on!!


Best!


Top
 Profile  
 
 Post subject:
PostPosted: Sun Dec 30, 2007 4:58 pm 
Offline
Contributing Member
Contributing Member
User avatar

Joined: Mon Mar 19, 2007 7:05 am
Posts: 9191
Location: United States
First name: Waddy
Last Name: Thomson
City: Charlotte
State: NC
Focus: Build
Status: Semi-pro
I realize that the hold down is not right for when I have the braces glued down.  I intend to make another bar.  This one was made for the Solera when it was based on the Courtnall plan.  The wing nut is on an threaded rod with double nuts locked on the other end.  It can be removed from either side of the Solera.  I know the neck is not even close to ready.  I was just seeing how stuff fits together.  It has been a curiosity since I started this process last Spring.  I wanted to test the wedge thing, to see if I was even close.  Looks like I'm not too far off.  I may need to adjust the wedges a little to fit the slots better, but that shouldn't be too hard.

Thanks for your tips, though.  Next step is to get some braces glued down, bend my real sides, and start assembly for real.  I may make some more go-bars though before gluing.  I only have about 19 of them.  Another 9 or 10 would be helpful.  I designed them so I can take the spacer out of the top of the tube, and use the deck at the same height to clamp on the back.  I think I am going to try installing the back braces in the guitar body before gluing the back.  I like the looks of that process.  I am, however, always open to suggestions or  reasons to change the way I should proceed.


_________________
Waddy

Photobucket Build Album Library

Sound Clips of most of my guitars


Top
 Profile  
 
 Post subject:
PostPosted: Sun Dec 30, 2007 11:57 pm 
Offline
Old Growth Brazilian Rosewood
User avatar

Joined: Fri Nov 02, 2007 9:49 am
Posts: 13079
Location: Ann Arbor, Michigan
First name: Hesh
Last Name: Breakstone
City: Ann Arbor
State: Michigan
Country: United States
Status: Professional
Wow Waddy you have been very productive my friend!!

Everything looks great and I really like the spring loaded go-bars.

In one of your pics I see a silver dehumidifier, something else, and a humidifier sitting on the top.  What is the middle unit?

Great job Waddy!


_________________
Ann Arbor Guitars


Top
 Profile  
 
 Post subject:
PostPosted: Mon Dec 31, 2007 12:21 am 
Offline
Koa
Koa

Joined: Wed Jun 01, 2005 6:35 am
Posts: 1325
Location: Kings Mtn., NC, USA
First name: Bill
Last Name: Greene
City: Kings Mountain
State: North Carolina
Zip/Postal Code: 28086
Country: USA
Focus: Build
Status: Amateur
Yep, count me in as one of the "Wow" people...that's nice. I wanna come see sometime!

It's ALL great, but I really like how you made the pipe. That's as nice as the store bought products.

Bill

_________________
Eagles may soar, but weasels don't get sucked into jet engines.


Top
 Profile  
 
 Post subject:
PostPosted: Mon Dec 31, 2007 12:36 am 
Offline
Koa
Koa
User avatar

Joined: Mon Sep 11, 2006 3:56 am
Posts: 855
Location: United States
Great looking stuff, Waddy. I'd like to take a few lessons from you in meticulousness (is that a word)?

I like those go-bars. Jeronimo Pena Fernandez used a very intricate jig that incorporated lots of minitures of this type for clamping his fan braces.

Where'd you get the info' on the Romanillos wedge neck joint? Also, did the idea for the raised portion of the solera in the lower bouts come from Romanillos too? I saw that in John Bogdanovich's book and plan to try it.

Keep up the good work.

Max Bishop
Brighton, Michigan

_________________
Max Bishop
Brighton, Michigan


Top
 Profile  
 
 Post subject:
PostPosted: Mon Dec 31, 2007 1:15 am 
Offline
Cocobolo
Cocobolo

Joined: Tue Nov 07, 2006 9:57 am
Posts: 140
Location: United States
WOW

And great pictures too.

Ray


Top
 Profile  
 
 Post subject:
PostPosted: Mon Dec 31, 2007 1:20 am 
Offline
Brazilian Rosewood
Brazilian Rosewood

Joined: Tue Nov 29, 2005 11:44 am
Posts: 2186
Location: Newark, DE
First name: Jim
Last Name: Kirby
Focus: Build
Status: Amateur
Waddy -

Great stuff! What was your main source of info on the Romanillos method with the sides outside the top? I've seen the method referred to in text in various threads. Did you work from that alone or are there pics somewhere?

The batch I'm working on now follow the Bream Romanillos plan, but my solera ramp is the entire width of the guitar. I was planning on using the method in Bogdanovich's book, but having to taper the sides to proper fit so they will sit down evenly on the ramped solera seems fiddly. Having a flat surface to sit the sides down on seems much more sensible. I may go trim a couple of mm off my solera ramp.

Ditto on the wedged joint. Yours looks different from what I imagined based on the sketch in Courtnall's book.
That may just be me, though.

Happy new year!

p.s. I did also switch from the Courtnall solera (seen on right with a Reyes-style flamenco) to the Bogdanovich solid form (left). It will be interesting to see how that feels as I go along. I carved the first of 4 neck heels yesterday, and have 2 of 4 backs braced. I was going to try double sides, but I think now that I won't on at least the first 2 of the 4, as I'd like to get them done sooner than rather than later.


_________________
Jim Kirby
kirby@udel.edu


Top
 Profile  
 
 Post subject:
PostPosted: Mon Dec 31, 2007 1:50 am 
Offline
Brazilian Rosewood
Brazilian Rosewood
User avatar

Joined: Mon Dec 27, 2004 3:50 pm
Posts: 4662
Location: Napa, CA
Waddy...Great post. I'm not a classical builder but your methods are interesting.

One thing in particular I'd like more information...your homemade bender. Can you elaborate a bit on its construction...materials and heat source...TIA

_________________
JJ
Napa, CA
http://www.DonohueGuitars.com


Top
 Profile  
 
 Post subject:
PostPosted: Mon Dec 31, 2007 1:59 am 
Offline
Brazilian Rosewood
Brazilian Rosewood
User avatar

Joined: Wed Jun 22, 2005 10:11 am
Posts: 2761
Location: Tampa Bay
First name: Dave
Last Name: Anderson
City: Clearwater
State: Florida
Zip/Postal Code: 33755
Country: United States
Yes,Your bender does look very nice! I like the idea of a temp. gauge on it!

_________________
Anderson Guitars
Clearwater,Fl. 33755


Top
 Profile  
 
 Post subject:
PostPosted: Mon Dec 31, 2007 2:13 am 
Offline
Cocobolo
Cocobolo

Joined: Sat Aug 25, 2007 12:59 pm
Posts: 241

Waddy, installing the back braces into the body first is a time honored method and enables you to refine the back curvature using either a radius dish or curved sanding stick. Be sure to place props under the braces so that they won't deflect under the pressure of gluing the back. I'm assuming that you will use the go-bars to put the back on?? If you use the traditional cordage method, be sure to trim the back to the precise shape as any overhang will be leveraged up and ruin the joint.


The tricky part of this method is fitting the brace intersections with the center reinforcement strip as well as keeping the amount of squeeze out to a minimum. Once the back is on you won't be able to get back in to remove it. Fish glue is good for this operation as it gives you more open time than Titebond.  


Stepping back to fitting the sides, be sure that the form/brackets allow the sides to rest well against the back of the heel, trimming the  profile is as much for this reason (so you can better see the "fit") as it is to lssen the amount of stock removal once the neck is inconveniently joined to the body.


I too am interested where you referenced the Romanillos technique........at the course in Siguenza last august he mentioned that his method book is soon to be published but I've never seen much if anything out there which explians it.


Best!  


Top
 Profile  
 
 Post subject:
PostPosted: Mon Dec 31, 2007 2:49 am 
Offline
Brazilian Rosewood
Brazilian Rosewood
User avatar

Joined: Thu Mar 22, 2007 10:59 pm
Posts: 2103
Location: Bucharest, Romania
Country: Romania
Focus: Build
Status: Professional
Shawn helped us a bit with his Siguenza experience.

I have used the slotted heel method too, but i've made less deep cuts for a sturdier central shaft and used spruce wedges.


_________________
Build log


Top
 Profile  
 
 Post subject:
PostPosted: Mon Dec 31, 2007 4:32 am 
Offline
Contributing Member
Contributing Member
User avatar

Joined: Mon Mar 19, 2007 7:05 am
Posts: 9191
Location: United States
First name: Waddy
Last Name: Thomson
City: Charlotte
State: NC
Focus: Build
Status: Semi-pro
Thanks everybody!

Hesh, the middle unit is a portable AC unit.  I vent it through a roof vent left over from an old gas hot water heater.  The only problem with it is that it uses inside air for the heat exchange, and that pulls in outside air which is, when you need the AC, usually very humid, so I have to run the AC and the dehumidifier at the same time.  Not very economical, but my wife said no window units.  Would have cost 1/3 as much and been 3 times more efficient.  Ah the price of a good hand built guitar!

Bill and JJ, the pipe, is a truck tail pipe section which I got for about 7 or 8 bucks.  It was twice that long, so I cut it in half, then slit the other half and squeezed it inside the other section to give it a little more mass.  The heater is a 50 year old 5 watt soldering iron.  You know, one of those that has a heating unit about 1 1/2" in diameter.  It is very slow, but that is good for regulating the heat.  It takes 30 to 45 minutes to heat up, but it also takes a couple of hours to cool down.  I looked at it yesterday after it had been off for over an hour and it was still at over 200*.  I actually did a lot of my tweaking of the sides after it had been turned off for a good while.  Mostly I was too tight in the lower and upper bout curves, and had to stretch them a bit.  It was like helping springback.  I was wishing for some.

Max, I got most of my information from the Courtnall book and from Shawn here at OLF.  He was very generous with information he learned at the Romanillos class.  After reading about him and an article in one of the American Lutherie magazines, I was really taken with his attitude, and his way of thinking.  Then I read more about him in the Courtnall book and bought his book on Torres.  All very revealing about his and Torres' perceptions.  I also, somewhere, ran across This Link, which told me way more than I though I would have learned from about 7 pictures.  Very revealing.  Shawn had talked about the raised lower bout thing, but this made it clear.  It also gave me the idea about the spring loaded go-bars.

Jim, I'm using the Bream / Romanillos plan too.  I learned about keeping the sides flat from Shawn, and also about the double wedge system.  He said it was easier than fiddling around with trying to match a single wedge to a slanted surface.  This way, cut them to size, and cut them on the diagonal.  I actually made mine too long, then trimmed down to fit.  Seemed to work.  As you can see, I just converted my Courtnall Solera to a Romanillos one.  Shawn told me Jose's are very simple and he just uses supports cut out of plywood and sheetrock screws to hold them down in the solera.  I, too, have the Bogdanovich book.  I like it pretty well, but keeping the sides flat and trimming after gluing the top seems too easy and logical to me.

Dave A., the temp guage is just a BBQ grill one stuck in a hole that fits.

Dave LaPlante, Shawn was a generous resource, and I can't say enough about how much I learned from that little slide show of Claudio Menegelli's.  Those pictures really tell a lot.  I can't wait for Jose's book.  I just have to have one of those when it comes out.  How do I get on the list?  Also, thanks for the pointers on fitting the back.  That will be helpful when the time comes.  I'd be interested in "set-up" methods that are used when fitting a back this way.  Does Jose use the foot as a stop against the reinforcement strip to control  minor adjustments in the neck angle?  Man I have a lot to learn!

Alex, I actually ended up reinforcing the central shaft of my neck after following the directions I had from the Courtnall book.  In my opinion it was much too narrow, so I glued reinforcement strips in to thicken it up.

Thanks again, all, for your comments and suggestions.


_________________
Waddy

Photobucket Build Album Library

Sound Clips of most of my guitars


Top
 Profile  
 
 Post subject:
PostPosted: Mon Dec 31, 2007 5:04 am 
Offline
Koa
Koa

Joined: Tue Mar 07, 2006 12:10 am
Posts: 606
Location: United States
Waddy, that is a very impressive zero spring-back fit with the pipe bending, bare handed, no slat, how many attempts and how long did that take you? I don't see any scorched wood, it sits flat and no quilting/warping.

My first attempts on a pipe were not nearly so successful, especially at the waist. I ultimately built a fox style bender and use the pipe for touch-up. But if I would have had that result on a pipe I wouldn't have bothered.

The fox bender is great, but seeing your result I'm going to give the pipe another try.


Top
 Profile  
 
 Post subject:
PostPosted: Mon Dec 31, 2007 5:16 am 
Offline
Contributing Member
Contributing Member
User avatar

Joined: Mon Mar 19, 2007 7:05 am
Posts: 9191
Location: United States
First name: Waddy
Last Name: Thomson
City: Charlotte
State: NC
Focus: Build
Status: Semi-pro
Marc, I really took my time, and went back and forth from the mold to the pipe checking the fit every time I made a little progress.  I was bending at between 325 and 350* mostly.  When the pipe would get to 350 I'd turn it off.  I did this bend by just spritzing the surface of the bend on the bend side and going straight to the pipe.  I did have a good bit of problem with the board wanting to cup where it was wet and not bent, and had to do some straightening.  I did that by keeping it on the pipe and putting pressure with another flat board as I slowly worked it across the surface.  It took care of most of it.  I can tell you though, it was not a fast bend, and I'm sure my next one won't be either.  I'm also not sure Poplar is a good bender.  It seems to be soft, mushy, sort of, and water soaks in rather than burning off.  I think that makes it warp more, though I stand to be corrected on that.  When I was fitting to the Solera, I had to do a bit of twisting to make it lie perfectly flat, and have vertical sides.

_________________
Waddy

Photobucket Build Album Library

Sound Clips of most of my guitars


Top
 Profile  
 
 Post subject:
PostPosted: Mon Dec 31, 2007 9:31 am 
Offline
Cocobolo
Cocobolo

Joined: Sat Aug 25, 2007 12:59 pm
Posts: 241

Thought these might be of interest. These are my fixtures which were derived from those used at the course in Siguenza. The solera is quite similar though I opted to make the solid side rails as opposed to the angle brackets. I may modify this by segmenting the rails and providing for a small amount of 
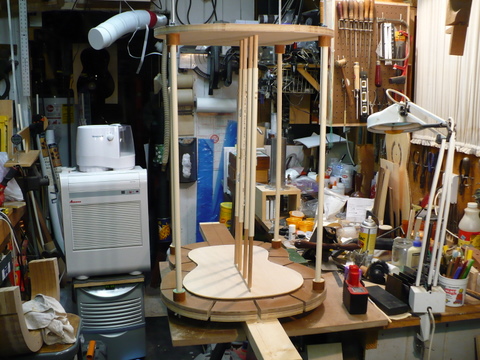
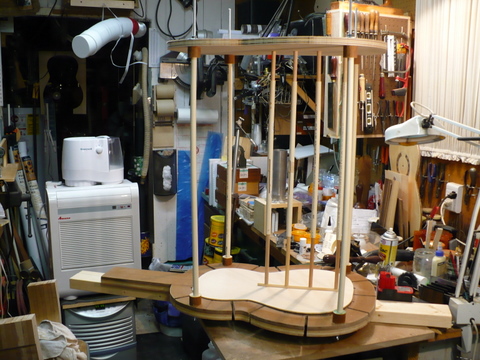
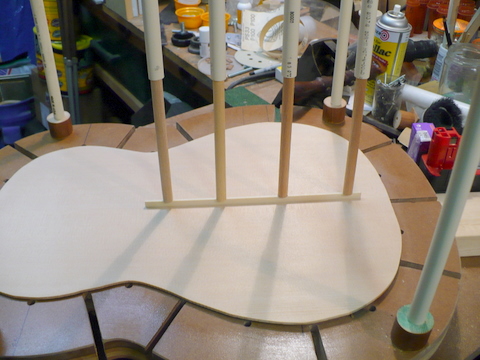
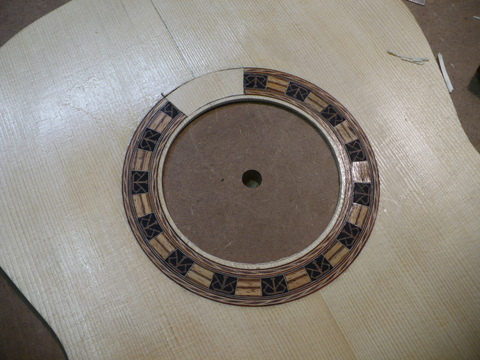
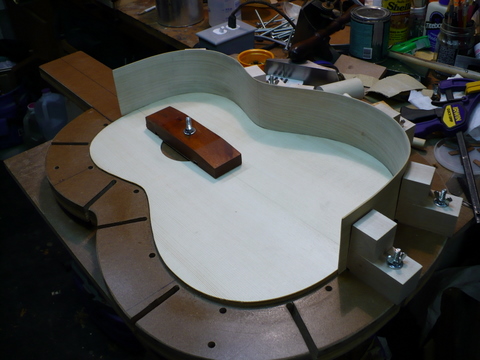
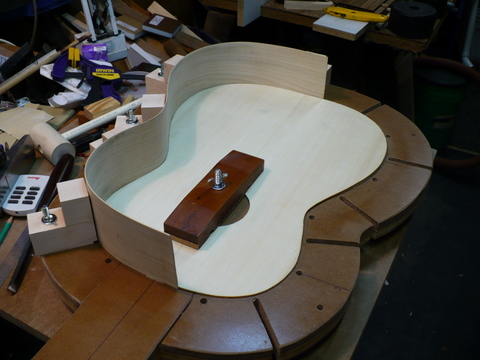
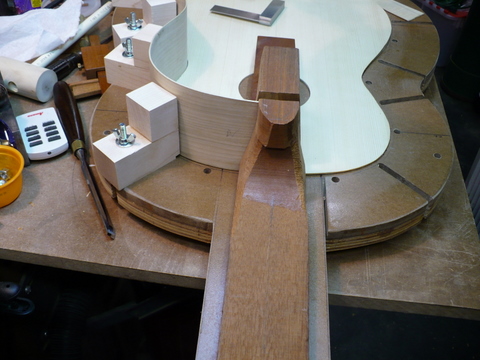
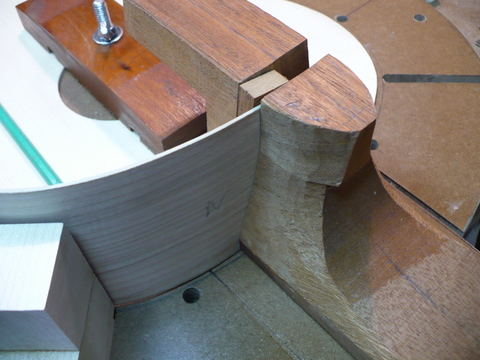
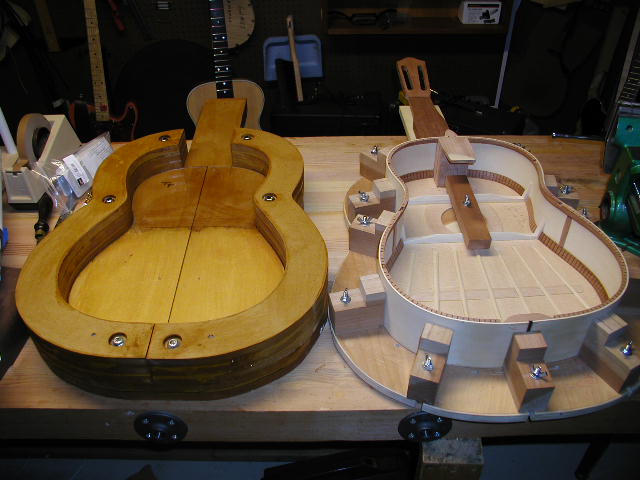
adjustability in and out to better snug the sides around the trimmed top....Note the hold down bar and bridge caul. Also note the contouring which has the high point at the bridge location and which extends right back through the sound hole area.


Top
 Profile  
 
 Post subject:
PostPosted: Mon Dec 31, 2007 9:40 am 
Offline
Cocobolo
Cocobolo

Joined: Sat Aug 25, 2007 12:59 pm
Posts: 241
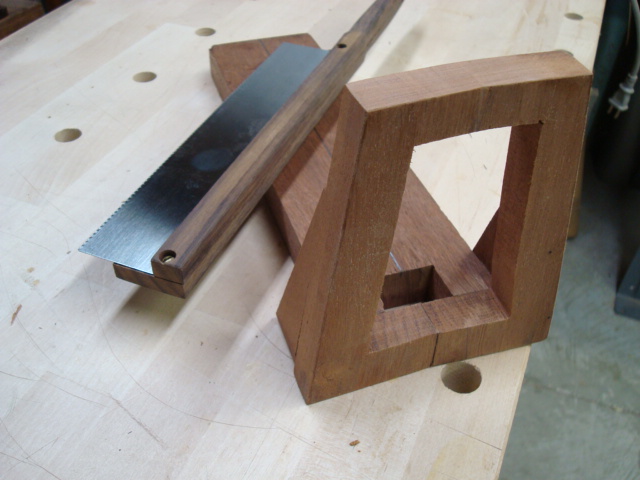
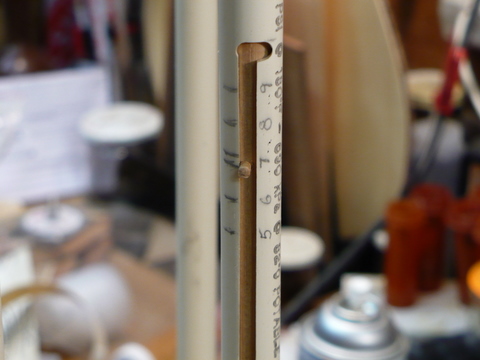
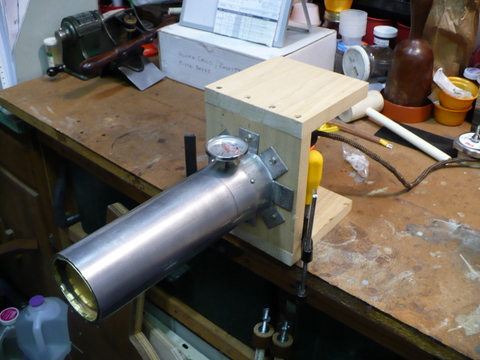
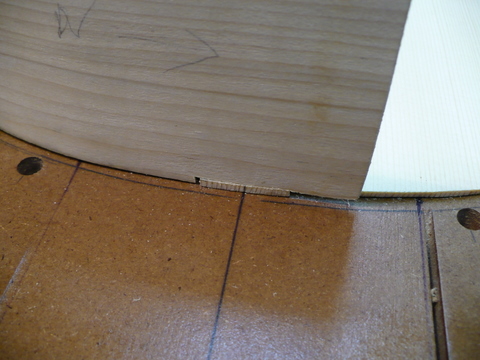
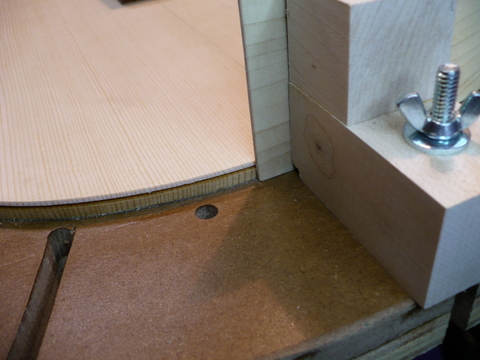
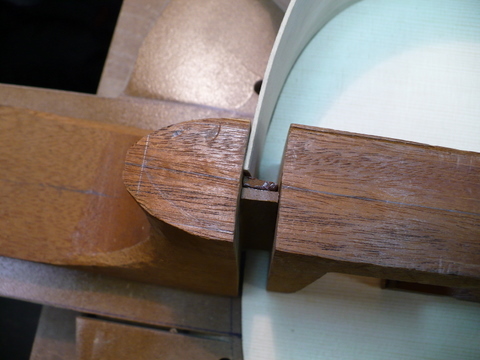
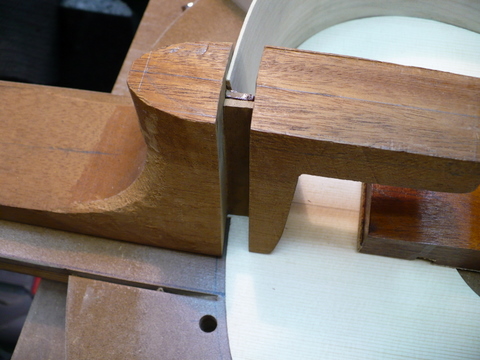
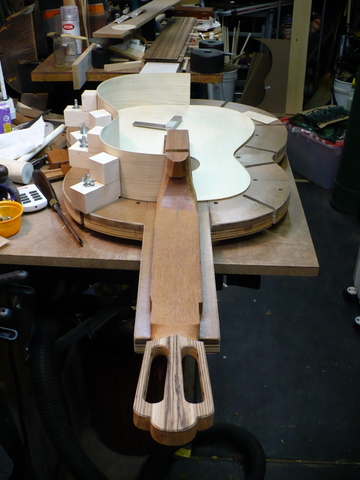
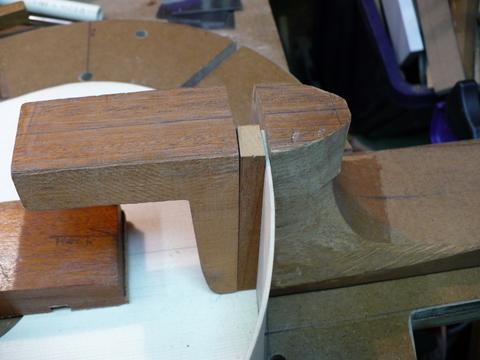
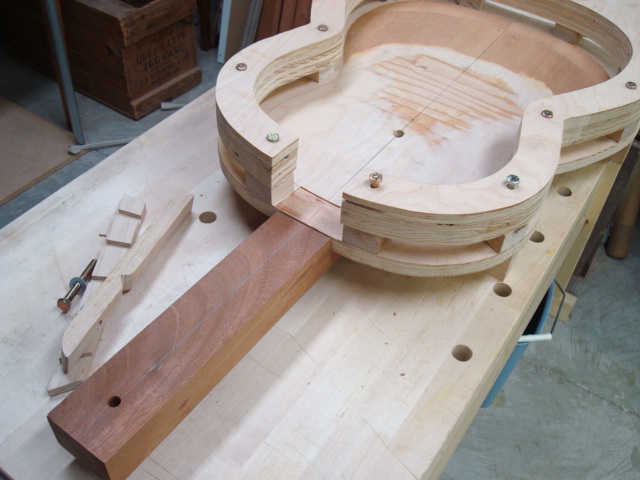
Here are some additional fixtures, this one is the holder for the neck to cut the solts for the sides and wedges. The saw is designed to cut fush to the back surface with a stop at the proper angle. Flipping the saw over automatically makes the 10 mm wide solt to receive the wedges.  


Top
 Profile  
 
 Post subject:
PostPosted: Mon Dec 31, 2007 9:47 am 
Offline
Cocobolo
Cocobolo

Joined: Sat Aug 25, 2007 12:59 pm
Posts: 241
Lastly, this is a shot of  Jose', Liam and myself gluing the back on my guitar in Siguenza.


Top
 Profile  
 
 Post subject:
PostPosted: Mon Dec 31, 2007 12:10 pm 
Offline
Contributing Member
Contributing Member
User avatar

Joined: Mon Mar 19, 2007 7:05 am
Posts: 9191
Location: United States
First name: Waddy
Last Name: Thomson
City: Charlotte
State: NC
Focus: Build
Status: Semi-pro
What, you don't have one of Jose's double saws with spacer welded between them?

Thanks for posting the pictures.  The solid rib supports might be nice.  I like that you can slide them in and out.  Does the whole neck fit through your slot cutting jig? Do you cut it before shaping the foot side of the neck, while everything is still square? I cut mine by hand. Really hard to stay perfectly parallel, and I'm probably not, but I'm close.  I think adjusting the wedges a little will compensate. I asked before, but what surfaces do you glue on the wedges?  I know none on neck to sides - how about wedge to sides?  I assume you glue wedge to wedge, and wedge to neck, both at the foot and at the web between the slots.

You look like you're gonna snap Jose's hand with the rubber band.  Not Nice, Dave!


_________________
Waddy

Photobucket Build Album Library

Sound Clips of most of my guitars


Top
 Profile  
 
 Post subject:
PostPosted: Mon Dec 31, 2007 12:56 pm 
Offline
Cocobolo
Cocobolo

Joined: Sat Aug 25, 2007 12:59 pm
Posts: 241

"Does the whole neck fit through your slot cutting jig? Do you cut it before shaping the foot side of the neck, while everything is still square?"-


I establish the basic taper of the neck block and shape the foot prior to cutting the slot. As shown the jig will only accept the blank through the opening with a taper. I suppose it could be made to accept the squared blank but one of the functions of the jig is to establish the wedge shaped center web between the heel and the neck block.The saw blade I used was limited in width and thus the angle. Once the slot is cut and cleared, I then can carve and establish the profile of the heel where it meets the sides.


" I asked before, but what surfaces do you glue on the wedges?  I know none on neck to sides - how about wedge to sides?  I assume you glue wedge to wedge, and wedge to neck, both at the foot and at the web between the slots."


Yes, wedge to wedge gets glue as well as wedge to side and wedge to neck block


Actually that cordage is 1/8" nylon with really no stretch......I was maintaining the tension while Jose' put a clamp on over a brace location. Note that the solera at the course had angled brackets and we used a triple cruciform "tree" which funneled the cord over the braces.    


Top
 Profile  
 
 Post subject:
PostPosted: Mon Dec 31, 2007 1:07 pm 
Offline
Contributing Member
Contributing Member
User avatar

Joined: Mon Mar 19, 2007 7:05 am
Posts: 9191
Location: United States
First name: Waddy
Last Name: Thomson
City: Charlotte
State: NC
Focus: Build
Status: Semi-pro
I saw that.  Very utilitarian, and I mean that in a good way.  It is one of the things I like about his methods.  Logical, and only complex where necessary.

_________________
Waddy

Photobucket Build Album Library

Sound Clips of most of my guitars


Top
 Profile  
 
 Post subject:
PostPosted: Mon Dec 31, 2007 2:29 pm 
Offline
Cocobolo
Cocobolo

Joined: Sat Aug 25, 2007 12:59 pm
Posts: 241

Well, yes and no, I think some of the methods we experienced at the course were designed to make it more economical to accomodate 20 students using less clamps etc. and I actually prefer many of the methods I've used over the last 25 years or so...........Jose's method does however include some quite elegant techniques which I feel priviledged to have learned........and his aesthetic is unsurpassed..............here's a detail of one of his guitars for inspiration:


Top
 Profile  
 
 Post subject:
PostPosted: Tue Jan 01, 2008 4:55 am 
Offline
Brazilian Rosewood
Brazilian Rosewood
User avatar

Joined: Thu Mar 01, 2007 3:15 pm
Posts: 2302
Location: Florida

Beautiful work indeed!


Waddy, looks like you have a VERY nice guitar on the way too. A little different than the style of building I am used to, but obviously efficient and accurate. Thanks for sharing!


_________________
Reguards,

Ken H


Top
 Profile  
 
Display posts from previous:  Sort by  
Post new topic Reply to topic  [ 29 posts ]  Go to page 1, 2  Next

All times are UTC - 5 hours


Who is online

Users browsing this forum: No registered users and 26 guests


You cannot post new topics in this forum
You cannot reply to topics in this forum
You cannot edit your posts in this forum
You cannot delete your posts in this forum
You cannot post attachments in this forum

Jump to:  
Powered by phpBB® Forum Software © phpBB Group
phpBB customization services by 2by2host.com