Official Luthiers Forum!
http://www.luthiersforum.com/forum/

Reverse-kerf lining tutorial
http://www.luthiersforum.com/forum/viewtopic.php?f=10102&t=14647
Page 1 of 1

Author:  Dave Stewart [ Fri Nov 23, 2007 8:06 am ]
Post subject: 

I wanted to try reverse kerfed linings (up to now, I've only used traditional) & couldn't stomach $3 per 16" piece, so I made up a batch & took pix. It turned out pretty well so I thought I'd post them, for anyone else who'd like to give a try (although I expect a lot of you are already doing something similar).


I started by milling mahogany to 3/4 x 1 1/4" and easing the corners with a 1/4" roundover bit.


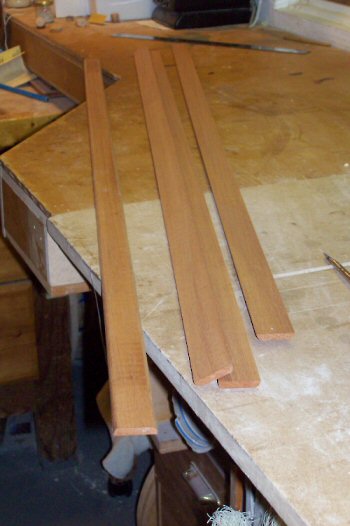
These were then resawn in half & planed to 7/32" thick.


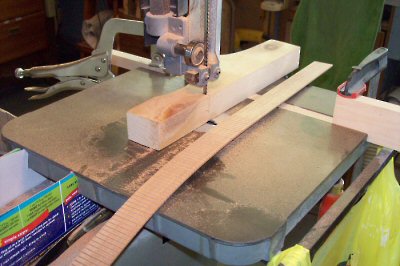
I glued a runner 90deg to a wood block, then cut a recess for the bandsaw blade & inserted a tiny brad to index kerf spacing. (Like I said, nothing fancy). The rear "slot stop block" dictates the depth of cut (& therefore the web thickness) and the front one is the "unload" position (shown), so you don't bang into the back of the blade each time. Just "unload", advance each newly cut kerf onto the brad & cut the next. Setup keys are backstop bearings touching the blade (ie no rearward flex) & make sure the blade teeth & vertical face of the block are parallel (my blade leans back a bit).


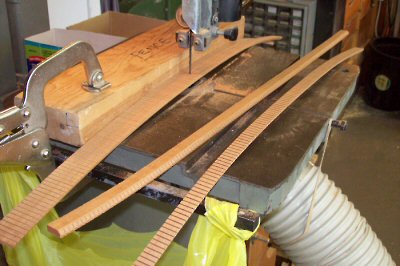
Once all kerfs are done, saw in half & you're done.


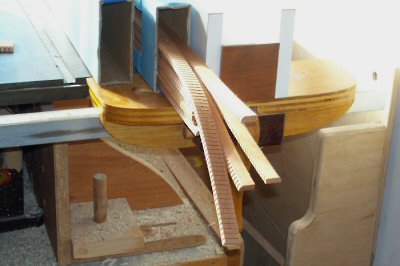
(36' in about 3 hrs.) You can tap the rear stop block to adjust the web thickness - thicker for the majority of it & a few pieces of reduced web for sharper radii of cutaway, horn & waist.  Hope this helps!


Author:  Brad Way [ Fri Nov 23, 2007 9:00 am ]
Post subject: 

Dave...great tutorial!

Thanks for putting this together.

Author:  Bruce Dickey [ Fri Nov 23, 2007 9:29 am ]
Post subject: 

Dave, that's sweet.
Great Job.

Author:  Dean [ Fri Nov 23, 2007 10:20 am ]
Post subject: 

If you charge out your time at just $50/hr., It cost you $4.17 ft. Looks like $3 for 36" was a bargain.

Dean


Author:  Dean [ Fri Nov 23, 2007 10:22 am ]
Post subject: 

 P>S. Plus you had to pay for materials.

Dean


Author:  Dean [ Fri Nov 23, 2007 10:28 am ]
Post subject: 

Reread the post $3 for 16" is better but still a bargain.
Dean


Author:  Dave Rickard [ Fri Nov 23, 2007 10:33 am ]
Post subject: 

Thanks Dave

Author:  Bruce Dickey [ Fri Nov 23, 2007 10:41 am ]
Post subject: 

Dean, At $50 an hour, if you built a guitar in 200 hours, it would need to sell for $10,500. That's if you add in $500 for primo materials.

Sometimes it's not the money, it's the satisfaction of doing a job well and saving a little just to make it fun.

Everyone who's in this for the money please hold up your hand.

Author:  James W B [ Fri Nov 23, 2007 1:34 pm ]
Post subject: 

Real nice Dave,I hope this goes on the tutorial page.
                        James

Author:  FishtownMike [ Fri Nov 23, 2007 4:03 pm ]
Post subject: 

Not trying to hijack this good thread but does anyone here use unkerfed lining? Hand bent on an iron? I have seen this in some books and online and i wonder is there an advantage to using kerfed other then being easier to work with. Like better glue bonding due to the glue flowing into and grabbing onto the kerfing cuts.

Author:  KHageman [ Sat Nov 24, 2007 3:47 am ]
Post subject: 

This information is great!! Thanks for posting the information.
Ken

Author:  charliewood [ Sat Nov 24, 2007 12:39 pm ]
Post subject: 

Thanks!
Nice tutorial - Im going to need to make some "kerfed linings" soon I think...
Hey Dave where abouts in Canada are you? Im on Vancouver Island,,,
Cheers
Charlie

Author:  Allen McFarlen [ Sat Nov 24, 2007 2:07 pm ]
Post subject: 

I use solid linings. Make mine up out of 3 thin pieces that I bend on the iron. Takes just seconds when they're that thin. Then laminate them up on a mold. Once dry, run them over a round over bit.

I find it quicker than making the kerfed linings, and makes the sides much stiffer than traditional kerfed linings. I haven't tried the reversed ones to compare though.

At at $3.25 for 400mm length (need 8 for a guitar) here in Australia it's much cheaper to make your own when you've got more time than money.


Author:  Lillian F-W [ Sat Nov 24, 2007 3:46 pm ]
Post subject: 

Allen, what wood(s) are you using for the linings?

Author:  KenH [ Sat Nov 24, 2007 4:34 pm ]
Post subject: 

I sort of lost you on the part where you actually cut the kerf in the wood. Can you elaborate on how you did this?

Author:  Dave Stewart [ Sun Nov 25, 2007 3:24 am ]
Post subject: 

Thanks all - hope this helped someone.


It occurred to me that after step 2, you could table-route a shallow "pocket" in the center of the rounded side and the kerf from THAT side (rather than above) to end up with CAPPED linings. Might try that next!  (I "capped" traditional linings on my last build & it stiffened the sides up unbelievably, although it was a real pain because each "cap" was a weird & different shape!)


Charlie - I'm just outside Toronto.


Ken - you place the "back" (flat) side of the strip against the vertical face of the block & feed into the blade, which cuts partially through the strip before being "stopped". You retract, move the strip to the left (so the kerf slips over the brad in the block just to the left of the blade) and cut another kerf. Repeat (many, many times!)


Dave


Author:  John K [ Sun Nov 25, 2007 3:49 am ]
Post subject: 

Thanks Dave
Very nicely done and I have learned something useful. Can't beat that.

John

Author:  Bruce Dickey [ Sun Nov 25, 2007 9:36 am ]
Post subject: 


Linings
Reverse-kerf lining tutorial - Dave Stewart

Look Dave, you are famous!

http://www.connor.net.au/olftutorial/

Thanks Bob, HERE is a link to Bob's Tutorials

http://www.connor.net.au/olftutorial/


Page 1 of 1 All times are UTC - 5 hours
Powered by phpBB® Forum Software © phpBB Group
http://www.phpbb.com/