Official Luthiers Forum!
http://www.luthiersforum.com/forum/

Technique for radiusing tail block
http://www.luthiersforum.com/forum/viewtopic.php?f=10101&t=46599
Page 1 of 1

Author:  PhilQ [ Mon Nov 02, 2015 11:09 am ]
Post subject:  Technique for radiusing tail block

Hello everyone.

I'm currently on my 6th build, and so far all my guitars were built with a flat tail block, resulting of course in a flat section where the end graft is. I was wondering how to give the block more of a radius in order for the curve of the lower bout to continue more fluidly all the way around without a flat. Do you just eyeball it and round it off? I'm assuming you also need a female version of the radius to use as a caul to glue the sides to the block properly?

Any help/advice/info would be greatly appreciated!

Phil

Author:  Barry Daniels [ Mon Nov 02, 2015 11:21 am ]
Post subject:  Re: Technique for radiusing tail block

A disk sander is the easiest tool for radiusing the blocks (both tail and head should be radiused). But if you don't have that then a plane can work. Gluing the blocks in easy with an outside body form. Or a radiused caul will also work.

Author:  James Orr [ Mon Nov 02, 2015 11:23 am ]
Post subject:  Re: Technique for radiusing tail block

Phil, I've done a few things.

First you need to find out what the radius is. I have Stew Mac's set of radius gauges, and so far all of mine have complied with one, usually 16', 18', or 20'. I also have radius sanding blocks for all of those, so I just line one with sandpaper, clamp it in the vise, and go.

I've also traced that radius onto the block and removed most of the excess with a block plane before doing the final work on the radius block.

I don't use a special caul when I glue them, but you can use your radius block for that, too. I just clamp with spring clamps. I use jorgenson clamps and some kind of thin backer (usually the cut-offs from the side) to reach in where the spring clamps won't go.

Note that you'll probably need to radius the neck block as well. If you're using a neck block with a pre-cut mortis, you'll want to make sure that it stays square when you glue it up.

Author:  Hesh [ Mon Nov 02, 2015 11:31 am ]
Post subject:  Re: Technique for radiusing tail block

What I would do is find the appropriate radius from any plans that you are using and then match that radius with the belt sander as Barry said.

For the gluing caul and I am reminded of The Padma...... :) because I used Bondo for my gluing cauls. I would make a flat block, paint on some Bondo, cover the sides and tail or neck block area with waxed paper and then clamp the new caul with uncured Bondo to the respective blocks. The clamping would make excess Bondo squeeze out (remember to use waxed paper) and when it all cured my clamping cauls with a thin layer of Bondo on the business side would perfectly match the radius of my neck and tail block. I ended up with clamping cauls for a number of shapes and sizes of instruments this way.

Early on I determined that guitars look way better if the gentle curves are continued and there are no flat spots on the blocks.

Still trying to figure out if I should spell Bondo as B*ndo or Bondo but hey it works very well! :D

Author:  PhilQ [ Mon Nov 02, 2015 11:40 am ]
Post subject:  Re: Technique for radiusing tail block

Wonderful advice so far. Thank you!

My worry with radiusing the headblock is to be able to use my template to route the dovetail, as my template is flat...

Author:  DannyV [ Mon Nov 02, 2015 12:29 pm ]
Post subject:  Re: Technique for radiusing tail block

Do you build with a mold? I draw a centre line on the back to top plane and then a series of lines going out from there to give you a reference. Another reason to use plywood. The laminations do the same thing. I match the radius to the mold and glue the block on in the mold. Remember to put wax paper between the rims and mold. I've heard of people gluing their rims to the mold. Not me of course.

I use a 6 x 48 belt sander. Same for the head block.

Author:  Bryan Bear [ Mon Nov 02, 2015 12:30 pm ]
Post subject:  Re: Technique for radiusing tail block

I have done it several ways mentioned here. Lately I have found that drawing the curve on both ends then using a block plane to remove the waste is the fastest/easiest. I don't have a clamping caul. I usually clamp the block to the sides in the mold and use extra clamps where the mold doesn't cover the height of the side. I don't use a pre-morticed or dovetailed heel block so the procedure for both is the same. I've been thinking about using a pre-dovetailed heel block in the future. I have kicked an idea around in my head where I make a clamping caul with the shape of the heel bearing surface and the male part of the dovetail. I could then pull everything tight as the dovetail slides in. I'm not sure if that wold make proper alignment of the block easier or harder. One of these days I'll give it a try.

Author:  Clinchriver [ Mon Nov 02, 2015 1:04 pm ]
Post subject:  Re: Technique for radiusing tail block

Chord arc to find your radius, and a really sharp block plane to do the job

Author:  phil [ Mon Nov 02, 2015 2:03 pm ]
Post subject:  Re: Technique for radiusing tail block

I work with an outside mold. With the sides in the mold I clamp the whole thing upright in my bench vise. Then I tack an adhesive backed 80 or 100 grit to where the block will be glued. I make witness lines on the block so I make sure I'm removing material evenly. Then I sand away. Three minutes later the surfaces mate perfectly.

I've used a hand plane and a belt sander in the past. But it doesn't speed up the job very much.

Phil

Author:  James Orr [ Mon Nov 02, 2015 2:29 pm ]
Post subject:  Re: Technique for radiusing tail block

phil wrote:
I work with an outside mold. With the sides in the mold I clamp the whole thing upright in my bench vise. Then I tack an adhesive backed 80 or 100 grit to where the block will be glued. I make witness lines on the block so I make sure I'm removing material evenly. Then I sand away. Three minutes later the surfaces mate perfectly.


This is how I fit the block for a florentine cutaway. I use my might spring clamps here again, too. I clamp a small square in place to act as a fence to keep everything square.

Author:  J De Rocher [ Mon Nov 02, 2015 3:23 pm ]
Post subject:  Re: Technique for radiusing tail block

The tail on my guitars has a radius just under 9 inches. I draw the arc on both ends of the tail block and sand to the lines on the belt sander.

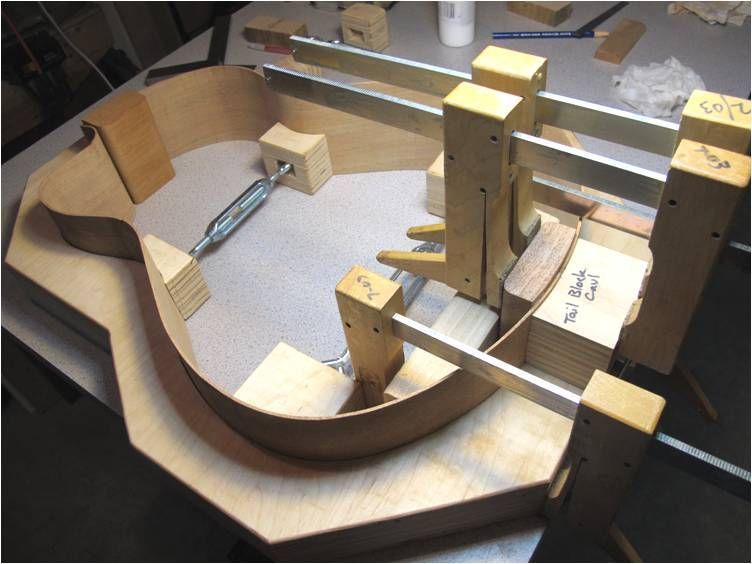
For clamping, I use my outside body mold and a caul. With the sides and tail block in position, the mold is pushed down to the benchtop surface and the caul with the same radius rests on top of the mold. Clamped as in the photo.

Image

Here's the general approach I use to make radiused cauls for radii 12" or less. On the band saw, clamp some type of pivot point to the fence so it's aligned 90 degrees with the cutting edge and position the tip of the pivot the distance of the radius from the blade. Hold a block centered on the pivot point and then sweep it through the blade. You get both convex and concave surfaces of the desired radius.

Image

Author:  Tom West [ Tue Nov 03, 2015 9:28 am ]
Post subject:  Re: Technique for radiusing tail block

Phil: I glue my blocks to sides in my mold. Given that I use the mold itself as my sanding block. Adhesive backed abrasive in the area where the block will sit and rub the block up an down in that area. My mold is almost 4" thick so it works nicely. I use a block plane to rough shape the blocks so the sanding does not take too long. At gluing time I do a dry run and check the fit with feeler gauges. If there is any problem it's generally easily fixed with a bit of hand work. This has worked for me for quite a while.
Tom

Page 1 of 1 All times are UTC - 5 hours
Powered by phpBB® Forum Software © phpBB Group
http://www.phpbb.com/