Official Luthiers Forum!
http://www.luthiersforum.com/forum/

Arm Rest Bevel Question
http://www.luthiersforum.com/forum/viewtopic.php?f=10101&t=43750
Page 1 of 2

Author:  Mike OMelia [ Thu Jul 03, 2014 3:24 pm ]
Post subject:  Arm Rest Bevel Question

Is the transition to bevel idea based on "widening" the binding material? If my binding is curly maple, should I plan on using a curly maple veneer over the bevel?

I think I am starting to see how this works (hopefully)

Mike

Author:  DannyV [ Thu Jul 03, 2014 3:28 pm ]
Post subject:  Re: Arm Rest Bevel Question

Yes you should. Or at least thats one way of doing it and the last way I did a maple one.

Author:  Mike OMelia [ Thu Jul 03, 2014 4:07 pm ]
Post subject:  Re: Arm Rest Bevel Question

DannyV wrote:
Yes you should. Or at least thats one way of doing it and the last way I did a maple one.


Danny, could you post a pic of that maple? Of the transition zones, etc? Assuming you still have it...

Thanks

Mike (have a source for curly maple veneer?)

Author:  StevenWheeler [ Thu Jul 03, 2014 5:53 pm ]
Post subject:  Re: Arm Rest Bevel Question

Mike,

For this situation it is best to make your own bindings and veneer so the grain, color and curl all match. Can look awful otherwise.

Steve

Author:  Kamusur [ Thu Jul 03, 2014 7:05 pm ]
Post subject:  Re: Arm Rest Bevel Question

Mike

You might get a few ideas here from this excellent build http://www.anzlf.com/viewtopic.php?f=1&t=6277

Steve

Author:  Josh H [ Thu Jul 03, 2014 9:32 pm ]
Post subject:  Re: Arm Rest Bevel Question

I would second what has been said about making your own binding veneers. It is really the only way you will get an exact match. Often I will use a set of sides and cut that up into the various strips and veneers I need. I would also add that dark woods are much easier to use than light woods. It is easier to hide joints and make the transitions look nice. You may want to consider doing a couple dark ones while you figure out the process you will use. Once you are comfortable with your process getting the armrest to look nice with lighter woods will be easier.

Author:  Ken Jones [ Fri Jul 04, 2014 8:08 am ]
Post subject:  Re: Arm Rest Bevel Question

Josh H wrote:
You may want to consider doing a couple dark ones while you figure out the process you will use. Once you are comfortable with your process getting the armrest to look nice with lighter woods will be easier.

I wholeheartedly agree with this. I've done a good many, and I'm still sticking with ebony for now. I'm almost confident enough in my process to attempt one in rosewood, but maple is still a ways off.


Ken Jones
Mountain Song Guitars

Author:  uvh sam [ Fri Jul 04, 2014 8:58 am ]
Post subject:  Re: Arm Rest Bevel Question

One thing you can do is use maple and if it goes poorly, you can paint it black. It gives a nice contrast and kinda looks like a violin rest. Not that I have tried that........

Author:  James Ringelspaugh [ Fri Jul 04, 2014 10:36 am ]
Post subject:  Re: Arm Rest Bevel Question

I second that using a darker wood is much easier... maple is about the toughest to get a seamless match, and even with wood from the same board if one end is a perfect match it will be dumb luck if the other end works out that way. You can use that contrast to your advantage though depending on the order you do things... if you bind the guitar first it the overlay transition can look lumpy and sloppy, but if you overlay the bevel before you do the binding you can get a nice sharp transition. Here's one I'm currently doing in cherry:

Author:  Mike OMelia [ Fri Jul 04, 2014 11:39 am ]
Post subject:  Re: Arm Rest Bevel Question

James, your picture seems to show you did the binding before the bevel (opposite of what you said?)

It looks to me that purfling is not used in that guitar?

Mike

Author:  Kathy Matsushita [ Fri Jul 04, 2014 1:07 pm ]
Post subject:  Re: Arm Rest Bevel Question

Mike O'Melia wrote:
Is the transition to bevel idea based on "widening" the binding material? If my binding is curly maple, should I plan on using a curly maple veneer over the bevel?

I think I am starting to see how this works (hopefully)

Mike


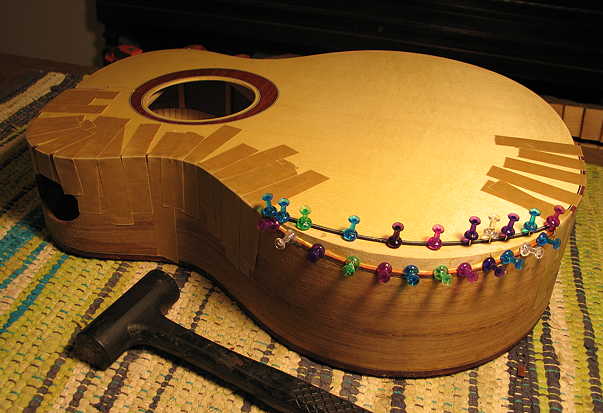
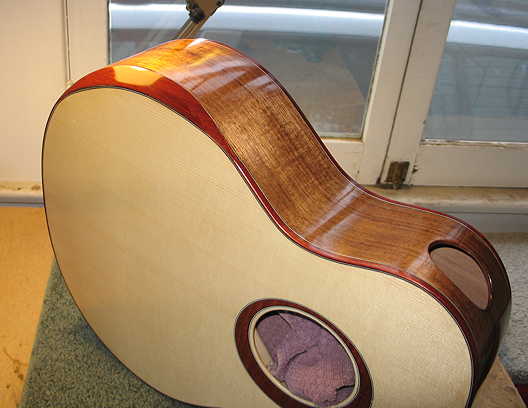
Mike: I've only done one transitional arm bevel so far (http://theamateurluthier.com/retirement/htmlpages/gsmini.html), following Kent Everett's DVD (teaser: https://www.youtube.com/watch?v=X3Uqc_O2kDE).

He glues the bevel's purfling and binding (sanded down to a bit above the binding's purfling) to the cut-out edges on the top and side first, before filing the bevel down. No routing has to be done for the bevel's purfling. Then he adds a thin strip of purfling to the top's purfling, to provide a buffer zone, for when he files down the bevel wood flush to the top & side purfling strips. A veneer is then glued to the bevel.

ImageImage

Author:  Don Williams [ Fri Jul 04, 2014 1:15 pm ]
Post subject:  Re: Arm Rest Bevel Question

Nice looking work Kathy!

Author:  Kathy Matsushita [ Fri Jul 04, 2014 1:20 pm ]
Post subject:  Re: Arm Rest Bevel Question

Don Williams wrote:
Nice looking work Kathy!


Thanks, Don! Now that I know the more difficult parts of doing this kind of bevel, I know I can do much better on the next one. (I had a little bit of trouble gluing the veneer on properly --- but I managed to fix it so it's not too noticeable!) Also, the next time I do one, I would extend the bevel further down towards the tail end of the guitar. Kent's methods on the DVD are very good, and it gave me the confidence to try a bevel....

Author:  Mike OMelia [ Fri Jul 04, 2014 6:34 pm ]
Post subject:  Re: Arm Rest Bevel Question

Very nice Kathy. Your photo really shows the concept well. I think I'll get that DVD and study it.

Mike

Btw, is that DVD a pretty good tutorial? Not leaving too much to guess at?

Author:  Kathy Matsushita [ Fri Jul 04, 2014 6:57 pm ]
Post subject:  Re: Arm Rest Bevel Question

Mike O'Melia wrote:
Very nice Kathy. Your photo really shows the concept well. I think I'll get that DVD and study it.

Mike

Btw, is that DVD a pretty good tutorial? Not leaving too much to guess at?


The DVD is excellent --- Kent actually takes you through a bevel build that he is doing with one of his classes of 3 guys. You are seeing him do every single step, all the way through to the end. DEFINITELY get the DVD. As I was doing my bevel, I was following along with the DVD.

I'd love to hear/see how yours goes, as you follow Kent's method!!!!

You could also see the process on my latest GS Mini build, starting on this page: http://theamateurluthier.com/retirement/htmlpages/gsmini10.html

Author:  James Ringelspaugh [ Sat Jul 05, 2014 9:13 am ]
Post subject:  Re: Arm Rest Bevel Question

Mike O'Melia wrote:
James, your picture seems to show you did the binding before the bevel (opposite of what you said?)

It looks to me that purfling is not used in that guitar?

Mike


No, I cut the binding ledge after the bevel is carved and overlayed with a veneer. I've added a couple pictures that might make it more clear... in effect the binding gradually shrinks to nothing as the bevel gets larger. There is no purfling on this particular guitar... the upside is that the bevel is easier but the downside is that the binding and bevel overlay has to be perfect as gaps that can be filled and/or covered up in dark woods are glaring and unsightly in lighter colored woods like maple and cherry. The process is the same when I use purfling, I just have to be very careful around the transition points to keep the purfling lines on the outside of the bevel.

Author:  DannyV [ Sat Jul 05, 2014 10:39 am ]
Post subject:  Re: Arm Rest Bevel Question

Mike O'Melia wrote:
DannyV wrote:
Yes you should. Or at least thats one way of doing it and the last way I did a maple one.


Danny, could you post a pic of that maple? Of the transition zones, etc? Assuming you still have it...

Thanks

Mike (have a source for curly maple veneer?)


As a matter of fact it gets strings today!
Attachment:
rsz_img_6448.jpg


I'm almost 100% happy with the outcome. The veneer I used had a ripple in it from the curl. Not much but enough to make the purfling to veneer transition close to, but not quite perfect. The next one I will sand the glue side flat before applying. Other than that the transitions went well. It required no Bondo! :lol:

I never thought much about the colour match of the binding and veneer. Others are right. Maple can vary a bit but I got lucky with this match. I have a good stash of this veneer. PM me if you need a bit. I would say this is on the darker side of Western Big Leaf Maple.

Author:  Mike OMelia [ Sun Jul 06, 2014 10:17 am ]
Post subject:  Re: Arm Rest Bevel Question

Danny, did you use Kent Everett's technique? Nice work!!

Kathy, I studied your build log. Maybe I missed it, but I don't understand how you bevel up to the purfling line such that you end up with a depth just that of the veneer. It seems to me that you would need wood on the bevel side of each purfling line to file down.

Author:  Mike OMelia [ Sun Jul 06, 2014 10:34 am ]
Post subject:  Re: Arm Rest Bevel Question

From what research I have done, there seem to be three primary techniques: 1) Jeff Bamburg's approach, using routers, Kent Everret's precut insert, and Simpson Guitar's approach of a laminated build

http://youtu.be/8X8euQznTHM

What do you all think of that last one?

Mike

Author:  DannyV [ Sun Jul 06, 2014 11:19 am ]
Post subject:  Re: Arm Rest Bevel Question

I used Robbie's toot. https://www.youtube.com/watch?v=CK_EVunKZQg There are a few gap but gives you the general idea. I thinned down hardboard and used my bender to laminate 3 pieces for the side template.

If you happen to see this Kathy, is that Bloodwood? It looks great.

Author:  Kathy Matsushita [ Sun Jul 06, 2014 2:49 pm ]
Post subject:  Re: Arm Rest Bevel Question

Mike O'Melia wrote:
Danny, did you use Kent Everett's technique? Nice work!!

Kathy, I studied your build log. Maybe I missed it, but I don't understand how you bevel up to the purfling line such that you end up with a depth just that of the veneer. It seems to me that you would need wood on the bevel side of each purfling line to file down.


Yes, that's exactly what Kent's method is. He first glues the top purfling strip on, and sands the binding down to about 1/8" or so above its purfling line. (That sanded-down binding area provides the buffer zone for the bottom of the bevel.) Then he glues an extra black purfling strip or two to the top purfling strip, and also then glues the spruce off-cut strip to that. (This extra purfling and spruce strip provides the buffer zone for the top of the bevel.)

Sorry, but I didn't take a photo of those pieces glued on before I started filing the bevel!!! But here's the page where I kind of describe it: http://theamateurluthier.com/retirement ... ini22.html

Here's a quick drawing:
http://theamateurluthier.com/attachment ... rawing.JPG
(My drawing doesn't show it, but you also, before filing the bevel, file down the inside corner of the bevel too, to remove some of the weight: http://theamateurluthier.com/retirement/htmlpages/gsmini12.html

Hope this helps!!!

Author:  Kathy Matsushita [ Sun Jul 06, 2014 2:53 pm ]
Post subject:  Re: Arm Rest Bevel Question

DannyV wrote:
I used Robbie's toot. https://www.youtube.com/watch?v=CK_EVunKZQg There are a few gap but gives you the general idea. I thinned down hardboard and used my bender to laminate 3 pieces for the side template.

If you happen to see this Kathy, is that Bloodwood? It looks great.


Yep, it is bloodwood. I love bloodwood, in combination especially with East Indian rosewood --- http://theamateurluthier.com/retirement/htmlpages/arii5.html
I think it looks really rich, with a nice dark brown rosewood!!!

Author:  Mike OMelia [ Mon Jul 07, 2014 11:16 am ]
Post subject:  Re: Arm Rest Bevel Question

Kathy, do you use the same template for tracing the cut in the top and the side? Seems that you would do something close to that. Granted, the curved shape of the side would add some length...

That picture you posted of the side view really helped. Technically, I don't need to really use extra purfling except as insurnace? Could just use the top piece?

Oh, one other thing... what wood did you use for the bevel insert? Basswood?

Mike

Author:  johnparchem [ Mon Jul 07, 2014 11:50 am ]
Post subject:  Re: Arm Rest Bevel Question

Mike O'Melia wrote:
... Technically, I don't need to really use extra purfling except as insurnace? Could just use the top piece?

Oh, one other thing... what wood did you use for the bevel insert? Basswood?

Mike


If you look back at Kathy's diagram you will see that where you bevel back the filler wood or the extra purfling, the veneer gets very thin right where the bevel joins the top or the sides. If you finish sand the top down even just a bit you will sand through the veneer at the edge into the filler strip. If the filler is a contrasting piece of wood like a cutoff from the top as suggested in Kent's DVD you will see it. An extra purfling or using a bit of the binding wood as the filler strip on the top will mitigate any issues you might have if you are not perfect.

I used basswood on mine. I have a bunch of pictures as well from when I followed the DVD.

http://harvestmoonguitars.com/WRC-Koa%2000-3.htm

Author:  Kathy Matsushita [ Mon Jul 07, 2014 11:53 am ]
Post subject:  Re: Arm Rest Bevel Question

Mike O'Melia wrote:
Kathy, do you use the same template for tracing the cut in the top and the side? Seems that you would do something close to that. Granted, the curved shape of the side would add some length...

That picture you posted of the side view really helped. Technically, I don't need to really use extra purfling except as insurnace? Could just use the top piece?

Oh, one other thing... what wood did you use for the bevel insert? Basswood?

Mike


I didn't use any sort of template to draw the cutting lines for the bevel shape --- I just eyeballed it. Kent does his about 3/4" deep at the center of the bevel, and then just draws it gradually down to the ends. (And, anyway, each guitar will be different, in how long you want the bevel to be.) It doesn't have to be a precise drawing of the line, because you just smooth it out as you sand it down using the belt sander end first, then refining it on a drill press sanding drum. You check the smoothness both by eye, and, more importantly, by feeling along the edge with your thumb. You can feel more than your eye can see, any tiny imperfections in the smoothness. You especially want it to be perfectly smooth on the top edge, where any tiny bump in the edge will really be magnified when you glue the purfling on.

As for just doing the spruce strip, I would still do the extra black purfling line(s), because you want to make sure you don't sand/file away any of your top purfling strip lines. The extra black purfling provides a safety zone.

1" thick basswood for the insert --- it's cheap, stable, light, and easily carved.

Definitely order the DVD if you haven't yet --- it goes into much more detail and explanation than I can give!!! Have fun!!! To me, Kent Everett's method seems the easiest....

Page 1 of 2 All times are UTC - 5 hours
Powered by phpBB® Forum Software © phpBB Group
http://www.phpbb.com/