Official Luthiers Forum!
http://www.luthiersforum.com/forum/

Old parlor - repair thread
http://www.luthiersforum.com/forum/viewtopic.php?f=10101&t=39320
Page 1 of 4

Author:  Johny [ Mon Feb 11, 2013 8:22 pm ]
Post subject:  Old parlor - repair thread

Edit: I realize there's a lot of pictures. If this forum is not the appropriate place to post this, please tell me and I'll ask for it to be moved to the "Doc-u-build" section.

Hello gentlemen,

First a disclaimer: I don't post often but I lurk quite a lot.
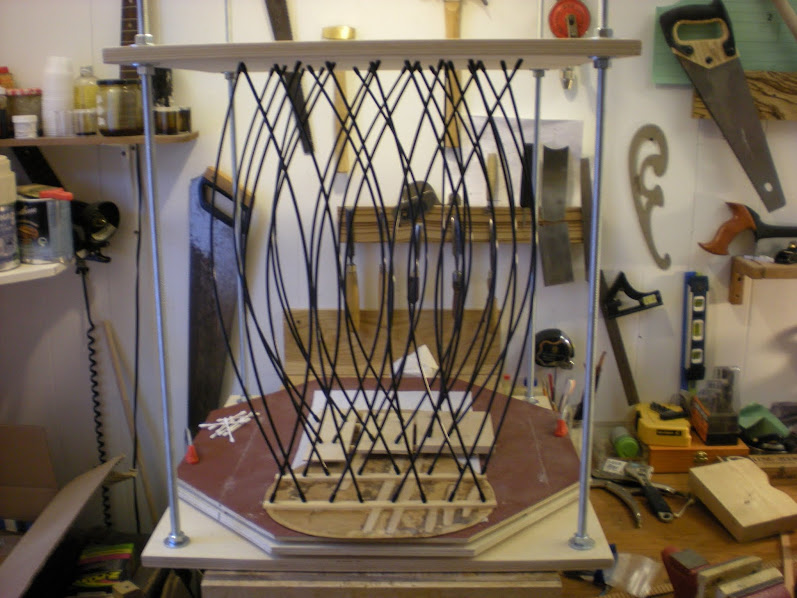
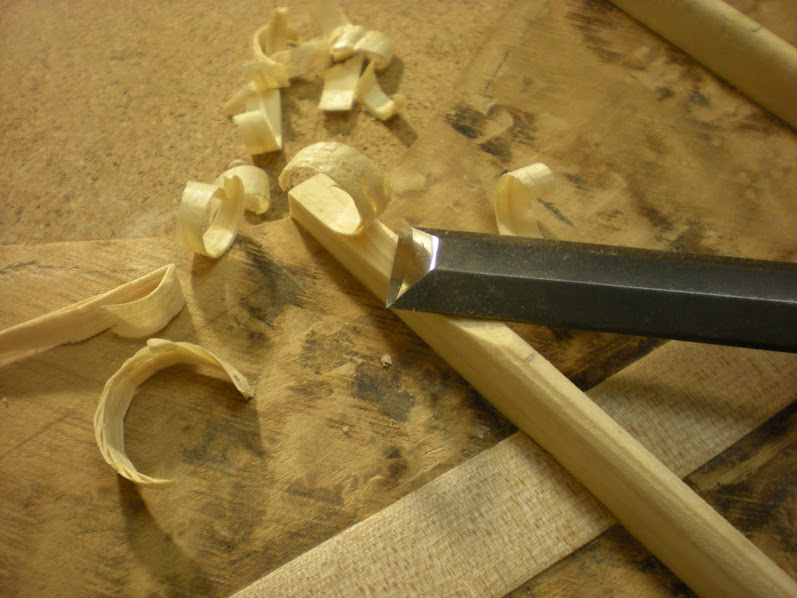
Still, I figured some of you might be interested by the old guitar I'm currently working on, and I could also get some guidance from knowledgeable people at the same time.

(psst: if you have a lot of time on your hands and want to see all the pictures, go there: https://plus.google.com/photos/11477671 ... 2598340561)

I bought this little thing on ebay for not much money.
Image

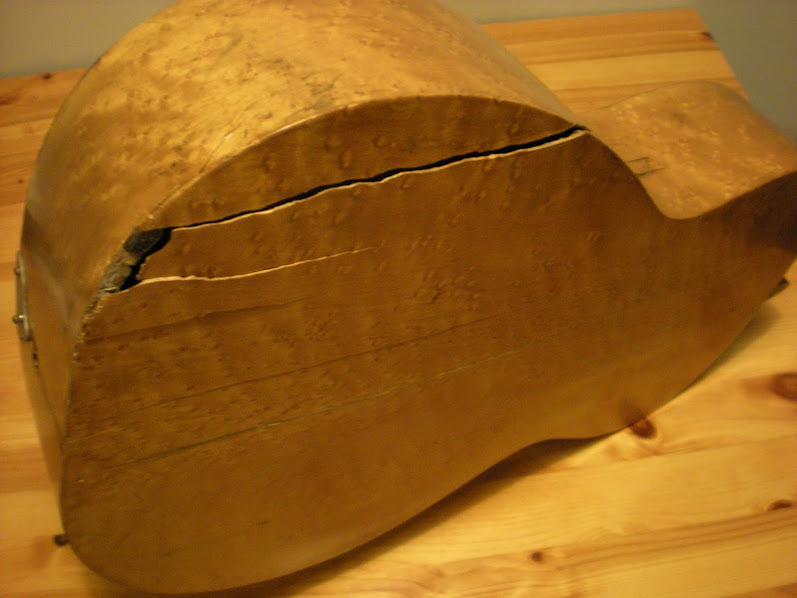
It's a smallish guitar, ladder braced, with birdseye maple back and sides, darkish spruce top, no binding, cedar neck with no truss rod, metal tailpiece and floating bridge.

The back and sides are in pretty sad shape, from what looks like wounds from dryness/shrinkage.
Image

And the label, which is still a mystery to me. Google did not help me on that one.
Anyone has a clue? idunno
Image

I don't know if the tuning machines were original, but I know they were a bad idea... This is not going to be an easy repair.
Image

Following in next post

Author:  Johny [ Mon Feb 11, 2013 8:29 pm ]
Post subject:  Re: Old parlor - repair thread

I first remove the fretboard. I would have liked to keep it, but sadly it was all dry and full of cracks. Plus it will allow me to put a truss rod in the neck further on.
Image


Then I remove the back, running a razor blade all around. (Thank god this thing is not bound)
Image

This is inside the guitar, with the back coming loose.
Image

The back is off, pretty cleanly I should add.
Image

And that allows for a good look on the top bracing. Interesting slanted/ladder bracing. Any thoughts of its origin or period?
Image

To be continued...

Author:  Johny [ Mon Feb 11, 2013 8:37 pm ]
Post subject:  Re: Old parlor - repair thread

After removing the braces and cleats on the back:
Image

Then I glue the cracks shut, one by one, and glue a strip of birch (it was what I had laying around) on the inside for support, as I suspect these cracks to be somewhat unstable.
Image

I had to fashion some pillars to close this last one.
Image

And had some fun carving this little piece to replace a missing bit.
Image

The back is now in one piece.
Image
Image

To be continued

Author:  Johny [ Mon Feb 11, 2013 8:44 pm ]
Post subject:  Re: Old parlor - repair thread

The side was busted, what I suspect to be a "key in the pocket" crack, on the waist, treble side. It was glued at one time in its history, but was rather uneven and scary to look at. So I undid the pieces.
Image

And glued them back correctly.
Image

I also glued a birch shaving from my plane on the inside of the cracked side, (visible on the next picture) and also glued in side braces for good luck.
Image

Next post is about getting the neck out.

Author:  Johny [ Mon Feb 11, 2013 8:57 pm ]
Post subject:  Re: Old parlor - repair thread

This is the espresso machine that my ex girlfriend keeps trying to get back from me. beehive
Image

Worked really well to send some steam in the neck pocket, after some modifications.
Image

And the mystery continues: in the neck pocket, a stamped number. 367. Any educated guess about this one?
Image

Next step is to graft on a new headstock, as to keep as much original wood as possible and while assuring the integrity of the joint. I decided to do a V joint, 120 degrees, and used African Mahogany for the graft, as I had some around and thought it would look ok.
Image

Gives me something like this:
Image

That I glue like this:
Image

Author:  Johny [ Mon Feb 11, 2013 9:17 pm ]
Post subject:  Re: Old parlor - repair thread

At this point I drilled a hole and glued a maple dowel in the heel, for it to accept the conversion to bolt-on I have in mind.
Image

I also worked on blending the curves from the neck to the grafted headstock.
Image

And glued Macassar ebony plates on both faces of the headstock, then blended them in again.
Image

Glued on threaded inserts.
Image

And I'm quite relieved to see this neck holding on the guitar after this conversion that some might perceive as a heresy...
Image

Author:  Johny [ Mon Feb 11, 2013 9:26 pm ]
Post subject:  Re: Old parlor - repair thread

I radiused and glued the back bracing with the help of my home made radius dish and go-bar deck:
Image

Carving braces with a sharp chisel is one satisfying thing.
Image

Glued the back on with a couple of spool clamps.
Image

And slowly worked the top off with a razor blade.
I really hesitated before deciding to remove the top, but I figured, with my level of experience (pretty much none), I would be better off to work on the free top, have a good feel of it and have better access to repair cracks and glue braces etc. So off came the top.
Image

Image

Author:  Michaeldc [ Mon Feb 11, 2013 9:33 pm ]
Post subject:  Re: Old parlor - repair thread

Very cool! Lots of learning to be had with a project like that

Author:  Johny [ Mon Feb 11, 2013 9:41 pm ]
Post subject:  Re: Old parlor - repair thread

Finally (last post for tonight), after a lot of debate with myself, I decided to convert this guitar to a X braced top.

Here's my reasoning: I figure this guitar was orinally made for gut strings, or perhaps for steel strings but with a floating bridge / tailpiece design. The top was distorted, the action was high. Guitar bracing evolved for a good reason... right? My compromise is to brace the top lightly, as to make the guitar able to handle both gut strings (new synthetics like nylgut) and low tension silk and steel strings.

So I aim to follow the Scott Antes parlor plan, with the visual cues from pictures of old 19th century Martin guitars.

This is the bracing traced on:
Image

So, this is pretty much where I am today. I think that the project has went smoothly so far and I hope it continues so.

Do you guys see any incoming pitfalls? Some mistakes I have made?
Any of you know what can this guitar be? My bet is a 1890's to 1930's american made guitar from a small maker, but I sure can be wrong.

Thanks for having a look

Author:  Spyder [ Mon Feb 11, 2013 11:35 pm ]
Post subject:  Re: Old parlor - repair thread

Hey, great work! Can't wait to see how this one turns out. One word of advice though, you mention the Antes parlor plan for the bracing. Double check the drawing, since the view of the top bracing uses hidden lines. In other words, you may be getting a reversed image of the bracing, which means the long diagonal brace toward the big end might be going the wrong way.

Definately worth a close look!

Author:  Mitch Johnson [ Tue Feb 12, 2013 1:42 am ]
Post subject:  Re: Old parlor - repair thread

Yup...Looks like it's braced for a lefty to me. Since the words are not mirrored images on the plans in the background, it does appear to be backwards. The way I always remember is that when you're holding the guitar (or not) the open ends of the braces (not connected to the X) are on the bass side. For me it always makes sense that the bass side should be more free to move. Also, I've heard that in general the Antes plans are pretty over braced. Do some looking on parlor bracing dimensions in the forum archive. I seem to recall there being a thread talking about x brace and other brace widths and heights. Great job so far though! I love watching these threads [:Y:]

Author:  Mitch Johnson [ Tue Feb 12, 2013 1:42 am ]
Post subject:  Re: Old parlor - repair thread

Whoops...Double post

Author:  Tai Fu [ Tue Feb 12, 2013 6:44 am ]
Post subject:  Re: Old parlor - repair thread

Very similar to those Stellas I have restored for a customer before. I wish I was free to do as I please and convert them to X brace and all, but first of all the cost would have been prohibitive to the customer, but he also wanted to preserve its originality as much as possible so I had to work with that limitation in mind. It's something to keep in mind if you are doing a paid restoration job...

And sometimes for whatever reason, the repair doesn't hold and I had to patch them back up again... happened to the 12 string where a new back crack somehow developed.

Author:  jfmckenna [ Tue Feb 12, 2013 8:51 am ]
Post subject:  Re: Old parlor - repair thread

You do good work [:Y:]

I just built a parlor based on a C. Bruno which dated to about 1900 maybe late 1800's and it had that same bracing pattern. Like you I decided to go with an X-Brace because I figured it was meant for gut strings as well. Just be careful to not over brace it. And IDK if you mentioned it or not but with the X-Brace I'd do without the tail piece and use a pinned bridge instead.

Author:  mkellyvrod [ Tue Feb 12, 2013 9:21 am ]
Post subject:  Re: Old parlor - repair thread

Jan-Alexis,
very nice work; [:Y:] don't think I would have attempted such repairs. It's a very interesting project, can't wait to see if someone can help you with the history on this one Eat Drink ; the label looks pretty distinctive.
Marty

Author:  Ken Franklin [ Tue Feb 12, 2013 10:28 am ]
Post subject:  Re: Old parlor - repair thread

Antes plans are known for their over bracing. Make sure the x braces and tone bar are no wider than 1/4".

Author:  Johny [ Tue Feb 12, 2013 6:17 pm ]
Post subject:  Re: Old parlor - repair thread

Oh! Well I'm really grateful, for it would have been a shame to brace this thing "upside down".
Thanks for all the comments also, I take good notes and will make sure to go as lightly as possible on the bracing.
And yes, I plan to make a standard pinned bridge. Actually I designed something, my twist on the pyramid design. I'll try to make it and see how it turns out.
Image

Thanks again, I'll make sure to post further progress pics.

Author:  PT66 [ Wed Feb 13, 2013 11:54 am ]
Post subject:  Re: Old parlor - repair thread

Just a question about the bracing. Does anyone know if the big companies (Martin, Guild,Gibson) reversed the bracing when they made a lefty or just install a left handed bridge?

Author:  Quine [ Wed Feb 13, 2013 1:31 pm ]
Post subject:  Re: Old parlor - repair thread

Wow...great looking repair jobs. You must have the patience of Job to do all that
Its a pretty little guitar. Hope it's worth the effort

Author:  SteveSmith [ Wed Feb 13, 2013 4:17 pm ]
Post subject:  Re: Old parlor - repair thread

Reversing the bracing doesn't matter, in my opinion. I've got a size 0 done by the Antes plan - lightened considerably - but reversed it before I caught it. The box sounds just fine.

Author:  Johny [ Sun Mar 10, 2013 12:58 pm ]
Post subject:  Re: Old parlor - repair thread

I had some time to work on the top bracing. Here's what I've got done.

First a fun macro shot of a cleat I'm shaping.
Image

Then the heart of the subject:
Image

I shaved the X to 0.4" tall.
Image

Image
Image

Keeping in mind my goal is to have it handle synthetic gut or silk and steel type of strings, do you see any risk of imminent implosion?
Any word of wisdom before I close the box?

Thanks again!

Author:  Kent Wilkinson [ Sun Mar 10, 2013 2:35 pm ]
Post subject:  Re: Old parlor - repair thread

WOW!

Author:  Greg B [ Sun Mar 10, 2013 3:02 pm ]
Post subject:  Re: Old parlor - repair thread

I'd be inclined to add another transverse brace in the upper bout above the popsicle graft. .25" wide is probably sufficient. The head block is rather shallow. I've retopped and/or rebraced a few similar old beaters, and they all tend to want to rotate the headblock into the soundhole with standard ladder bracing. That said, it'd likely be OK for nylon strings as is.

You have a slight gap in the glue line of the bridge plate. Easier to fix it now than later... I always wet the top of bridgeplates when gluing them on to help prevent this.

Other that that, looks good to me. :) The surprising thing to me is how little converting to X bracing changes the sound. You'll get a bit more bass and a slightly richer sound, but IME the basic character remains the same. Tends to make me believe the idea that most of the sound is in the top wood and the actual shape of the guitar.

Author:  Dave Livermore [ Sun Mar 10, 2013 5:29 pm ]
Post subject:  Re: Old parlor - repair thread

Very very cool thread. Thanks for taking the time to post it all.

Author:  mzimbel [ Sun Mar 10, 2013 6:00 pm ]
Post subject:  Re: Old parlor - repair thread

Very cool!


Sent from my iPad using Tapatalk HD

Page 1 of 4 All times are UTC - 5 hours
Powered by phpBB® Forum Software © phpBB Group
http://www.phpbb.com/