I don't have an answer to your question, but you have to be kidding me asking $375 for that design

| Official Luthiers Forum! http://www.luthiersforum.com/forum/ |
|
| How does this work? http://www.luthiersforum.com/forum/viewtopic.php?f=10101&t=38580 |
Page 1 of 1 |
| Author: | Chris Ensor [ Mon Dec 17, 2012 10:55 pm ] |
| Post subject: | How does this work? |
So I have to admit, while I have used this jig before, I don't quit understand how it can cut cleanly. When cutting with the Williams style jig, you cut so that you never go against the grain. With this jig, you run the body around from one end to the other. So how does this cut cleanly while going against the grain? http://www.canadianluthiersupply.com/products/binding-jig |
|
| Author: | Rod True [ Mon Dec 17, 2012 11:11 pm ] |
| Post subject: | Re: How does this work? |
You climb cut the whole way. This makes for a clean cut, along with the size of the cutter (1.5" I think...) also helps with the clean cut. Larivee, Taylor and a few other large factories cut their binding channels this way, it works for several thousand guitars a year (10's of thousands in Taylor's case). |
|
| Author: | Leftyprs [ Mon Dec 17, 2012 11:12 pm ] |
| Post subject: | Re: How does this work? |
I don't have an answer to your question, but you have to be kidding me asking $375 for that design
|
|
| Author: | Rod True [ Mon Dec 17, 2012 11:46 pm ] |
| Post subject: | Re: How does this work? |
Brad, the "bearing" parts are all CNC cut to percision sizes to get a precision depth of cut. This design also relies on the router collet being concentric with the "bearing" parts which ensures and even channel all the way along. The design is very good and compact (can't be said for most binding channel jigs) and precise. I tryed to make one of similar design, I actually made two different versions of it but never was able to get it so precise as this. I was going to buy one of these a couple years ago however Mark Kett stopped making them, so I went with a different style, something similar to the W/F style... cost me a pretty penny too, and I had to buy the router bit and bearings (I chose the SM set, well worth it). So all in all, I'm into my set up for much more than $375. Try buying a W/F style jig and the router bit and bearings for less than that.....Blues Creek (John's a Great guy!!) sells the W/F style jig and cradle for $315, still need the bit and bearings, which will run you around $94 for the basic set from SM, $140 for the full set... You'll still need a router for both.... So, precision design, compact, works flawlessly....what's not to like? |
|
| Author: | klooker [ Tue Dec 18, 2012 7:22 am ] |
| Post subject: | Re: How does this work? |
So you use the different size machined dumbbell bearings to adjust the depth of cut but you also adjust it by moving the piece these bearing pieces mount in to? Why not only adjust with the piece that the dumbbells mount into and have a single dumbbell which would lower cost? A Youtube video would be nice. Kevin Looker |
|
| Author: | Josh H [ Tue Dec 18, 2012 8:39 am ] |
| Post subject: | Re: How does this work? |
Hey Guys, Since I'm the one making this jig I thought I chime in and add a little info. What Rod has said about the function and design of this jig is correct (in both his posts). The only thing I'll clarify the cutter size is actually 1.25" and not 1.5". In reference to the cost, Rod is also correct that most of the cost has gone into the Aluminum parts which were all custom made and have been done on a CNC lathe. Kevin, The machined dumbbell is what adjust the depth of cut for the width of your binding/purfling channel. The depth adjustment for the height of you binding is done by adjusting the depth on the router which exposes more of the cutter. It would be possible to make a jig where you have a single dumbbell on some type of a screw adjustment, and I've seen a number of other binding jigs that work that way. The reason for using multiply sized sliders is repeat-ability. Once you know your depths for a set binding/purfling combination the jig can be setup in a number of seconds. And when you're done cutting the binding channel you can reset the jig to cut the purfling channel in about 30 seconds. I bought one of Mark Kett's binding jigs when I started building 9 years ago. The fact that this style of jig is used in a number of factories and by many top level luthiers is a testament to how well it works. This jig is a close copy of Mark's original design which I am making with his permission. I will be adding some more detailed information about the jig to my website and will also be shooting some YouTube videos shortly. I hope to finish all that in the next week or two. In the mean time if anyone has more questions feel free to ask. Josh |
|
| Author: | Chris Ensor [ Tue Dec 18, 2012 9:32 am ] |
| Post subject: | Re: How does this work? |
Thanks for the clarification. I didn't realize it was all done on an climb cut. That makes since now. Kevin, I have used a binding jig that has a single moving bearing. The problem I had is consistency. If you have two overlapping circles, you really only have one point in which you are cutting to the full depth you set. When you have a bearing that is full depth the full circumference of the cutter, you get a consistent channel. Attachment: circles.jpg
|
|
| Author: | Tim McKnight [ Tue Dec 18, 2012 10:20 am ] |
| Post subject: | Re: How does this work? |
Guys, just a +1 plug for the Kett / House jig. It is the BEST one that I have ever used and I have used them all. Having said that, its not 100% full proof and if you don't pay attention you can screw up a guitar using this one if you are not careful. I am sure Josh will explain this in his video... However, as long as you "feel" and maintain contact with both ends of the guides and the registration doughnut its fool proof. If you tip the body and loose contact with one of the two aluminum guide ends then the cut can get slightly skewed. Its usually not catastrophic and it can usually be recovered so don't be fearful of purchasing this tool. It truly is the best, easiest and most accurate method that {I} have found to cut binding and purfling channels, to date. |
|
| Author: | James Ringelspaugh [ Tue Dec 18, 2012 10:36 am ] |
| Post subject: | Re: How does this work? |
This looks like a winner... I've used a simple lam trimmer with bearing guide for far too long, but most of the jigs I've come across take up far too much room for my shop. I look forward to seeing some video of it in action. That said... as a 1-2 guitars/month guy I'd likely prefer a single dumbell if it saved considerable $. |
|
| Author: | bluescreek [ Tue Dec 18, 2012 11:42 am ] |
| Post subject: | Re: How does this work? |
I am very familiar with the Martin process , and Martin has to do the cut on 2 set ups for the back. They use a discreet cutter for the binding design and ride on a bearing surface. Then they do some hand work to the channel . The key to any good binding jig is accurate piloting location. You have to locate it accurately in all planes. Ketts design is as good as I have seen on hand held units. I have not used on but will take Tim's word that it is usable. The one point is the cutter and what is used to locate it. When using an adjustable location pilot , you have to be very careful to stay on the tangent of the pilot. I think you can use the pilot bearing with the Kett jig from the picture. The top on most steel stringed guitars are pretty easy to do , it is the back where the most problems do occur. I do use a different approach with a special riding donut to accommodate the radius and the back taper. This locates on few points and eliminates variability of process. . Most hand helds rely on the skill of the operator . Using a pilot bearing cutter is more accurate than the adjustable pilot. I have used about every binding out there myself and the ones that hold the cutter parallel with a bearing pilot of often the most accurate. I will also add , when climb cutting , you need to be careful that if you over feed , there is a high risk of compression of the wood so take small controlled nibbles. This is most prevalent along the end grain. Climb cutting , It will leave a nice finish. Also use some tape on the body for the first cut then remove the tape and you have a nice control clean up cut. Like all processes , the best process is the one that works for you. Learn to read your chips . that can tell you a lot of what is happening with the cutter and the wood. Dull tools are dangerous so be sure to check the sharpness. Like anything it comes down to what you feel will work and the technique you use. There are many ways do to things for sure . Find what works for you and once you do have a process the is repeatable , stay with it. |
|
| Author: | klooker [ Tue Dec 18, 2012 12:51 pm ] |
| Post subject: | Re: How does this work? |
I get it now. Very cool! ![[:Y:]](./images/smilies/smiley20.gif "Thumbs Up") Kevin Looker |
|
| Author: | Chris Ensor [ Tue Dec 18, 2012 2:03 pm ] |
| Post subject: | Re: How does this work? |
Ok... So earlier I thought I understood the climb cut idea, but now I am finding myself still stuck. Even with a climb cut, how does the grain not tear/peal back when going against the grain? Maybe I am just being dense, but can someone please clarify? Thanks. |
|
| Author: | Kent Chasson [ Tue Dec 18, 2012 2:33 pm ] |
| Post subject: | Re: How does this work? |
Chris Ensor wrote: Ok... So earlier I thought I understood the climb cut idea, but now I am finding myself still stuck. Even with a climb cut, how does the grain not tear/peal back when going against the grain? Maybe I am just being dense, but can someone please clarify? Thanks. When you aren't climb cutting, the rotation of the cutter is such that it is lifting wood on the leading edge of the cut. When climb cutting, you have already removed the wood on the side of the cutting that is lifting so tear-out is much less likely. The cutter is compressing the wood instead of lifting it. I always like to point out that climb cutting is fine for small cuts when you have solid control of the work (or router) but it is dangerous on large cuts as it pulls the work into the bit. Not pretty if you loose control of the piece. |
|
| Author: | Tim McKnight [ Tue Dec 18, 2012 3:05 pm ] |
| Post subject: | Re: How does this work? |
There are lots of ways to get the job done. I apologize and did not mean to come across wrong and diminish other methods because even a simple Stew Mac jig on the end of a Dremmel will certainly work. The F/W cutters, like John makes and sells will certainly work equally as well. I guess it boils down to which method you are most confident in and [for me] its the Kett jig. I've been using it for the longest period of time so my confidence level is higher with it. Set up time [for me] is far less than futzing with a body in cradle. However, once the body is squared up in the cradle you can use that style of cutter with a blind fold on with predictable results. You have to be on your toes when using the Kett jig but its the one that works the best for my style of building. Because you have to climb cut with the Kett jig, the cutter will need cleaned occasionally because it will build up pitch / resins on the carbide after a few dozen cuts. But its easily scraped clean with a 6" scale in a matter of seconds. |
|
| Author: | meddlingfool [ Tue Dec 18, 2012 3:23 pm ] |
| Post subject: | Re: How does this work? |
There's no reason not to use the same combination of climb and normal cuts as displayed on the stewmac site. Nothing in regards to the bit and the wood has changed, it's just that the guitar is handheld instead of being put in a cradle. Once you're used to this method it is lickety split... |
|
| Author: | murrmac [ Tue Dec 18, 2012 3:30 pm ] |
| Post subject: | Re: How does this work? |
Kent Chasson wrote: I always like to point out that climb cutting is fine for small cuts when you have solid control of the work (or router) but it is dangerous on large cuts as it pulls the work into the bit. Not pretty if you loose control of the piece. I don't quite get that , Kent. Having done many thousands of climb cuts in some of Florida's foremost cabinet shops (where climb cutting was a mandatory procedure) my experience is that the worst that can happen is that the router gets thrown away from the workpiece, with no damage to the work...I cannot recall any situation where the work ever got "pulled into the bit" when climb cutting was being implemented. Certainly not when I was doing it, and I have no recollection of any other employee being adversely affected. This presupposes of course that the workpiece is firmly clamped and immovable in the first place. |
|
| Author: | Ron Belanger [ Tue Dec 18, 2012 4:04 pm ] |
| Post subject: | Re: How does this work? |
On a router table or a router fixed in a cradle the router certainly does pull the bit into the work. It climbs!! |
|
| Author: | Kent Chasson [ Tue Dec 18, 2012 4:06 pm ] |
| Post subject: | Re: How does this work? |
murrmac wrote: Kent Chasson wrote: I always like to point out that climb cutting is fine for small cuts when you have solid control of the work (or router) but it is dangerous on large cuts as it pulls the work into the bit. Not pretty if you loose control of the piece. I don't quite get that , Kent. Having done many thousands of climb cuts in some of Florida's foremost cabinet shops (where climb cutting was a mandatory procedure) my experience is that the worst that can happen is that the router gets thrown away from the workpiece, with no damage to the work...I cannot recall any situation where the work ever got "pulled into the bit" when climb cutting was being implemented. Certainly not when I was doing it, and I have no recollection of any other employee being adversely affected. This presupposes of course that the workpiece is firmly clamped and immovable in the first place. I think you answered your own question. Having the router thrown away from you is not safe. And if your work is not secure, as in the common practice of hand feeding on a router table, it's the work that will get thrown with a likelihood of pulling your fingers toward the cutter. Sounds like you get that but I don't think it's reasonable to assume that everyone on a public forum has that experience and it's worth mentioning. |
|
| Author: | bluescreek [ Tue Dec 18, 2012 4:36 pm ] |
| Post subject: | Re: How does this work? |
interesting discussion and a chance to educate people on a good jig and a not so good one. There are many ways to do any one process. I used about every combination of binding trimmer that was around. There are some out there that are pretty useless. Cheap is often a reflection to the value . Good tooling is an investment cheap tools are often a cost. For those of use that do this for a living , it is an investment to be able to do a job that is repeatable and with as little set up time as possible. The more finicky the set up the more a chance of something going wrong. Early in my building , I had a Brazilian Rosewood guitar , I was using a Harbor freight laminate trimmer , this thing stated to let the cutter out of the collet and the binding channel was pretty much a mess. I had to go from a simple binding to a 45. That was when I realized a $19 router was a cost. Replaced that with a porter cable and never looked back. Learn from others mistakes, you can't make them all yourself. A good design is a pleasure to work with and there are a few good designs. Using the sized "dumbells" is much metter than other hand held units. There is always more than one way to do things. When in doubt ask the supplier questions about the product and get a feel for them. There is plenty of work out there for all of us and I can see that this looks like a quality tool. Keep pinkies out of the sharp stuff. |
|
| Author: | Rod True [ Tue Dec 18, 2012 5:48 pm ] |
| Post subject: | Re: How does this work? |
klooker wrote: So you use the different size machined dumbbell bearings to adjust the depth of cut but you also adjust it by moving the piece these bearing pieces mount in to? Why not only adjust with the piece that the dumbbells mount into and have a single dumbbell which would lower cost? A Youtube video would be nice. Kevin Looker Kevin, Chris is right, having the cutter and the bearing points concentric (having the same centerline) ensures the cut is even. By having a single bearing size and moving it up and down to change the depth of cut doesn't account for skewing the body one side or the other of the centerline.....and you have to hold the body perpendicular to the tangential point of the bearing, ie top dead center..... otherwise the cut will not be perfect. I know this cause I made this jig and used it for a few guitars.... 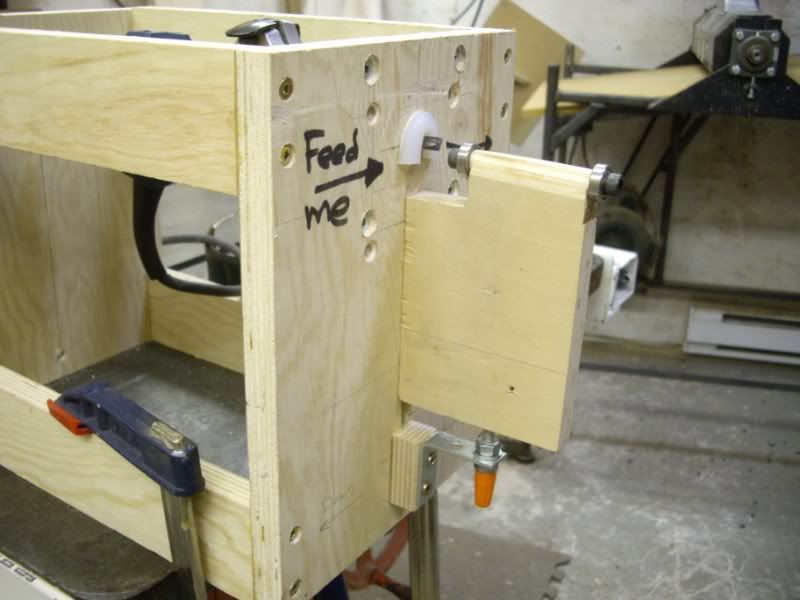 You can find a pretty good thread on binding jigs here Chris Ensor wrote: Thanks for the clarification. I didn't realize it was all done on an climb cut. That makes since now.
Kevin, I have used a binding jig that has a single moving bearing. The problem I had is consistency. If you have two overlapping circles, you really only have one point in which you are cutting to the full depth you set. When you have a bearing that is full depth the full circumference of the cutter, you get a consistent channel. Attachment: circles.jpg |
|
| Author: | Kent Chasson [ Tue Dec 18, 2012 6:22 pm ] |
| Post subject: | Re: How does this work? |
As for the issue of the bearing being concentric to the bit, if you have a bearing that is about .100" smaller in radius than the bit, you minimize the problem. You still have to be careful and take 2 passes to be sure but it works pretty well. If all my binding and purfling was the same dimension, fixed bearing sizes would be ideal but I use different sizes. Having a micro adjustment is helpful for that. |
|
| Page 1 of 1 | All times are UTC - 5 hours |
| Powered by phpBB® Forum Software © phpBB Group http://www.phpbb.com/ |
|