Official Luthiers Forum! http://www.luthiersforum.com/forum/ |
|
Rosette finally installed... http://www.luthiersforum.com/forum/viewtopic.php?f=10101&t=25738 |
Page 1 of 1 |
Author: | coke_zero [ Thu Jan 28, 2010 4:07 pm ] |
Post subject: | Rosette finally installed... |
Well after taking a break from my first build for a few weeks (due to work and frustration) I got around to installing my first rosette. Now it is far from perfect butI don't care ![]() It was very trial and error as I don't have any set way of doing it yet like I'm sure those who do it week in week out do. I basically used a small 6mm Dremel bit and a circle cutter to cut out the recess in the top in 4 or 5 ever expanding circles. I did have one issue which resulted in me having to increase the binding size slightly (no big issue for me). 
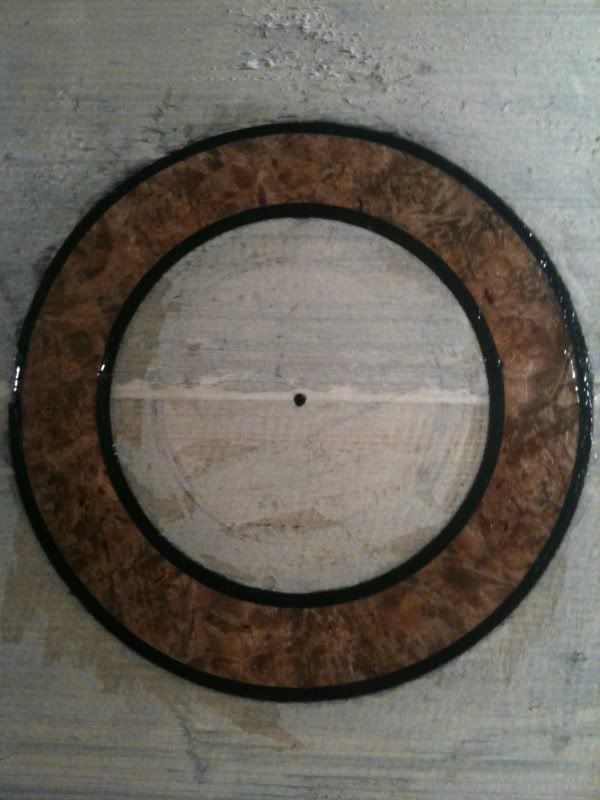
It is spalted maple with ebony binding (I guess that's what it's called anyway). There is a slight gap but that is were the fretboard will go. It's quite striking looking and probably isn't everyone's sort of thing but I quite like it. Now please keep all criticism to yourselves... but seriously, any advice or criticism would be greatly appreciated. Like I said this is my first attempt and by no stretch of the imagination am I going to pretend it is of perfect quality or skill. Advice will only help. 
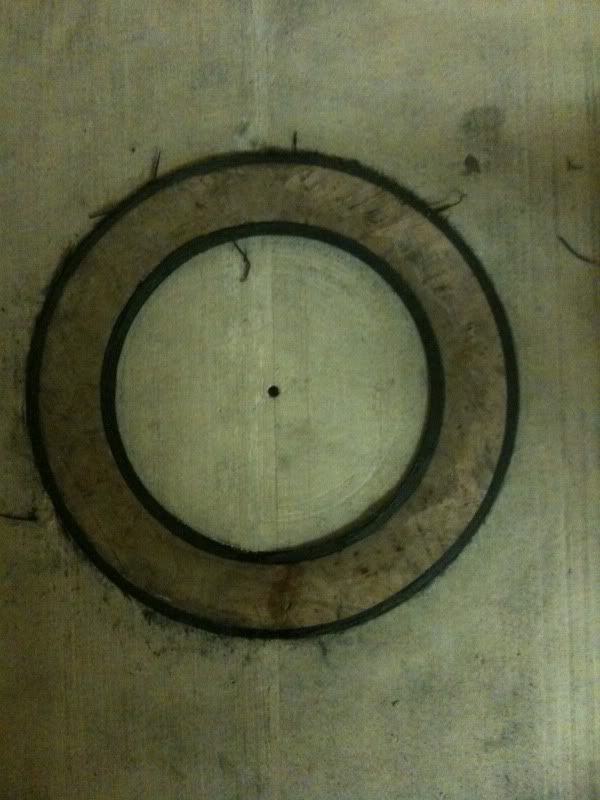
During planing it down: ![]() With some CA: ![]() It still needs a good sanding along with the top which I will do either later tonight or tomorrow. |
Author: | Mike Collins [ Thu Jan 28, 2010 4:13 pm ] |
Post subject: | Re: Rosette finally installed... |
Pete; Looks good. A bit more leveling (scraping or sanding)and you'll have a nice rose. Mike ![]() |
Author: | coke_zero [ Thu Jan 28, 2010 5:17 pm ] |
Post subject: | Re: Rosette finally installed... |
Thanks for the comment. Question, how do people manage to get a tight fit on their rosettes without damaging the top? I got it in eventually but probably did a little more denting than I would have liked. |
Author: | Hesh [ Thu Jan 28, 2010 5:30 pm ] |
Post subject: | Re: Rosette finally installed... |
Hey Peter you're getting there and I agree with Mike that it looks nice. It takes a few to get the hang of it but at least you did your own work here and didn't need any rescue from any one else. Congrats! |
Author: | Lars Stahl [ Thu Jan 28, 2010 5:48 pm ] |
Post subject: | Re: Rosette finally installed... |
Looks good !! ![]() ![]() For the next and to get a nice fit as you askt for. Make the cut just a little oversized so you wont have to force the wood in. and then "if using titebond or whiteglue etc, the wood will swell and there will be no gap visable. If you have to force the wood in, then the cut is to narrow. just a light pressure "with the nails" and the wood should go in then you are right. If using superglue or similar then the cut have to be exact as the wood will not swell. But you still should not have to force it in, thats when the dings etc comes ! ![]() Lars. |
Author: | coke_zero [ Thu Jan 28, 2010 5:50 pm ] |
Post subject: | Re: Rosette finally installed... |
Thanks for the tips Lars. I have actually noticed the rosette has appeared to be much tighter looking since I first glued it. I guess like you said it has swollen (I used white glue). Thanks. Next up, a good sanding & cut the soundhole. |
Author: | Brock Poling [ Thu Jan 28, 2010 7:42 pm ] |
Post subject: | Re: Rosette finally installed... |
Here is one way to get a perfect fit every time 1. Use calipers to measure your purflings 2. Buy a bit that is EXACTLY the size of your purflings. I get them from MSC or McMaster Carr. They have them in (almost) .001 increments up to about .125 3. Make 2 sacrifice tables with guide pins in them. Make sure the guide pins are absolutely square to the surface 4. Drill a center pin hole that is snug in both the rosette material, and your top at the proper location 5. Double stick tape down a piece of your rosette material over the guide pin on one of the sacrifice tables 6. Set the router to cut the outter diameter of the rosette and make the cut. Cut all the way through the material. 7. DO NOT MOVE THE ROUTERS DIAMETER SETTING 8. Put the top on the other sacrifice table, take the router to that table and gently route a circle the depth of your inlay material 9. Now do the same thing for the inner circle. Move the router back to the rosette material and cut all the way through 10. DO NOT MOVE THE ROUTER'S DIAMETER SETTING 11. Move back to the top and route it to the depth of the inlay material 12. Now start moving the router bit out to eat away at the top material to remove the rest of the material in the rosette channel Your purflings will now fit perfectly. Glue it up with a water based glue (LMI or titebond) and it will not be so tight you have to crush it in there, nor so loose as to have gaps. The water based glue makes the wood and purflings swell slightly and it will be very tight when you scrape it back. |
Author: | coke_zero [ Thu Jan 28, 2010 8:20 pm ] |
Post subject: | Re: Rosette finally installed... |
Nice advice Brock. I am using the tips and advice on this forum for most of the things I am doing but I may have to give that a go next time as it sounds fool proof. Overall, I am quite happy with my rosette so far. I know it's only the first of many jobs but I think it looks good. I gave it a really quick sand with my orbital earlier and it sanded out great. |
Author: | coke_zero [ Thu Jan 28, 2010 9:18 pm ] |
Post subject: | Re: Rosette finally installed... |
Ran out of time to edit my post ![]() I'm trying to work out my neck at the moment. The nut will be 45mm (about 1 & 3/4) and the taper of the fretboard will end at 64mm (about 2 & 1/4). 1. Does that sound okay for the size of the taper or is it too big (I am making a parlour). I know it is personal choice, but to be honest I would like to keep it at a standard. I believe a standard LarriveƩ nut is the same but I am unsure of the taper size after the 18th fret. 2. I have NO idea about what to do with a bridge. I do have plans but I have altered them slightly as the nut width it recommends is well out of my personal threshold & I would find it unplayable. I am probably going to be making an international order with LMI as getting some things in the UK is very hard and expensive. I have already decided to get a pre-made fretboard with the scale length of my guitar (616mm or 24 & 1/4). This way I won't have to buy the fretting saw and take the risk of ruining a nice piece of ebony. It also means I can buy the frets to go with the fretboard & the slots will be perfectly cut. To take advantage of the order I was going to look at their pre-made bridges also. However I have no idea what I am looking at on the site. On the site, I prefer the Martin style bridge but have no idea how a nut width & bridge string spacing coincide. If anyone can steer me on track please wade in and help before my brain melts and leaks out my nose ![]() There's too many numbers & it's way to late at the moment for it to sink in... On that, is there anything else worth picking up from LMI (nothing too bulky as it will kill me on P&P). However ideas for essentials etc will be great. I already have binding & kerfing but any ideas are great. Thanks again people, I know I am annoying but this is the best place to ask. ![]() ![]() |
Author: | coke_zero [ Thu Jan 28, 2010 9:56 pm ] |
Post subject: | Re: Rosette finally installed... |
I misread the LMI website, it appears they don't offer a 24 & 1/4 scale length... ![]() As I haven't build the neck yet, I'm guessing that It won't hurt if I used a different scale length? The closest two they offer are 24.625 Scale - 12 Inch Radius or 24.9 Scale - 16 Inch Radius. |
Author: | bill stewart [ Fri Jan 29, 2010 5:59 am ] |
Post subject: | Re: Rosette finally installed... |
One bit advice I have is, Don't cut out the template shape of the top until you have decided which scale length you are going to use and whether it's going to be a twelve or fourteen fret join at the body. The end of the fretboard generally just touches the edge of the soundhole and you have to to determine what that distance will be before cutting out your guitar shape. The same rule will apply to the length of the neck to the body join. I hope this makes sense to you, Happy building ![]() Bill S. |
Author: | coke_zero [ Fri Jan 29, 2010 5:21 pm ] |
Post subject: | Re: Rosette finally installed... |
Thank you Todd. I am currently trying to get hold of a jig to make my braces but I have a lot of work to do so I won't get much work done on the guitar for a while. Now, my plans show the top ladder braced, will it matter if I design my own X bracing pattern instead? |
Page 1 of 1 | All times are UTC - 5 hours |
Powered by phpBB® Forum Software © phpBB Group http://www.phpbb.com/ |