Official Luthiers Forum!
http://www.luthiersforum.com/forum/

First Acoustic Build - Martin OM Style
http://www.luthiersforum.com/forum/viewtopic.php?f=10101&t=50628
Page 4 of 6

Author:  Jules [ Fri Jun 01, 2018 10:37 am ]
Post subject:  Re: First Acoustic Build - Martin OM Style

If anyone sees issues with how the build is proceeding, please stop me before I drive off the cliff.

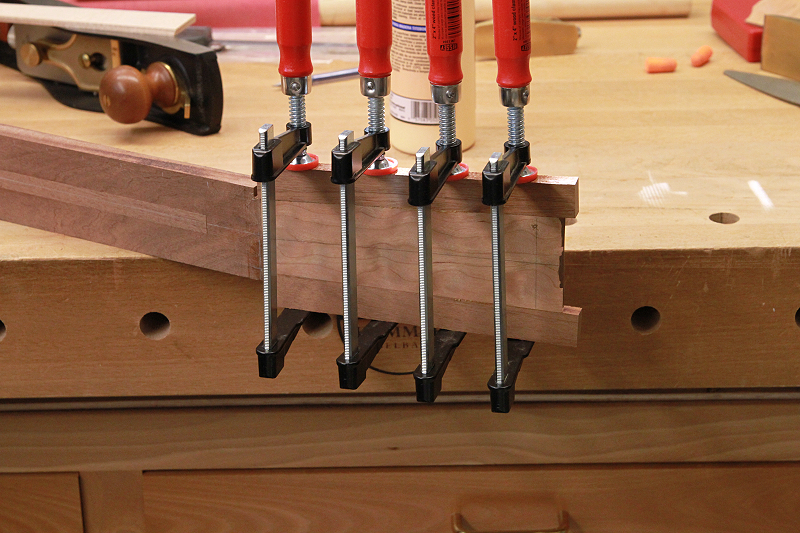
There was a small gap between the top of the truss rod and the top of the neck. I filled it and planed it flush. It's just press fit in place, no glue.
Image

The truss rod is pretty tight but not secured by any other means. For the electric guitars I've built, I put in a dab of silicone sealant at each end and in the center. Is anything required here? It's tight now but wood moves.

Fretboard slots cut for a 25.34 scale
Image

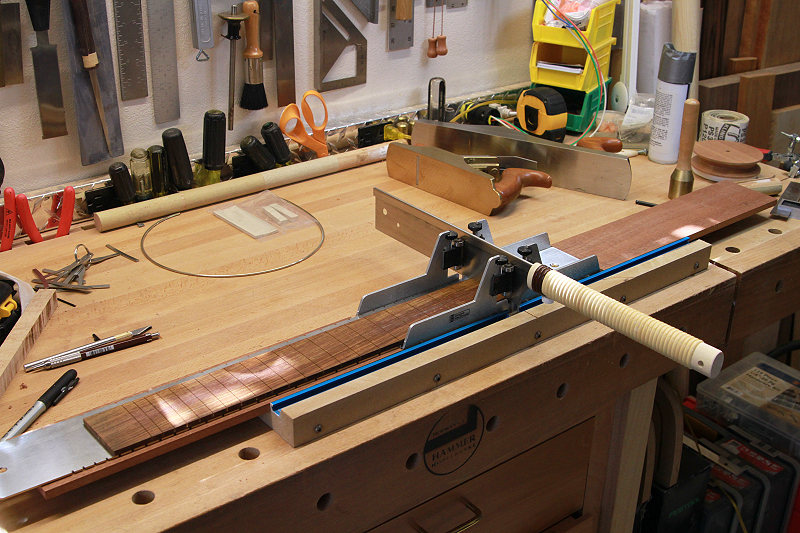
And rough planed to achieve a 16" radius
Image

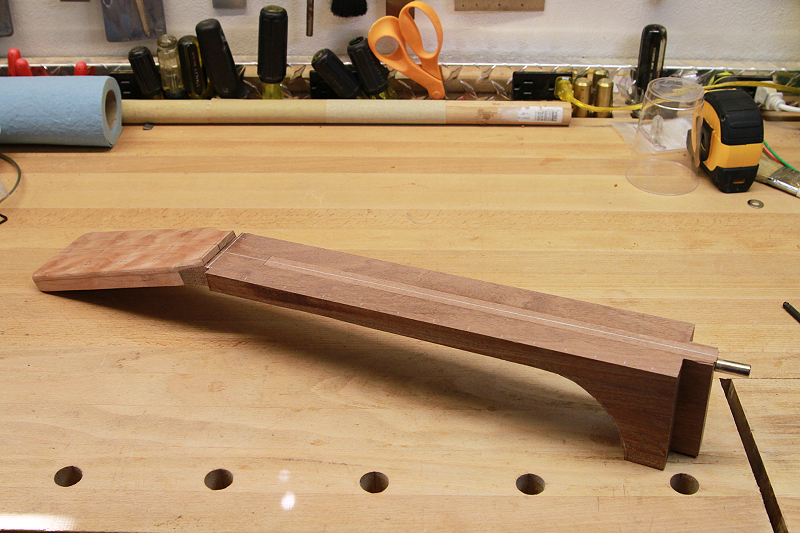
Looking at this I'm not sure how to proceed.
Image

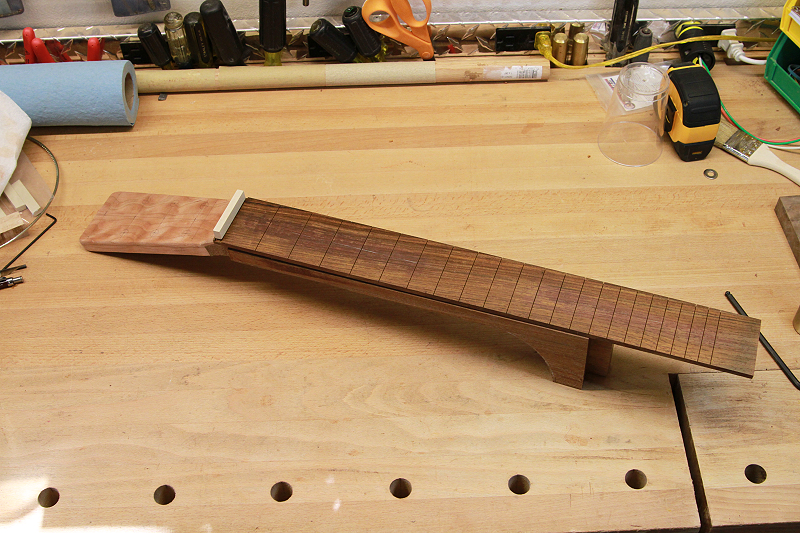
Right now the fretboard or the headstock top needs to be trimmed. Should the nut bottom sit entirely on the fretboard? I've done that with electric necks. My thoughts are to sandwich the nut between the head top and fretboard with the nut bottom sitting entirely on the fretboard. Okay or not?

Author:  Freeman [ Fri Jun 01, 2018 11:58 am ]
Post subject:  Re: First Acoustic Build - Martin OM Style

You can either put the nut on the flat of the neck (as Gibson does) or the angled part (Martin). There are advantages of each, there was a discussion here a while back. You can either butt the head veneer up against the nut (create a little slot) or put the nut on top of the veneer. I prefer to put the nut on the flat and butt the veneer against it, even on Gibson clones - I think it looks better and is much easier to make the nut.

You have somewhat determined that when you made your neck. If you put the 14th fret at the body joint did you leave a flat at the nut or does the angle start right at the end of the board?

Fwiw, I glue the f/b on the neck first, them make a dummy nut which I put against the f/b while I glue the veneer on. I make a little angle on the veneer, push it against the dummy, then knock it out before the glue sets. Another thing to think about is whether you are going to bind either head or f/b or both and how the binding comes together at the nut. I don't think one is better - I've just alway put it on the flat.

Here is a not very good picture of the OM. I'm not super happy with the way the purfling lines came out but not much I can do now

Attachment:
IMG_4529-3.jpg

Author:  Jules [ Fri Jun 01, 2018 3:15 pm ]
Post subject:  Re: First Acoustic Build - Martin OM Style

Freeman wrote:
You have somewhat determined that when you made your neck. If you put the 14th fret at the body joint did you leave a flat at the nut or does the angle start right at the end of the board?

The nut right now falls somewhat in the middle. But I haven't precisely established where the angle starts. The cherry I glued on is a lot thicker than a typical veneer. I was in this uncertain place because I didn't know how the scarf joint would hold up where it falls, between the top two tuners. So I grabbed a 1/4" piece of cherry and used that knowing I can plane it down later.

Next one I'll change the order of things. Still pretty green. Thanks for the help, Freeman.

Author:  Freeman [ Fri Jun 01, 2018 3:48 pm ]
Post subject:  Re: First Acoustic Build - Martin OM Style

I did a little essay for SnowMan on this thread about how I do a scarf joint. This happened to be a slot head but its exactly the same for a paddle, you just thin the head piece more. Its much easier to thin before its glued on but you can actually do a pretty good job with a safety planer in a drill press. That measurement to the break point is pretty important - I try to build it into cutting the pieces. Anyway, go down a ways in this

viewtopic.php?f=10101&t=50678

The second to the last picture show the nut slot the way I do it, but there is nothing sacred about doing it that way.

Fwiw I also do the same neck layup for Gibson clones with truss rod adjusters in the head and everything else I build. It is much more economical with wood and I think the scarf joint is a good way to go.

Author:  Jules [ Wed Jun 06, 2018 10:43 am ]
Post subject:  Re: First Acoustic Build - Martin OM Style

What am I missing? Besides notching the kerfing, is there anything else I need to do before gluing the top on? Something is eating away at me but I can't figure out what it is.
Image

Image

Author:  Bryan Bear [ Wed Jun 06, 2018 11:16 am ]
Post subject:  Re: First Acoustic Build - Martin OM Style

Jules wrote:
What am I missing? Besides notching the kerfing, is there anything else I need to do before gluing the top on? Something is eating away at me but I can't figure out what it is.


Did you remember to make a bridge clamping caul for the inside? If you are using a caul fit to the bridge-place and braces, it is easier to make it now than fitting it through the soundhole.

Author:  Brad Goodman [ Wed Jun 06, 2018 12:39 pm ]
Post subject:  Re: First Acoustic Build - Martin OM Style

Do you have an access hole in the brace for the truss rod wrench-if needed?

Author:  doncaparker [ Wed Jun 06, 2018 1:23 pm ]
Post subject:  Re: First Acoustic Build - Martin OM Style

Brad Goodman wrote:
Do you have an access hole in the brace for the truss rod wrench-if needed?


Along those same lines, it doesn't look like you cut a trench in the top of the head block for the adjusting end of the truss rod. You might want to cut that before you glue the top on. It would have been easier before you glued the block in, but it won't be that hard right now. After the top goes on, you will have to drill a hole, and that might be a bit tense.

Author:  Jules [ Wed Jun 06, 2018 9:25 pm ]
Post subject:  Re: First Acoustic Build - Martin OM Style

Bryan, I took your advice and made the caul. Thank you

Brad and Don - I had to drill the access hole through the head block and on through the brace. I'm so glad I kept the material costs on this low. Drilling that hole was a bit tense but no damage was done. I'm making a list of the things I've missed for the next one. :roll:

Author:  Freeman [ Thu Jun 07, 2018 10:55 am ]
Post subject:  Re: First Acoustic Build - Martin OM Style

I can't tell if thats a dovetaill or you plan to bolt the neck on. I would consider pulling it out of the mold and doing a rough fit of the neck, drill the holes thru the neck block and marking them at the heel. You'll still have to finesse it when the box is closed but its really hard to measure those holes from the outside. I drill the holes in the neck block on a drill press before it goes into the body, at this point fit the neck, put a brad point bit thru the holes to the heel, tap it with a hammer and the center of the hole for the insert is located. You can also use the holes in the neck block to guide drilling the heel assuming you can get a drill motor down close enough.

Image

Image\

In that first picture I have clamped the fretboard onto the neck and roughly set the neck geometry, then I've clamped the heel into the mortise while I drill it.

Image

If you are doing a dovetail forget all of the above, its easier to route after the box is closed.

Sign and date the top

Author:  Joe Beaver [ Thu Jun 07, 2018 3:36 pm ]
Post subject:  Re: First Acoustic Build - Martin OM Style

Looking good! As others have said:

Make truss rod adjusting access before gluing top

If a bolt on neck I like to drill the bolt holes now (or before now) but can be done after top is on but before the box is closed

Sign and date the top

And most importantly, clamp the top into place, lay a straight edge on the fingerboard and check the clearance at the center of the saddle position. You will want to end up with around 1/64" over the bridge after the frets are installed. If it is not right take the top off and do some planing or what ever you need. Much easier to get it close now before the top is glued to the rims.

Author:  Joe Beaver [ Thu Jun 07, 2018 3:44 pm ]
Post subject:  Re: First Acoustic Build - Martin OM Style

One other thing, I like to glue the wood strip down over the truss rod. I do it like this:

Put glue on the strip and install flush, then put clamps at both ends, then tension the rod causing the middle of the fillet to raise a little, let the glue dry, remove the tension, and plane the fillet flush.

Author:  Jules [ Thu Jun 07, 2018 8:33 pm ]
Post subject:  Re: First Acoustic Build - Martin OM Style

Freeman & Joe, I'm going to use the barrel nut idea from Cumpiano but planned to cut the mortise after the bottom is glued on. Then use dowel center pins in the tenon to locate and drill the holes in the top block. If that won't work, it's too late cuz the back is already glued on. :?

After I got the back glued on, I started sanding the sides. I had already picked up some dowels and wrapped them with 80, 120 & 180 PSA sandpaper to do the curves. Worked pretty well.
Image

Then I decided to give a shot at the tail insert. Since I didn't have a template, I had to freehand cut with the Dremel.
Image

I played around with plastic binding strips and this looked okay. I'm just not sure the BWB plastic looks right.
Image

Tomorrow I'm going to play some more with the tail insert by using mahogany veneer I have to replace the plastic binding.

Author:  Glen H [ Thu Jun 07, 2018 8:42 pm ]
Post subject:  Re: First Acoustic Build - Martin OM Style

The BWB looks right to me.

Author:  Joe Beaver [ Thu Jun 07, 2018 11:34 pm ]
Post subject:  Re: First Acoustic Build - Martin OM Style

The purfling looks great. It wold be outstanding if you continue it along the sides and miter the back strip purfling into it!!!

Author:  whiskywill [ Fri Jun 08, 2018 6:24 am ]
Post subject:  Re: First Acoustic Build - Martin OM Style

Jules wrote:
What am I missing? Besides notching the kerfing, is there anything else I need to do before gluing the top on? Something is eating away at me but I can't figure out what it is.


Is there some confusion between top and back here? It seems that the top is already glued on.

Author:  Jules [ Fri Jun 08, 2018 7:32 am ]
Post subject:  Re: First Acoustic Build - Martin OM Style

whiskywill wrote:
Jules wrote:
What am I missing? Besides notching the kerfing, is there anything else I need to do before gluing the top on? Something is eating away at me but I can't figure out what it is.


Is there some confusion between top and back here? It seems that the top is already glued on.

I must have been standing on my head when I wrote that. :?

Author:  Woodie G [ Fri Jun 08, 2018 7:32 am ]
Post subject:  Re: First Acoustic Build - Martin OM Style

For sanding the waist and other tight curves such as cutaway sections, a 6" long piece of 1-1/2" ID white plastic PVC pipe with some peel'n'stick cork sheet applied avoids having to use PSA paper...the cork provides enough tack to keep standard 1/4 sheets of P150 and P220 in place with just hand pressure. Both short lengths of PVC pipe and the cork sheeting is available at big box stores - we use the thin cork sheet on a variety of surfaces to cushion and increase grip. The larger diameter of the pipe (nearly 2" with cork applied) provides a truer surface and faster sanding, plus more leverage for those with smaller hands and a lighter sanding block.

Looking very good! A few thoughts: We install the tail graft after the body is closed and blocked level, and the rim stays in the mold until it is closed, which avoids introducing any twist or issues with the sides being out-of-plane. A guitar trojy is very handy for work on the tail graft and for mitering the side purflings, although it looks as though you have a holder for the body rigged that works well...any closeups?

Also - how do you like the Hoffman & Hammer bench? At some point I will have to cut the cord and say goodbye to the boss's 8' long 400 pound Scandanavian-style bench, and I will have my hands full just getting a small shop up and running, so doubtful I'll have the month or two of time to duplicate it. I've been debating foregoing a dedicated woodworking bench, but they as just so useful that at least a smaller 6' commercial bench seems a necessity.

Author:  Jules [ Fri Jun 08, 2018 7:47 am ]
Post subject:  Re: First Acoustic Build - Martin OM Style

My reluctance to using the plastic binding material comes in bonding the wood and plastic. If I bond the plastic together with acetone and then bond that to the wood insert with acetone, do I use hot hide glue, or whatever wood glue I'd use, to then glue the whole thing to the guitar? Or would I somehow try to glue the wood with wood glue and at the same time drop acetone onto the plastic and then jam it in the wedge? I've seen how plastic is bonded to wood but what do you do for the wood insert?

Anyway, I sliced some mahogany veneer I have to see how that might look. Mineral spirits added to simulate a finish.
Image

I have three different shades of mahogany veneer - standard mahogany, blonde mahogany and fumed mahogany. The dark wood in the picture is the fumed and the light is the blonde. The fumed is .5mm thick and the blonde is .75mm.

Author:  apostleguitarcompany [ Fri Jun 08, 2018 8:35 am ]
Post subject:  Re: First Acoustic Build - Martin OM Style

I like the mahogany purfling better. I'm using some on my current build and am very glad I did so. It looks really nice with the colors and is also a little more unique.

As far as attaching the neck to the body. I have had good luck using Robert O'Brien's technique.

Here is a video.

https://youtu.be/yzlZvDyKnPI

Author:  Freeman [ Fri Jun 08, 2018 12:12 pm ]
Post subject:  Re: First Acoustic Build - Martin OM Style

Guitar aesthetics are a very personal thing - you should decide what you like and build accordingly. Personally I like to take one theme (woods, binding, purfling, rosette) and carry that thru the entire build, I tend to use fairly simple themes. I've seen way too many guitars with one kind of head plate, something different for the rosette, different again for the binding, back stripe, yadda yadda. Each might be beautifully executed but they don't work together. However that is up to the builder and what I think really shouldn't matter. (fwiw - I start thinking about this theme long before I start building - when I select the wood and the style of guitar I want to build I have a pretty good idea of the details of the trim. I almost always bend the binding at the same time I bend the sides).

One thing I will suggest you consider is the use of CA for binding and purfling. I have had very good luck with the water thin stuff for wood, plastic and fiber binding, as well as all my pearl. One of the really nice things is that you can fit everything dry, get your miters perfect, then wick the CA into the interface.

Author:  Jules [ Fri Jun 08, 2018 1:22 pm ]
Post subject:  Re: First Acoustic Build - Martin OM Style

I appreciate what you're saying, Freeman. Until recently, I was just taking wood out of my stock and using it wherever. But once I got the tailpiece to where it is now, my attitude immediately changed. Now I'm thinking of planing off the cherry from the headstock and replacing it with book-match curly maple. Then I started thinking maybe I should build another neck out of curly maple. But then I thought about saving that for the next build. So I'm going to stick with planing off the cherry on the head and try to get this finished. I need a full notch in my belt.

Author:  Jules [ Sat Jun 09, 2018 9:41 am ]
Post subject:  Re: First Acoustic Build - Martin OM Style

One step forward, two steps back...

I removed the cherry from the headstock, all but a couple of millimeters, and cut away the cherry sides. Next was build it back up
Image

Believe it or not, these book-matched veneers are from the same board. The four on the right are from the first 7", the two on the left from the next 7".
Image
I'm leaning toward the ones on the right for the headstock veneer.

Author:  doncaparker [ Sat Jun 09, 2018 11:08 am ]
Post subject:  Re: First Acoustic Build - Martin OM Style

Are you committed to bookmatching two pieces? What about just using one of the two on the far left? They both look big enough to cover a headstock without getting into that dark streak. I think the figure could look nice.

Author:  Haans [ Sat Jun 09, 2018 11:30 am ]
Post subject:  Re: First Acoustic Build - Martin OM Style

Inlaying into a light colored wood is not an easy task, if you want to inlay the head stock. A glue joint down the middle is also extremely visible, even if you do a perfect joint. When bookmatching, you are also dealing with runout which is very visible in your choice on the right.

Page 4 of 6 All times are UTC - 5 hours
Powered by phpBB® Forum Software © phpBB Group
http://www.phpbb.com/