Official Luthiers Forum!

Owned and operated by Lance Kragenbrink
It is currently Mon Jul 28, 2025 3:36 pm


All times are UTC - 5 hours


Forum rules


Be nice, no cussin and enjoy!


Post new topic Reply to topic  [ 37 posts ]  Go to page Previous  1, 2
Author Message
PostPosted: Thu May 21, 2009 10:01 pm 
Offline
Koa
Koa
User avatar

Joined: Sat Mar 07, 2009 7:56 am
Posts: 1825
Location: Grover NC
First name: Woodrow
Last Name: Brackett
City: Grover
State: NC
Zip/Postal Code: 28073
Country: USA
Focus: Build
I get them close with a jointer. Then I put them between 2 pieces of 3/4" plywood clamped to my bench and use a 24" level with 120 grit adhesive sandpaper on the edge of the level.

_________________
I didn't mean to say it, but I meant what I said.
http://www.brackettinstruments.com/


Top
 Profile  
 
PostPosted: Thu May 21, 2009 10:58 pm 
Offline
Koa
Koa

Joined: Fri Jun 30, 2006 4:23 pm
Posts: 1694
Location: United States
First name: Lillian
Last Name: Fuller-Watson
State: WA
Country: USA
Focus: Build
Status: Amateur
Thanks Pat. That makes sense.

_________________
Aoibeann


Top
 Profile  
 
PostPosted: Fri May 22, 2009 8:49 am 
Offline
Koa
Koa
User avatar

Joined: Wed Sep 26, 2007 12:55 am
Posts: 1505
Location: Lorette, Manitoba, Canada
First name: Douglas
Last Name: Ingram
City: Lorette
State: Manitoba
Country: Canada
Focus: Build
Chris Paulick wrote:
Well, After gathering some of your ideas I broke down and whipped on together today with parts I had laying around the shop. It has a front hook that hangs under the front that also butts against my vise or I can secure it in the vise too. The back fence is adjustable. I had a piece of track left over from my router table. I figure it can be used as a bench hook too and I can make a 45 degree piece that can bolt down to the track too for miters. I could probably slide the fence up and put some wet stones there to . Made from Malamine.


Very nice, and well worth the wait, I'm sure!

I've been using a jointer. The most important element in getting a jointer to provide good results is practice. Then more practice.

If I ever feel the need to make a shooting board, its going to look a lot like this one.

_________________
Expectation is the source of all misery; comparison the thief of joy.
http://redrivercanoe.ca/


Top
 Profile  
 
PostPosted: Fri May 22, 2009 10:22 am 
Offline
Contributing Member
Contributing Member

Joined: Wed Mar 19, 2008 11:49 am
Posts: 897
Location: Northen Cal.
Looks good Chris [:Y:] I like the use of the aluminum channel to adjust for your back stop.
Link

_________________
Cut to size.....Beat to fit.....Paint to match.


Top
 Profile  
 
PostPosted: Fri May 22, 2009 4:44 pm 
Offline
Brazilian Rosewood
Brazilian Rosewood
User avatar

Joined: Sat Jun 21, 2008 10:58 am
Posts: 2774
Location: Tampa, Florida USA
Link, there's no Aluminum in it unless you are talking about the T track. Here's some add-ons I did today
A spring loaded cam clamp. And a grove cut in the hook so I can hang it on the wall off of a cleat.


You do not have the required permissions to view the files attached to this post.


Top
 Profile  
 
PostPosted: Fri May 22, 2009 8:10 pm 
Offline
Contributing Member
Contributing Member

Joined: Wed Mar 19, 2008 11:49 am
Posts: 897
Location: Northen Cal.
I was talking about the track.
L.

_________________
Cut to size.....Beat to fit.....Paint to match.


Top
 Profile  
 
PostPosted: Fri May 22, 2009 8:22 pm 
Offline
Koa
Koa
User avatar

Joined: Sat Jan 03, 2009 7:08 pm
Posts: 524
Chris that is way too cool, i thought you would be back here in record time with some awesome thing to post, you don't disappoint!

_________________
Jordan Aceto
Ithaca, NY


Top
 Profile  
 
PostPosted: Fri May 22, 2009 11:08 pm 
Offline
Brazilian Rosewood
Brazilian Rosewood
User avatar

Joined: Sat Jun 21, 2008 10:58 am
Posts: 2774
Location: Tampa, Florida USA
Someone on another forum ask about the construction of the cam. I made the cam using a barrel nut like I use in the adjustable neck for the pivot and capped the outside with walnut dowel plugs to keep the side movement down. here's a close up of it. and I changed the wing nuts to wood knobs like on my centerline finder. And hung it on the wall. I think the wood knobs make it look a little more craftsmans like. It's my new shop wall hanging. :)


You do not have the required permissions to view the files attached to this post.


Top
 Profile  
 
PostPosted: Fri May 22, 2009 11:35 pm 
Offline
Koa
Koa
User avatar

Joined: Tue Mar 18, 2008 8:43 am
Posts: 776
Location: Florida
First name: John
Last Name: Killin
Focus: Build
Status: Amateur
Very Cool Chris. I may be working on some sort of shooting board this weekend if I can get around to it.

Nice job. And timely post.

John


Top
 Profile  
 
PostPosted: Sat May 23, 2009 8:55 am 
Offline
Contributing Member
Contributing Member
User avatar

Joined: Fri Sep 09, 2005 7:51 am
Posts: 3786
Location: Canada
Nice one Chris .. I was going to say that without a lock down of some type, you may run into tops that wont register properly against your backing fence ... for instance, I have red and italian tops that have the edge grain angle as the outside edge .. one piece is slightly narrower than the other, so there is no way to align them on the back edge .. they ahve to be clamped somehow. my shooting board is a simple piece of mdf with a lockdown clamp similar to yours, mine uses 1/4-20 inserts and a couple screws ...

_________________
Tony Karol
www.karol-guitars.com
"let my passion .. fulfill yours"


Top
 Profile  
 
PostPosted: Sat May 23, 2009 10:31 am 
Offline
Brazilian Rosewood
Brazilian Rosewood
User avatar

Joined: Sat Jun 21, 2008 10:58 am
Posts: 2774
Location: Tampa, Florida USA
Thanks Tony,
Sounds like something simular to the Cumpiano Board. I've been trying to figure out where I saw the cam clamp idea before. It was either on some machine I worked with before or maybe even a WorkMate bench or maybe just exposure to jigs and tooling over time. Someone mentioned the time to remove clamps and that got me to thinking. At first I thought about using quick action toggle clamps and then looked at my cam clamp and thought about how simple of an idea that was and quick. And I like that vintage old time woodworking thing . It might sound silly but I like it when a jig comes out looking good as well as doing the job. It takes just as long to make a crapy looking tool as it does a good looking tool. Well maybe a little longer for the good looking one because I always like to soften all my edges and corners from burrs and who knows. It might save a ding on something. Although I have soften the edges on this too after the first pictures were posted.


Top
 Profile  
 
PostPosted: Mon May 25, 2009 10:37 pm 
Offline
Brazilian Rosewood
Brazilian Rosewood
User avatar

Joined: Sat Jun 21, 2008 10:58 am
Posts: 2774
Location: Tampa, Florida USA
Man what a difference a flat/ level sole and a razor sharp blade in a #5 Sweetheart Stanley and a nice board makes. Did a set of Red Spruce plates in about a minute with hardly any wood taken off. Sweet.


You do not have the required permissions to view the files attached to this post.


Top
 Profile  
 
Display posts from previous:  Sort by  
Post new topic Reply to topic  [ 37 posts ]  Go to page Previous  1, 2

All times are UTC - 5 hours


Who is online

Users browsing this forum: oval soundhole and 13 guests


You cannot post new topics in this forum
You cannot reply to topics in this forum
You cannot edit your posts in this forum
You cannot delete your posts in this forum
You cannot post attachments in this forum
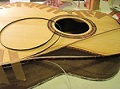
Jump to:  
Powered by phpBB® Forum Software © phpBB Group
phpBB customization services by 2by2host.com